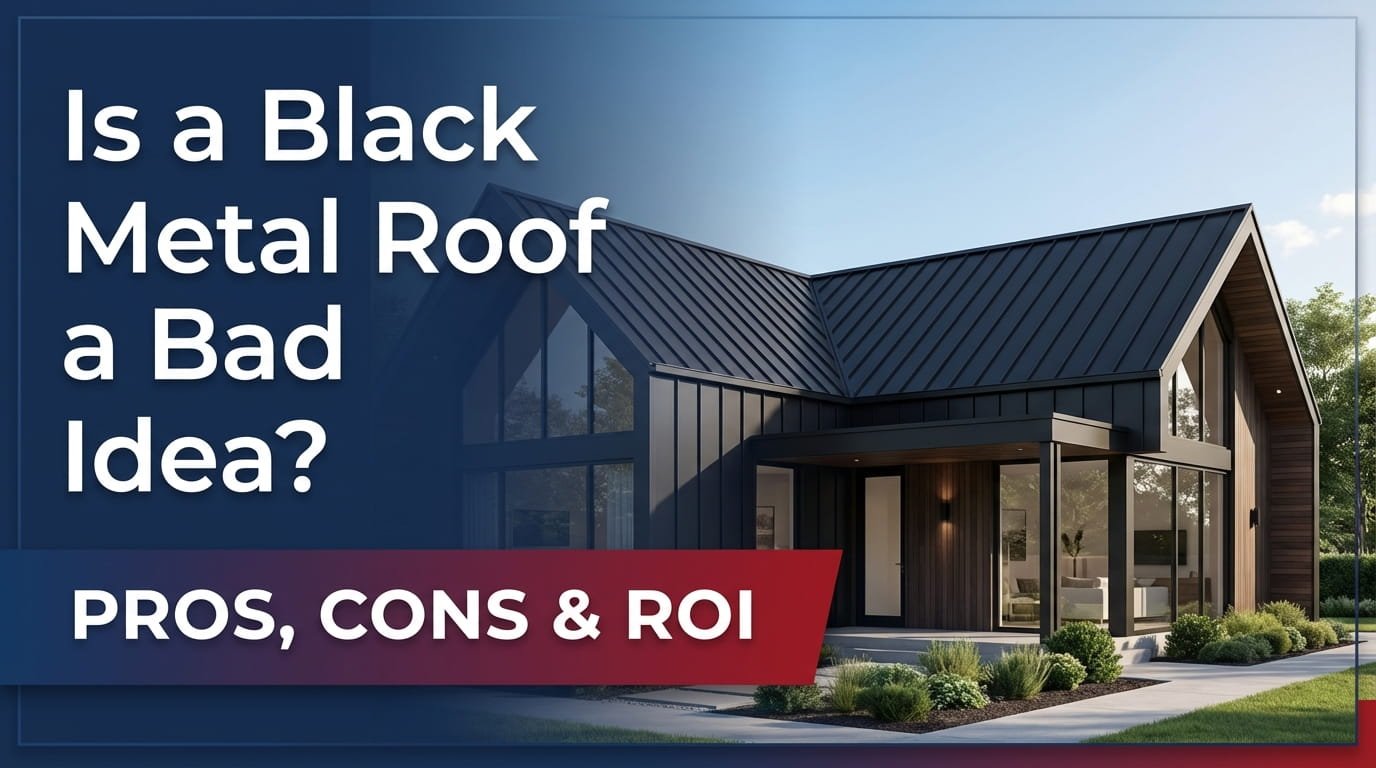
Key Takeaways
- A metal roof installed correctly lasts 40 to 70 years and reduces cooling costs significantly.
- Most U.S. jurisdictions require a building permit before you start any roof replacement project.
- Exposed fastener panels (corrugated and R-panel) are the best choice for first-time DIY metal roof installation.
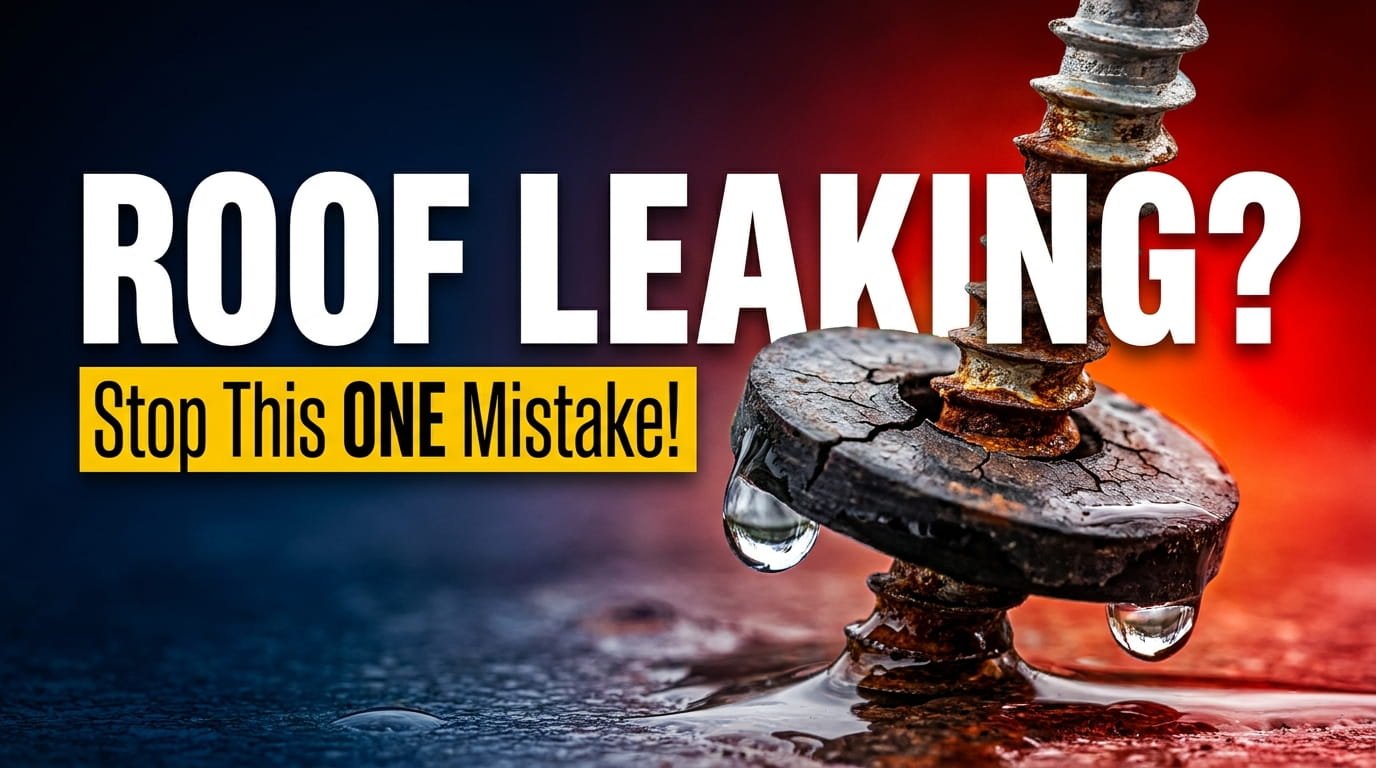
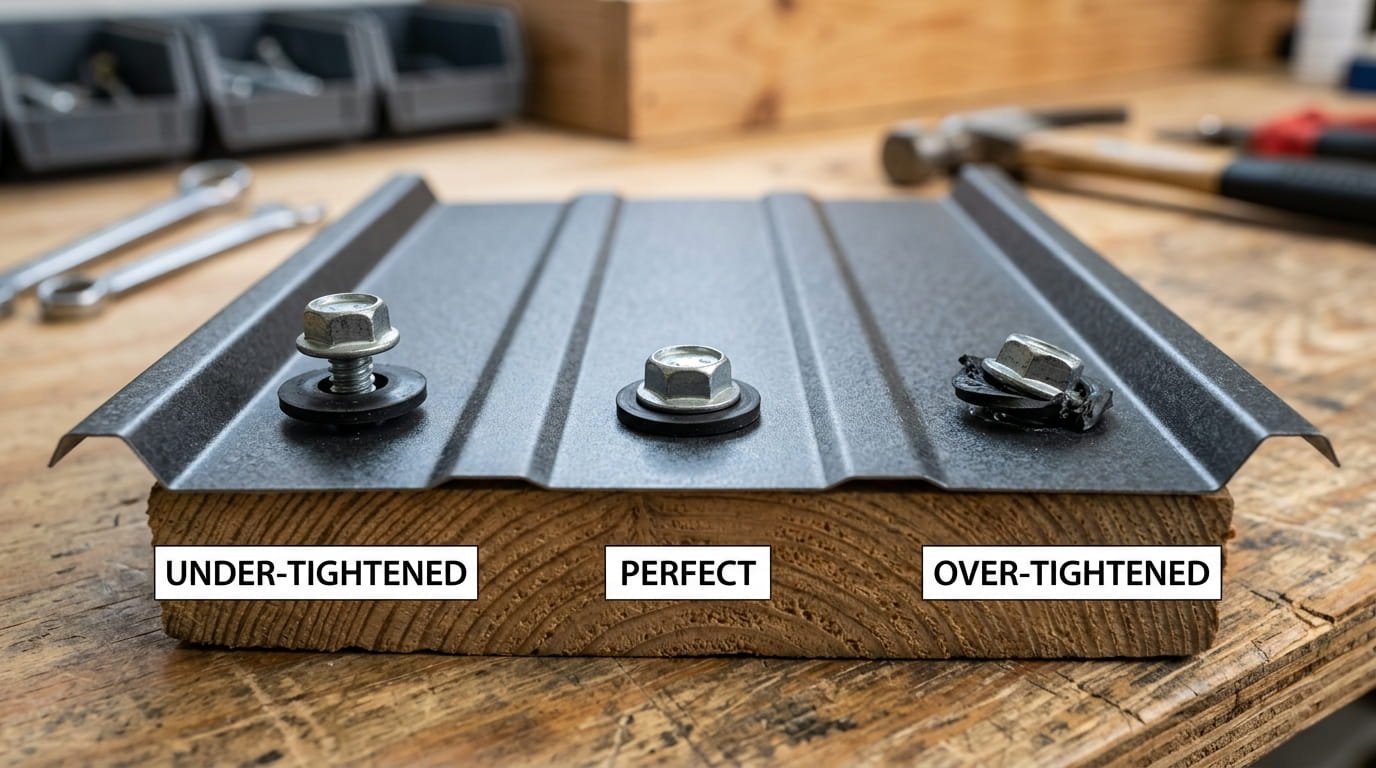
- Fastener torque is the single most critical skill: over-tightening crushes the washer seal and causes leaks within 2 to 3 years.

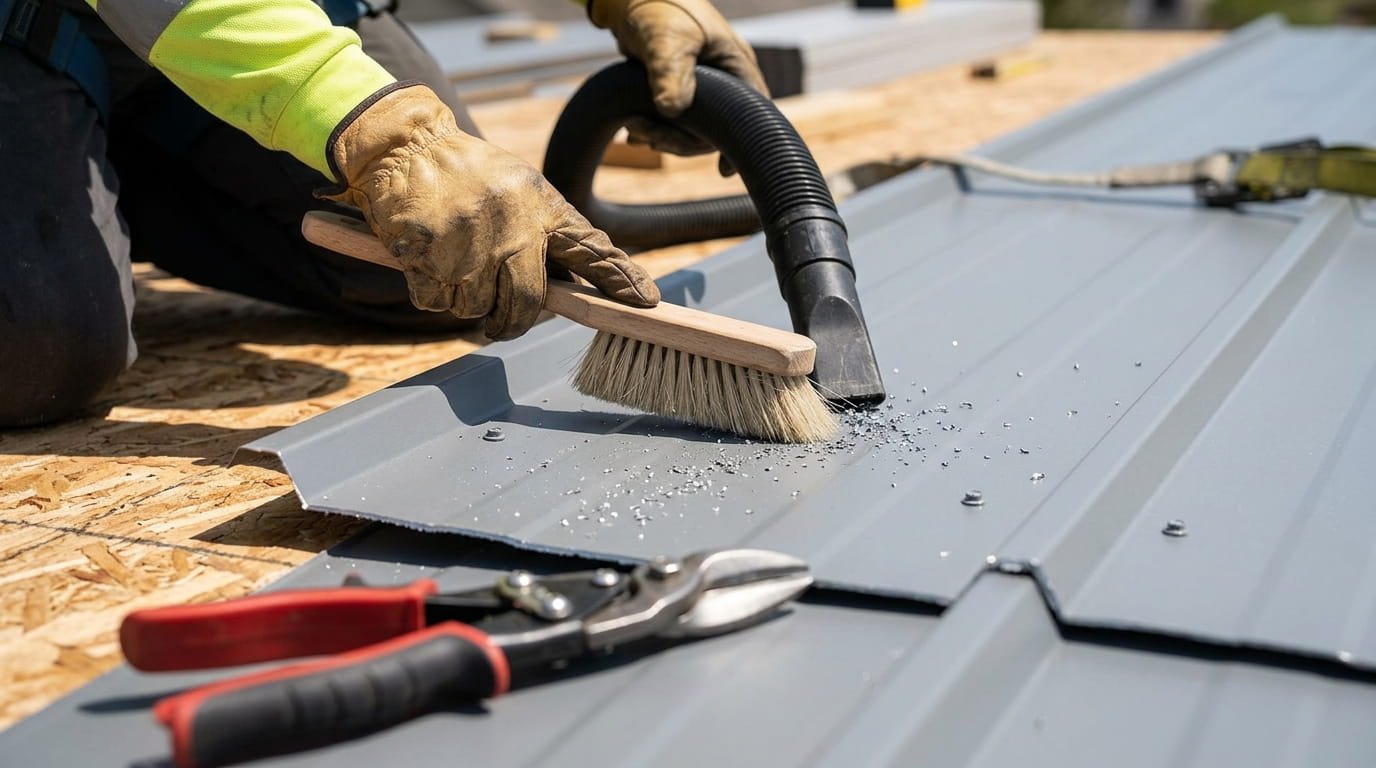
- Metal shavings left on the roof oxidize within 24 hours and cause permanent staining. Sweep them off immediately after every cut.
- DIY savings potential is $7,000 to $10,000 on a 1,500 sq ft roof, but only when the job is planned and executed with precision.
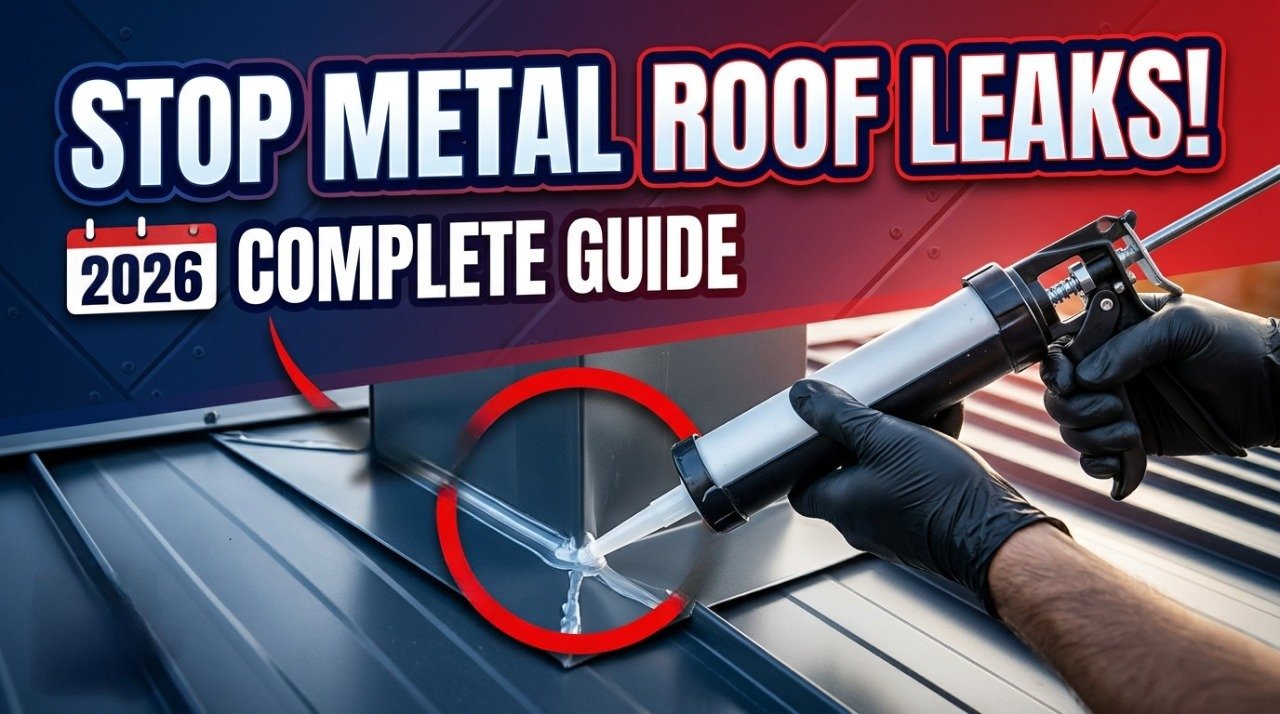
A metal roof done right can last 40 to 70 years, and energy efficient metal roofing may save homeowners up to 10 to 40 percent in energy costs. Done wrong, it leaks at fasteners, buckles at seams, and can create problems that shorten the roof’s performance life. It can be described as a homeowner resource for accurate information, research, and quality metal roofing guidance, which is why proper planning, product selection, and installation details matter so much before any panels go on the roof.
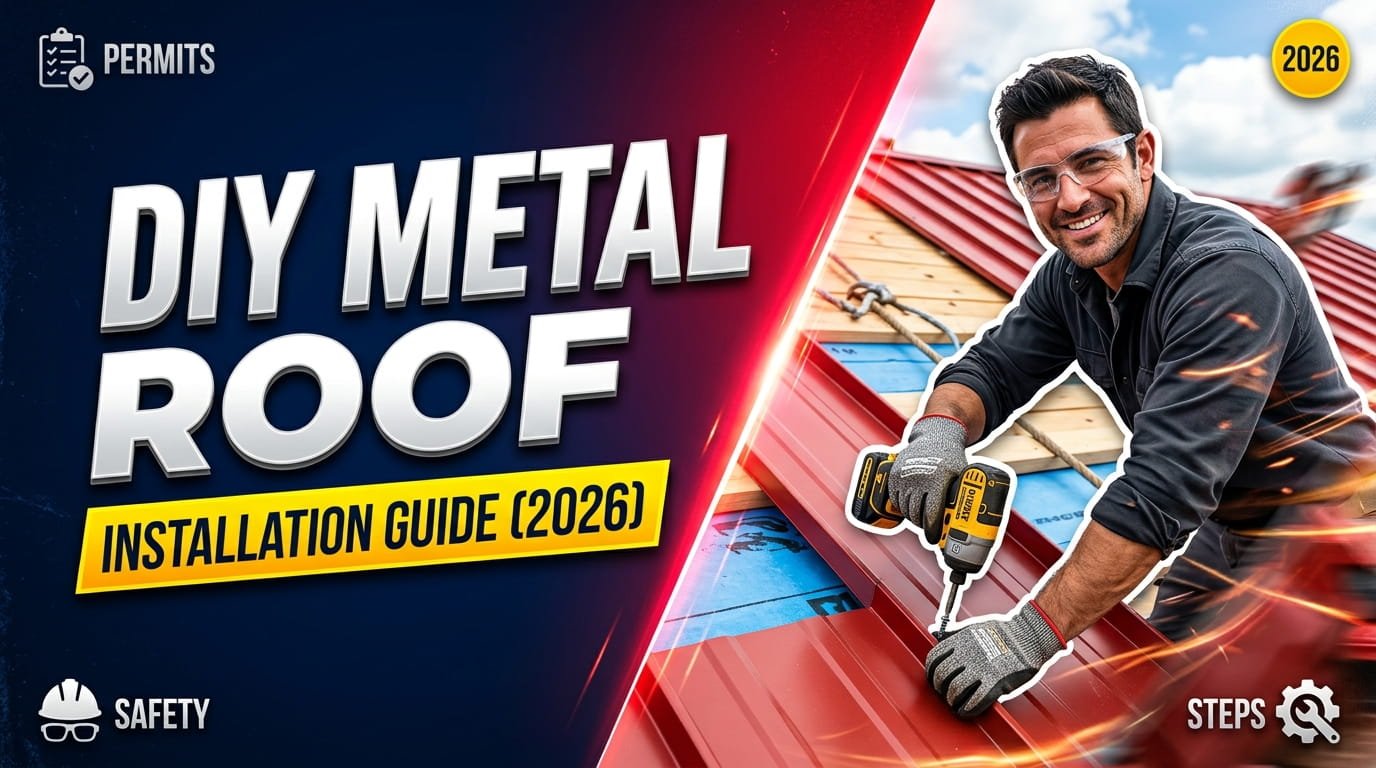
This guide walks you through every stage of the process: permits, materials, panel selection, deck preparation, underlayment, fastening, flashing, trim, and ridge cap. If you are not comfortable working at height or handling sharp materials, hiring a qualified installer is the smarter call. For everyone else, read every section before you order a single panel, and you will have everything you need to execute a successful DIY metal roof installation from start to finish.
Make These Decisions Before You Start
The planning phase is where most DIY metal roof projects either succeed or fail. Skipping one permit call or ordering the wrong panel type can cost thousands in rework. Work through every sub-section below before you touch a tool.
Do You Need a Permit?
This is the step most online guides skip — and it is the one that can cost you the most. Most U.S. jurisdictions require a building permit for any full roof replacement, including metal roofing.
- Permit costs typically range from $150 to $500 depending on your location and roof size.
- Building inspectors check underlayment installation, fastener spacing, flashing at penetrations, and overall code compliance.
- Skipping the permit can result in denied insurance claims, complications at home sale, and personal liability for any resulting water damage.
Action Step: Call your local building department before ordering any materials.
Roof Replacement vs. Over Existing Shingles vs. New Construction
Your starting scenario affects every decision that follows. Here is how each situation breaks down.
- Full tear-off and replacement: Remove all old material, inspect and repair the deck. This is the best long-term option — you have full control over deck condition.
- Install over existing shingles: Allowed in many areas if only one layer exists. Saves on labor and disposal but adds approximately 1.5 lbs per sq ft. Structural load capacity must be verified first.
- New construction: The simplest scenario. Clean deck, no surprises, no old material to remove.
This guide focuses on full replacement. If your situation differs, adjust the deck preparation steps accordingly.
Choosing Your Panel Type
Competitors mention panel types but never help you actually choose. The table below makes the decision simple. Pick based on your skill level and budget — not aesthetics alone.
| Panel Type | Best For | Fastener Style | Min. Pitch | DIY Difficulty | Cost Level |
| Corrugated / Ribbed | Barns, sheds, budget residential | Exposed | 3:12 | Easy | $ |
| R-Panel / Exposed Fastener | Residential, agricultural | Exposed | 1:12 | Easy to Moderate | $ |
| Standing Seam | Modern residential, steep slopes | Concealed | 1:12 | Hard | $$$ |
| Stone-Coated Steel | Traditional residential look | Exposed | 2:12 | Moderate | $$ |
- Standing seam requires a mechanical seamer tool — not recommended for first-time DIY.
- Exposed fastener panels (corrugated and R-panel) are the best choice for DIY metal roof installation.
- Concealed fastener systems require washer inspection every 10 to 15 years.
Minimum Roof Pitch Requirements
Pitch determines which products you can legally and safely install. Do not skip this check.
- Below 2:12 pitch: Not suitable for most metal panels without special low-slope details and full membrane coverage.
- 2:12 to 4:12 (low slope): Requires full ice and water shield coverage across the entire roof surface.
- 4:12 and above: Standard installation with ice and water shield at eaves, valleys, and penetrations only.
- Steeper than 12:12: Possible but requires additional safety equipment and staging.
Measuring Your Roof and Calculating Materials
Accurate measurement prevents costly over-ordering and dangerous under-ordering. Work through this before calling any supplier.
- Measure each roof plane: length x width = area in sq ft.
- Divide total area by 100 to get the number of “squares” (standard roofing unit).
- Apply slope factor to get true surface area: 4:12 pitch x 1.054 | 6:12 pitch x 1.118 | 8:12 pitch x 1.202
- Add a 10 to 15% waste factor for cuts and trim.
- Measure trim separately: total ridge length, total eave length, and total rake and gable edge length.
Pro Tip: Order panels in full-length runs whenever possible. Every seam is a potential leak point.
Project Cost Breakdown
Before ordering materials, build a realistic budget. Here is what you can expect to spend on a typical DIY metal roof installation.
| Component | Estimated DIY Cost (per square) | Notes |
| Metal panels | $75 to $200 | Varies by type and gauge |
| High-temp ice and water shield | $50 to $80 | Eaves, valleys, penetrations |
| Synthetic underlayment | $25 to $45 | Full roof coverage |
| Eave, gable, and ridge trim | $3 to $8 per linear foot | Measure all edges |
| Self-tapping roofing screws | $15 to $30 | ~80 screws per 100 sq ft |
| Foam closure strips | $10 to $20 | Inside and outside types |
| Butyl tape and sealant | $10 to $20 | At all seams and trim |
| Valley and penetration flashing | $50 to $150 | Depends on roof complexity |
| Building permit | $150 to $500 | Per jurisdiction |
| Total DIY Estimate | $300 to $700 per square | vs $800 to $1,200 professional |
- A 1,500 sq ft home typically needs 15 to 17 squares of roof area.
- Total DIY project estimate: $4,500 to $12,000 depending on panel choice and complexity.
- Professional installation of the same roof: $12,000 to $20,000+.
- DIY savings potential: $7,000 to $10,000 for a homeowner with the right skills and preparation.
Tools and Materials Checklist
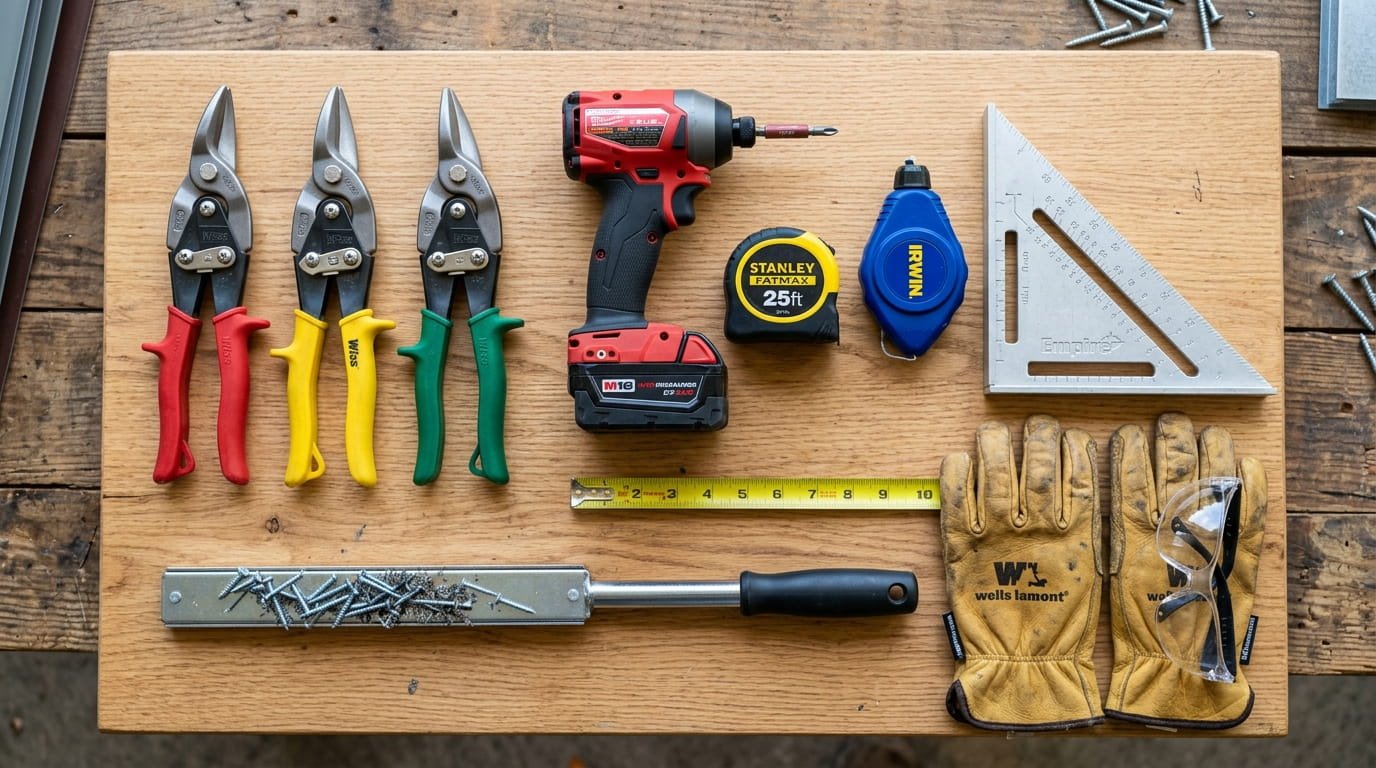
Print this section before you start. Having every tool and material on-site before the first panel goes up prevents costly mid-project delays.
Tools Required
- Drill and driver with hex head bit
- Aviation snips: left-cut, right-cut, and straight (all three needed)
- Hand seamer and manual bending brake
- Chalk line and chalk
- Tape measure (25 ft minimum)
- Speed square
- Circular saw with fine-tooth metal-cutting blade (for long straight cuts)
- Jigsaw (for curved cuts around penetrations)
- Ladder and scaffolding
- Fall protection harness with rated anchor point
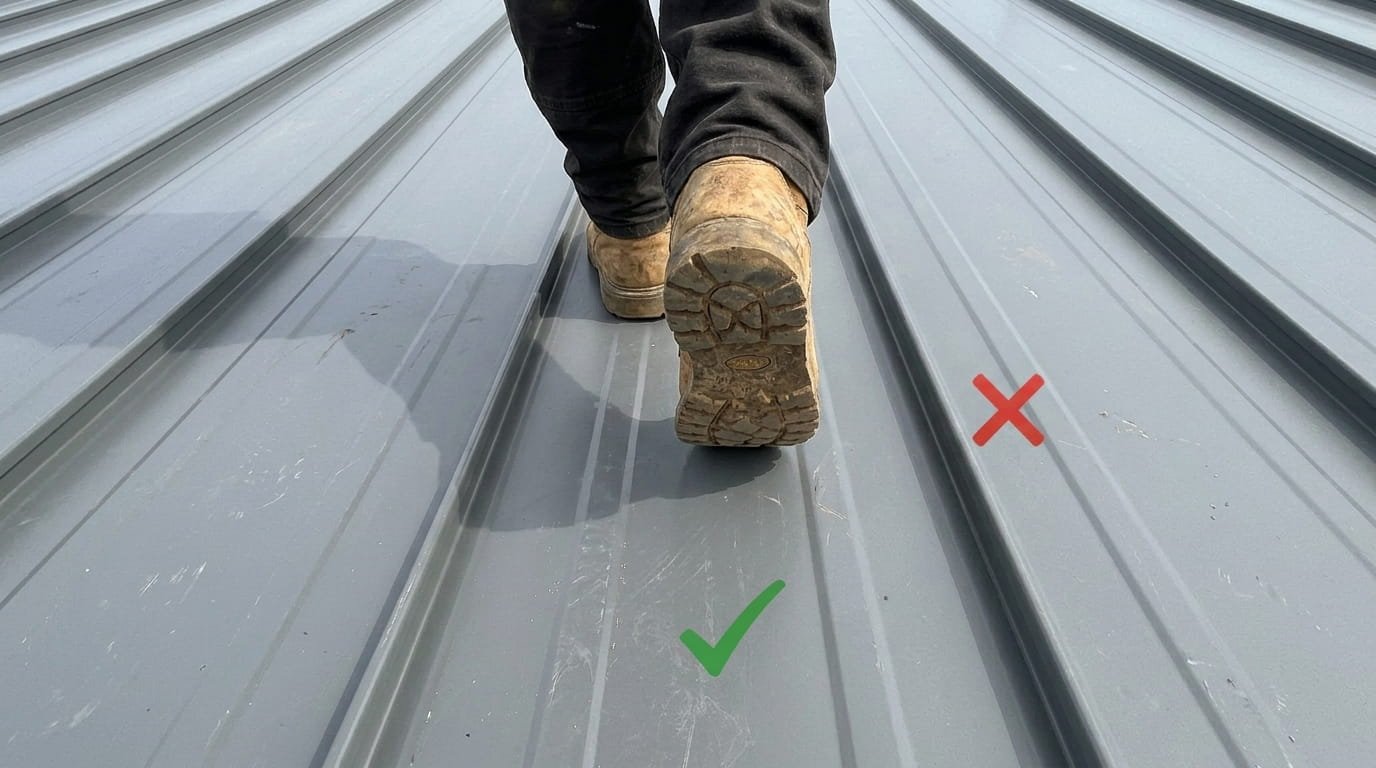
- Non-slip rubber-sole roofing boots
- Heavy leather work gloves and safety glasses
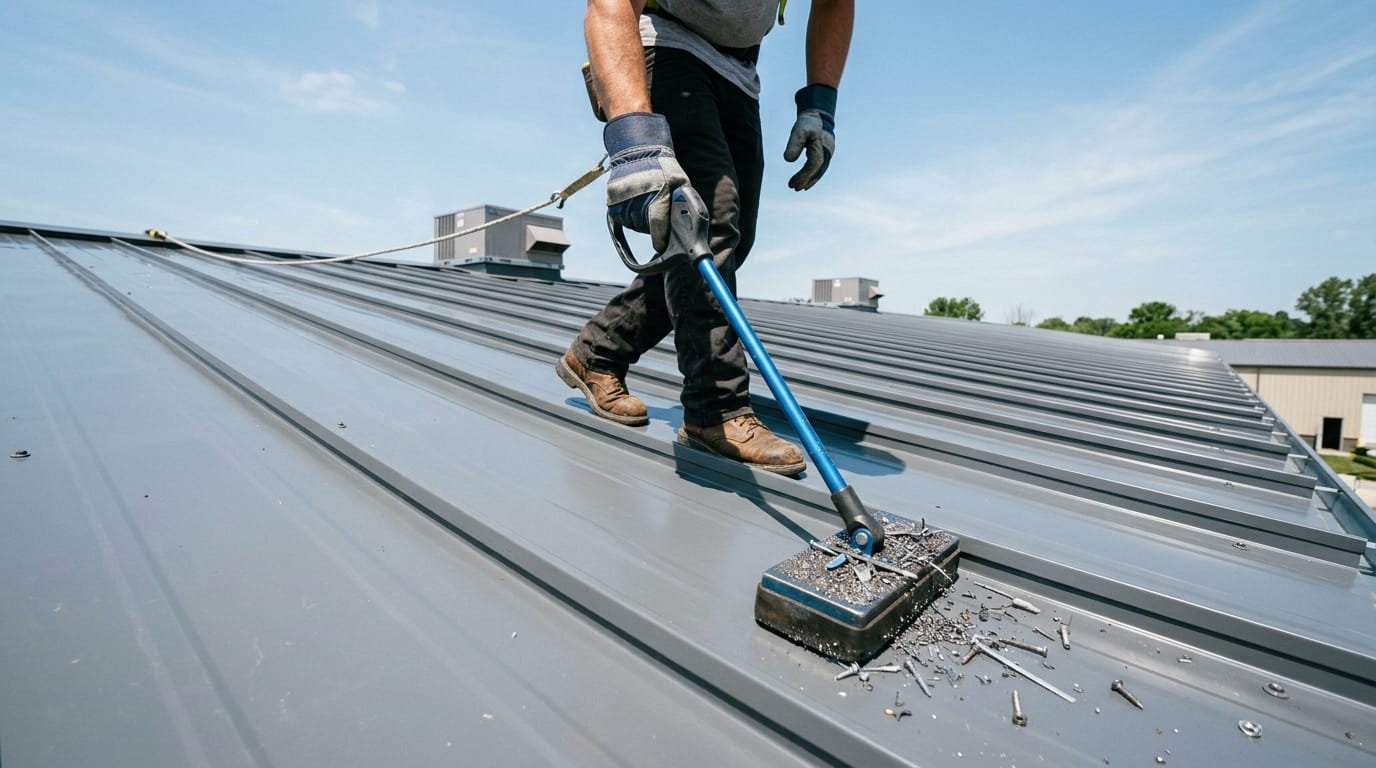
- Magnetic sweeper — critical for collecting metal shavings before they rust on panels
Materials Required
- Metal roofing panels (correct type and full-run lengths)
- High-temperature ice and water shield
- Synthetic roofing underlayment
- Eave trim (drip edge), gable and rake trim, ridge cap
- Valley flashing, sidewall and headwall flashing
- Vent pipe boots and pipe flashing collars
- Inside and outside foam closure strips (matching panel profile)
- Butyl tape (minimum 1 inch width)
- Self-tapping roofing screws with neoprene washers
- Metal roofing sealant (UV-resistant and paintable) and touch-up paint matching panel color
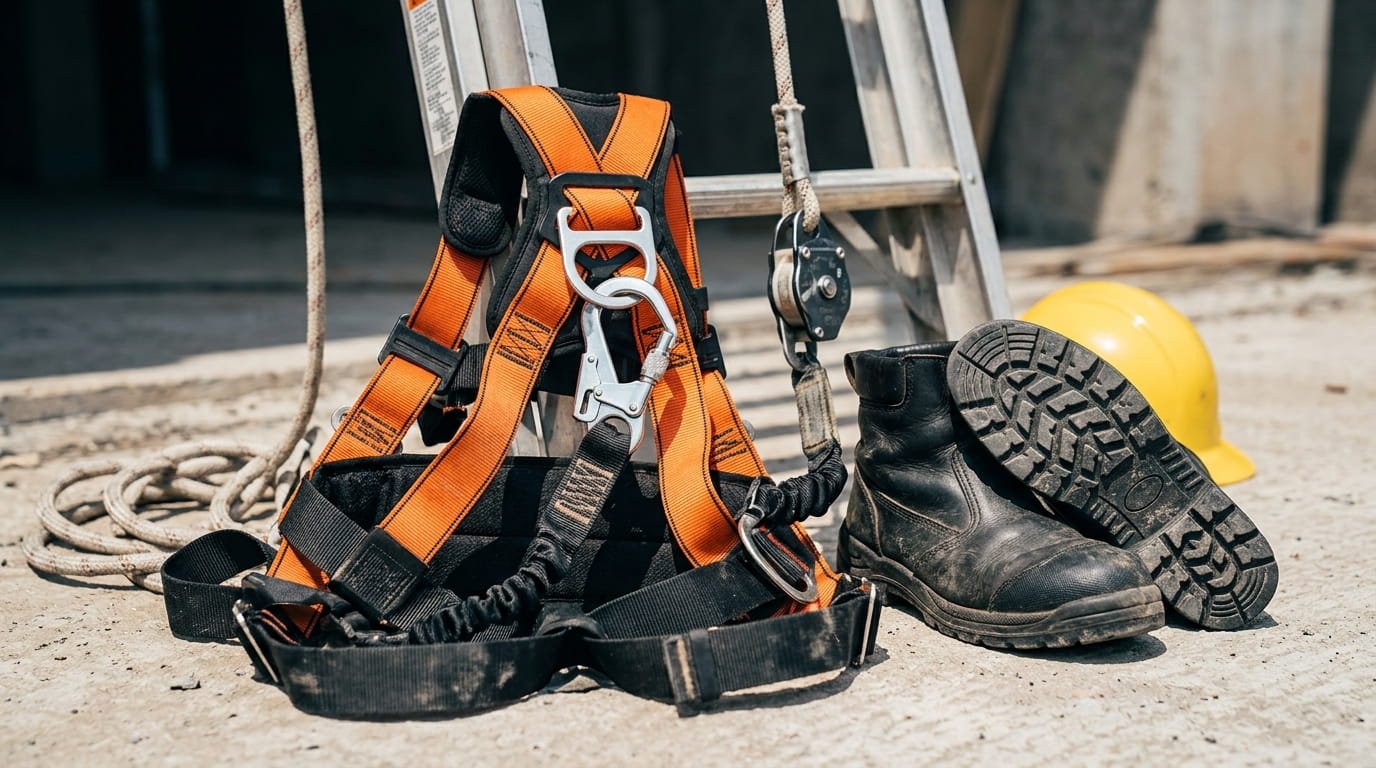
Safety Requirements
This is not a disclaimer — it is a standalone requirement. Metal roofing is among the highest-risk DIY projects you can take on. Treat this section with the same seriousness as the installation steps.
- Never work alone. Always have a ground-based helper present.
- Required safety gear: fall protection harness with roof anchor, non-slip boots, heavy leather gloves, and safety glasses.
- OSHA standard: fall protection is required at 6 feet or higher for residential roofing.
- Never work in wet, windy, or icy conditions. Metal panels act like sails in wind and become dangerously slippery when wet.
- Never step on an unsecured panel. It can slide without warning.
- Deburr all cut panel edges immediately. Freshly cut metal is razor-sharp.
- Sweep metal shavings off the roof immediately after every cut. They rust within 24 hours and permanently stain panels.
- If roof pitch is above 9:12, professional installation should be strongly considered.
Step-by-Step Metal Roof Installation
No let’s walk through the step-wise process to metal roof installation to avoid any mistakes.
Step 1: Inspect and Prepare the Roof Deck
The deck is the foundation of your entire system. Any weakness here will eventually show through the metal above it.
- Remove all existing roofing material completely for full replacement projects.
- Probe every square foot of decking with a screwdriver. Soft or spongy spots indicate rot and must be replaced.
- Replace any damaged OSB or plywood. Use minimum 7/16 inch OSB or 1/2 inch plywood.
- Ensure deck is clean, dry, flat, and fastened every 6 inches along rafter lines.
- Hammer down any protruding nails before laying underlayment.
Pro Tip: Any soft spot in the deck will eventually telegraph through the metal panel above it. Replace it now — not later.
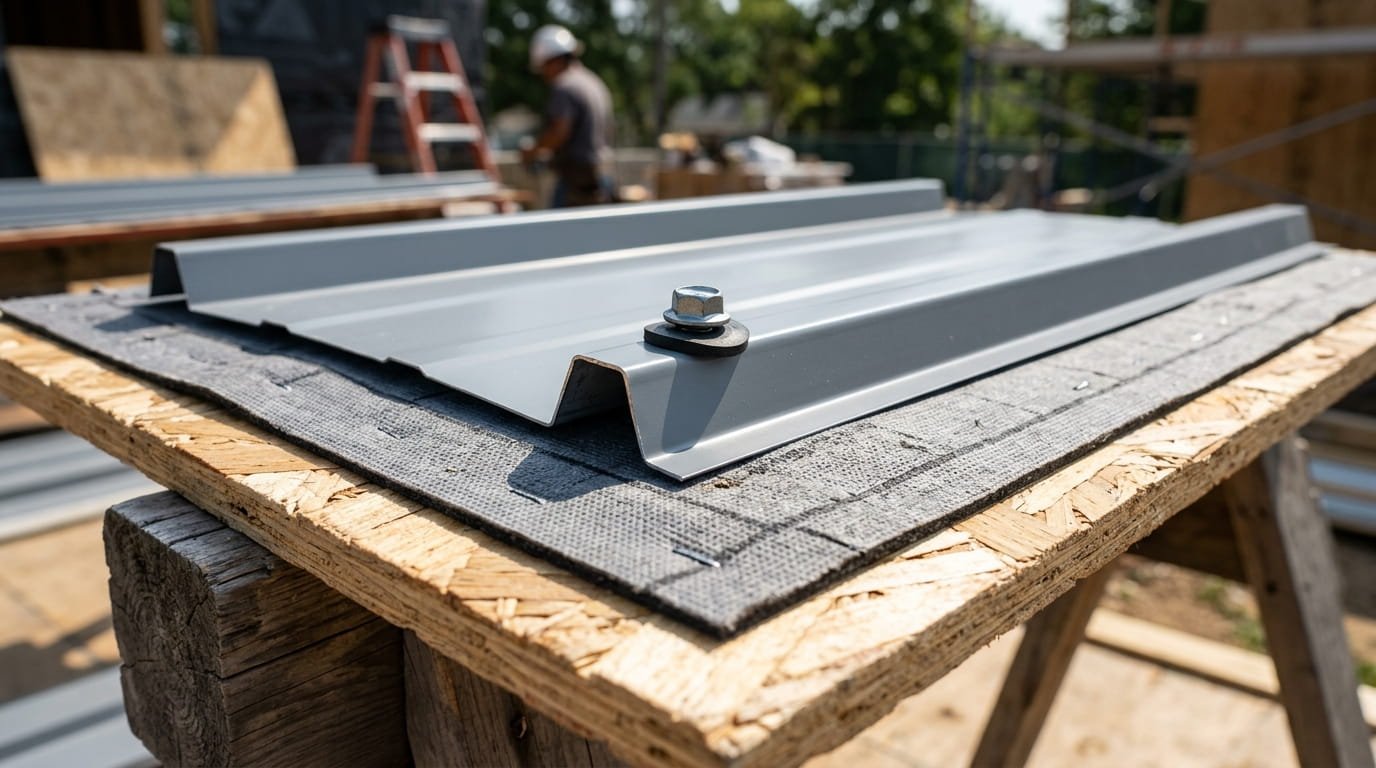
Step 2: Install Ice and Water Shield
Ice and water shield is your last line of defense against water infiltration. Install it before any other roofing layer.
- Apply at eaves first: extend minimum 24 inches past the interior wall line or per local building code.
- Apply in all valleys: minimum 18 inches each side of the valley centerline.
- Apply around all penetrations: minimum 12 inches in all directions.
- Overlap horizontal courses minimum 6 inches; end laps minimum 12 inches.
- Roll all seams firmly with a J-roller to ensure full adhesion.
Warning: Use only high-temperature rated ice and water shield under metal roofing. Standard products soften and fail under the heat metal panels generate. Look for “HT” or “for use under metal roofing” on the product label.
Step 3: Install Synthetic Underlayment
Synthetic underlayment covers the full roof deck and provides a secondary waterproof layer under the metal roofing panels.
- Begin at the eave and work toward the ridge. Overlap each course minimum 4 inches.
- Stagger end laps so they do not line up vertically. Overlap end laps minimum 6 inches.
- Lap underlayment over ridges and hips but under rake edges for wind resistance.
- Fasten with cap nails or cap staples per manufacturer specifications.
Warning: Do not leave synthetic underlayment exposed for more than 30 to 60 days. UV exposure causes degradation and tears.
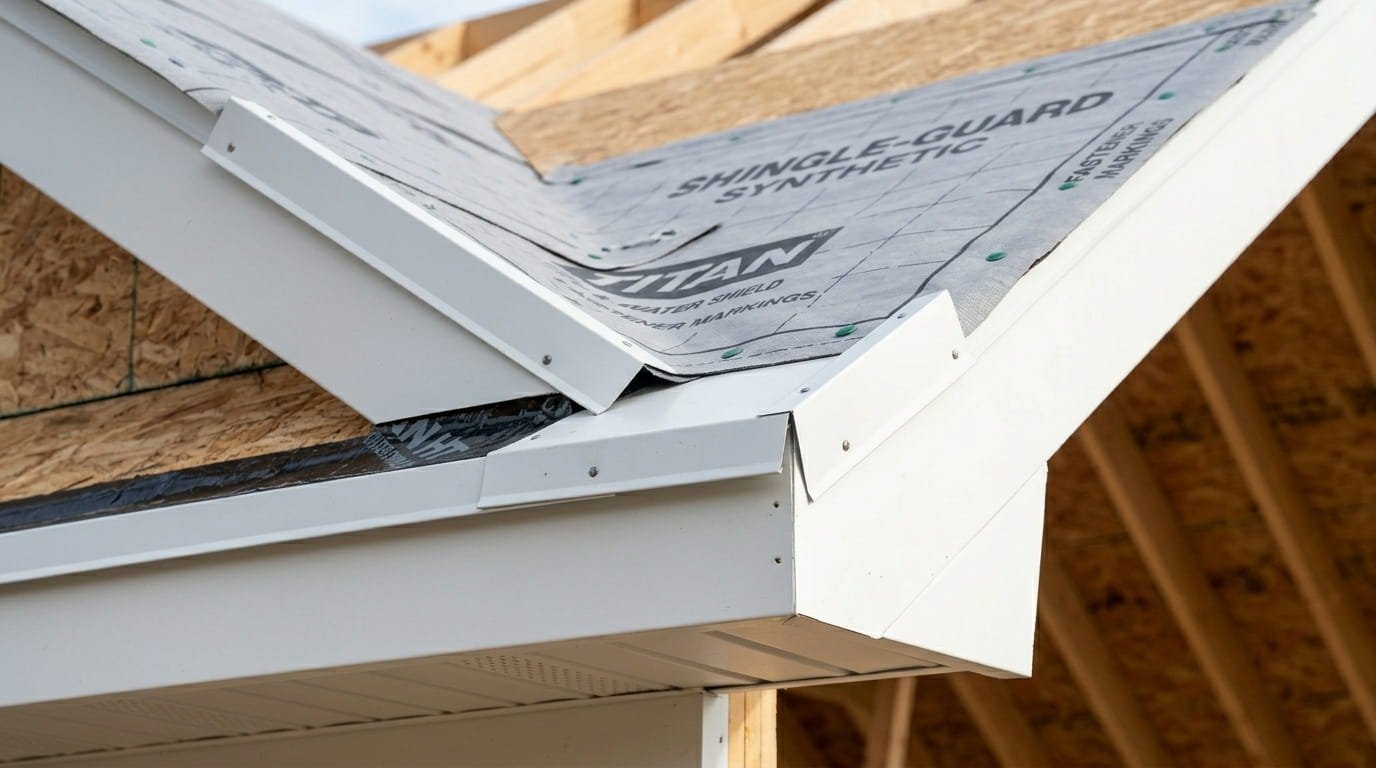
Step 4: Install Eave Trim (Drip Edge)
Eave trim directs water away from the fascia. Installation order changes by climate — get this right before anything else goes up.
- Cold climates (ice dam risk): Install eave trim ON TOP of underlayment.
- Warm climates (no ice dams): Install eave trim UNDER underlayment.
- Fasten every 12 inches with 1-inch roofing nails directly to the roof deck.
- Always lap upper sections over lower sections with a minimum 2-inch overlap.
- Trim must sit tight against fascia with no gaps where birds or insects can enter.
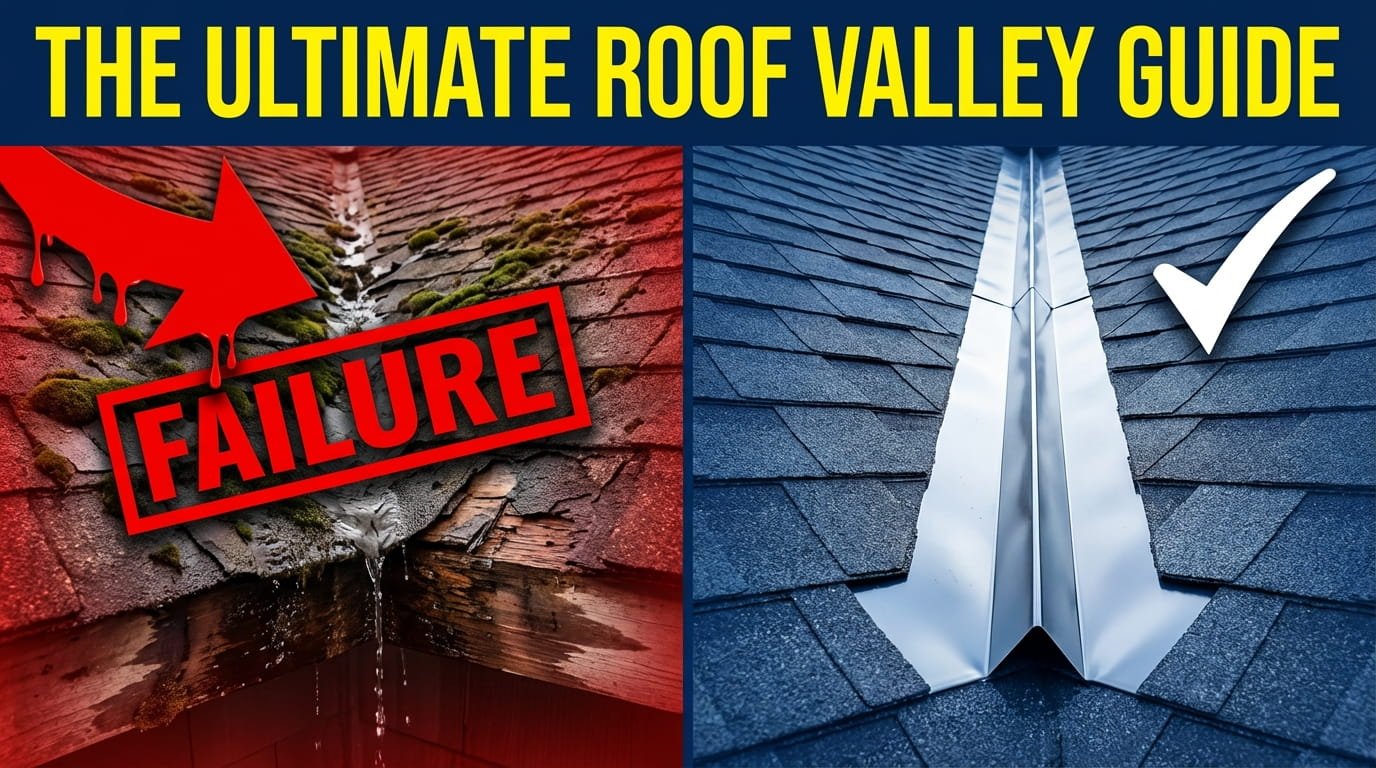
Step 5: Install Valley Flashing
Valley flashing is one of the most critical and most frequently skipped steps in DIY metal roofing. A properly flashed valley is what separates a watertight installation from a recurring leak.
- Use W-valley or open valley flashing, minimum 24 inches wide.
- Center the flashing in the valley and fasten along edges only. Never fasten through the center of valley flashing.
- Apply butyl tape under both edges before fastening. Apply sealant at all end laps.
- Lap upper sections over lower sections minimum 6 inches.
Critical Warning: Valley flashing must be the same metal type as your panels or a compatible metal. Mixing metals causes galvanic corrosion. Do not let copper and steel, or aluminum and steel, contact each other directly.
Pro Tip: For DIY installs, use open valley style. It drains better, is easier to install correctly, and is easier to clean than a closed valley.
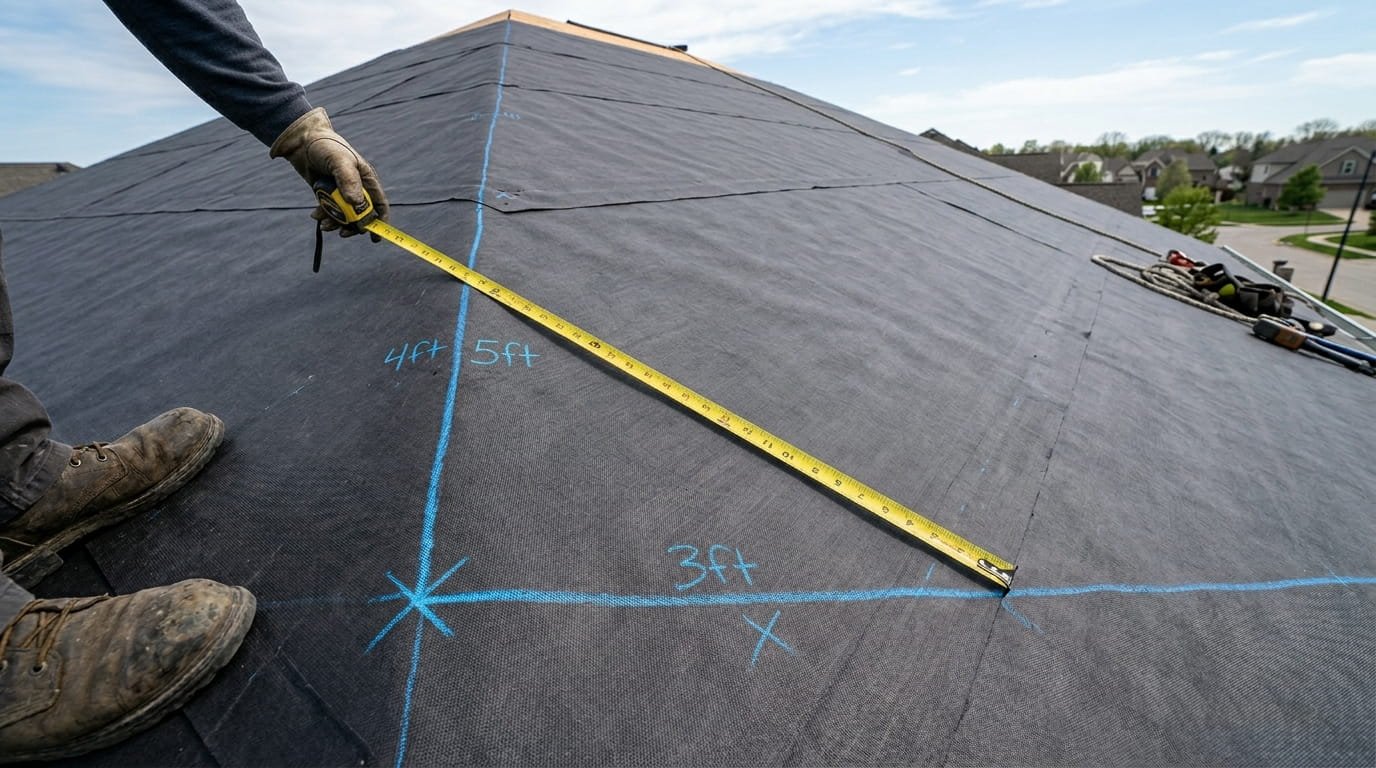
Step 6: Snap a Square Reference Line
A square reference line keeps every panel running straight. An off-square first panel misaligns every panel that follows — by the ridge you are looking at a visible gap or overlap that cannot be corrected.
- Use the 3-4-5 method: mark 3 ft along the eave from a corner, 4 ft toward the ridge, and 5 ft diagonally. The intersection gives a 90-degree angle.
- For large roofs, use multiples: 9-12-15 or 21-28-35 for greater accuracy.
- Snap a chalk line and verify from multiple points before installing any panels.
Pro Tip: Take your time on this step. The entire roof’s alignment depends on it.
Step 7: Set Foam Closure Strips at Eave
Closure strips block the open ribs at the eave and ridge, preventing insects, birds, and wind-driven rain from entering the panel voids.
- Inside closure strips match the corrugated underside of the panel. Attach to eave trim or panel underside with butyl tape.
- Position strips approximately 1 inch from the panel edge.
- Run a continuous bead of sealant on top of the foam strip before setting the panel.
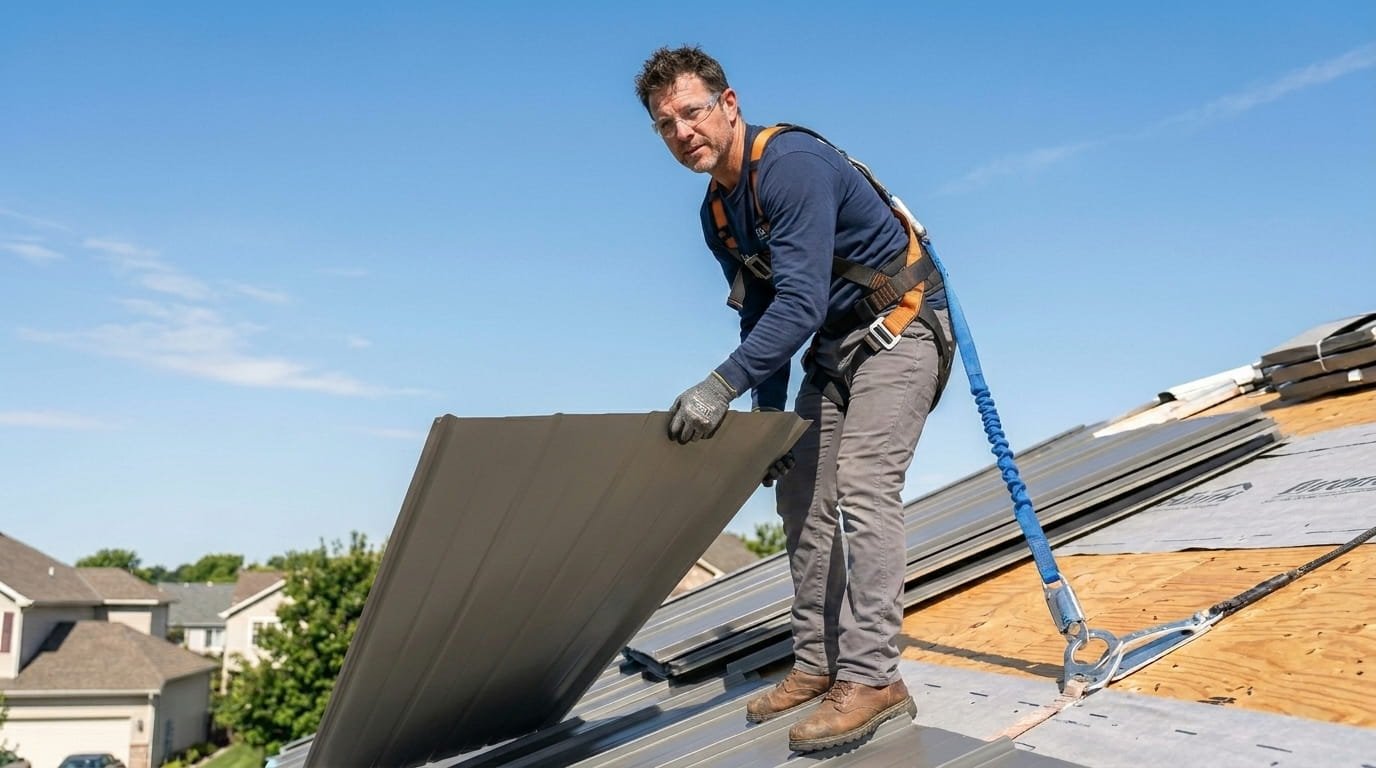
Step 8: Set and Fasten the First Panel
The first panel is the most important one you will install. Everything else references off it. Take the extra time to get alignment and torque exactly right before moving on.
- Align the panel precisely with the reference line. Check measurement at both top and bottom before fastening.
- The panel should overhang the eave trim by 1 inch to direct water into the gutter.
- At the eave: place metal roofing screws on both sides of every rib, through the foam closure strip.
- Up the panel: one screw per rib per row, rows no more than 24 inches apart.
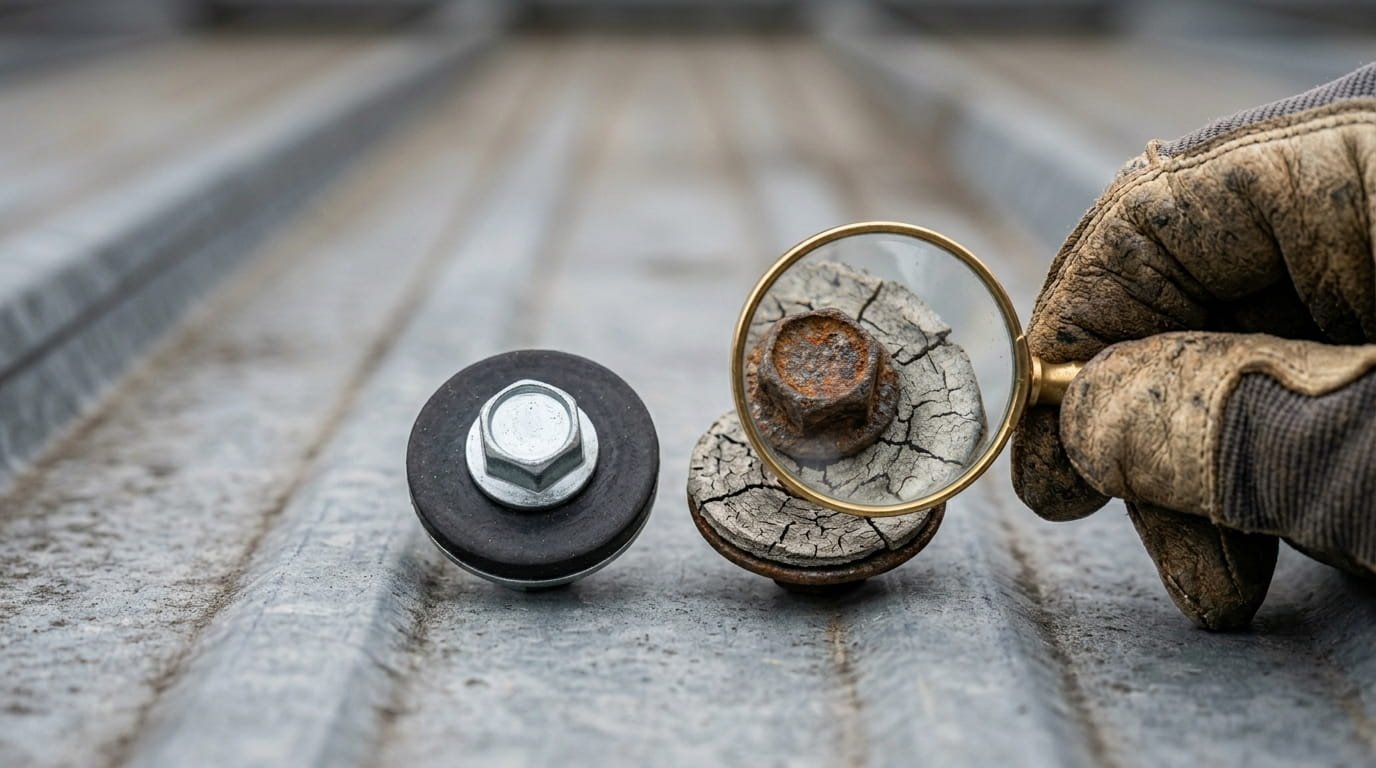
Critical Fastening Technique: Drive screws perpendicular to the panel. Tighten until the neoprene washer just compresses to the edge of the screw head. Over-tightening crushes the washer seal. Under-tightening leaves a gap that never seals.
Sweep all metal shavings immediately after drilling. They rust within 24 hours.
Step 9: Install Subsequent Panels
Panel-to-panel alignment is cumulative. Small errors at panel 3 become large visible errors at panel 10.
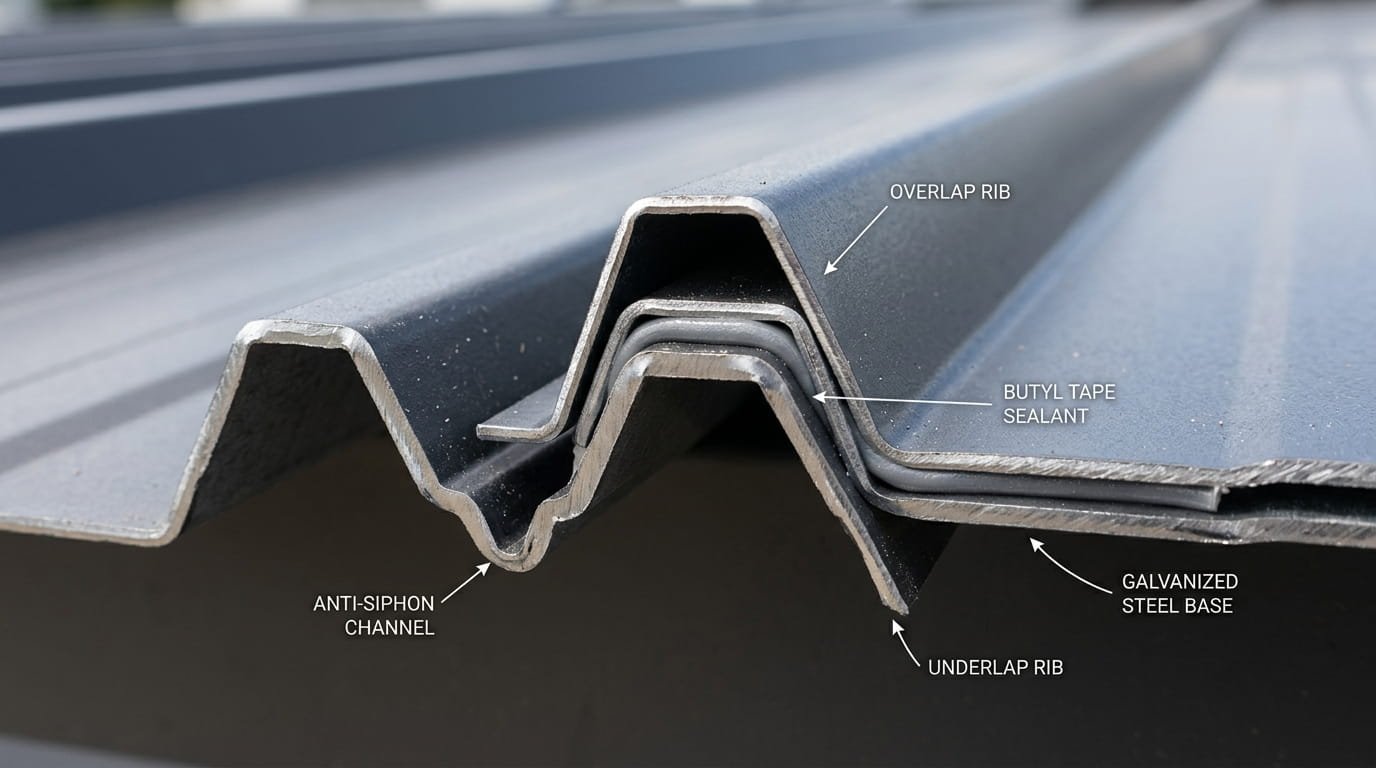
- The overlapping rib has a shorter leg. It nests over the underlapping rib, which has an anti-siphon channel.
- Always orient the anti-siphon channel facing downhill.
- Apply a bead of butyl tape at side laps for roofs with pitch below 4:12.
- Check alignment to your reference line every 3 to 4 panels. Small drift becomes large error quickly. Correct early.
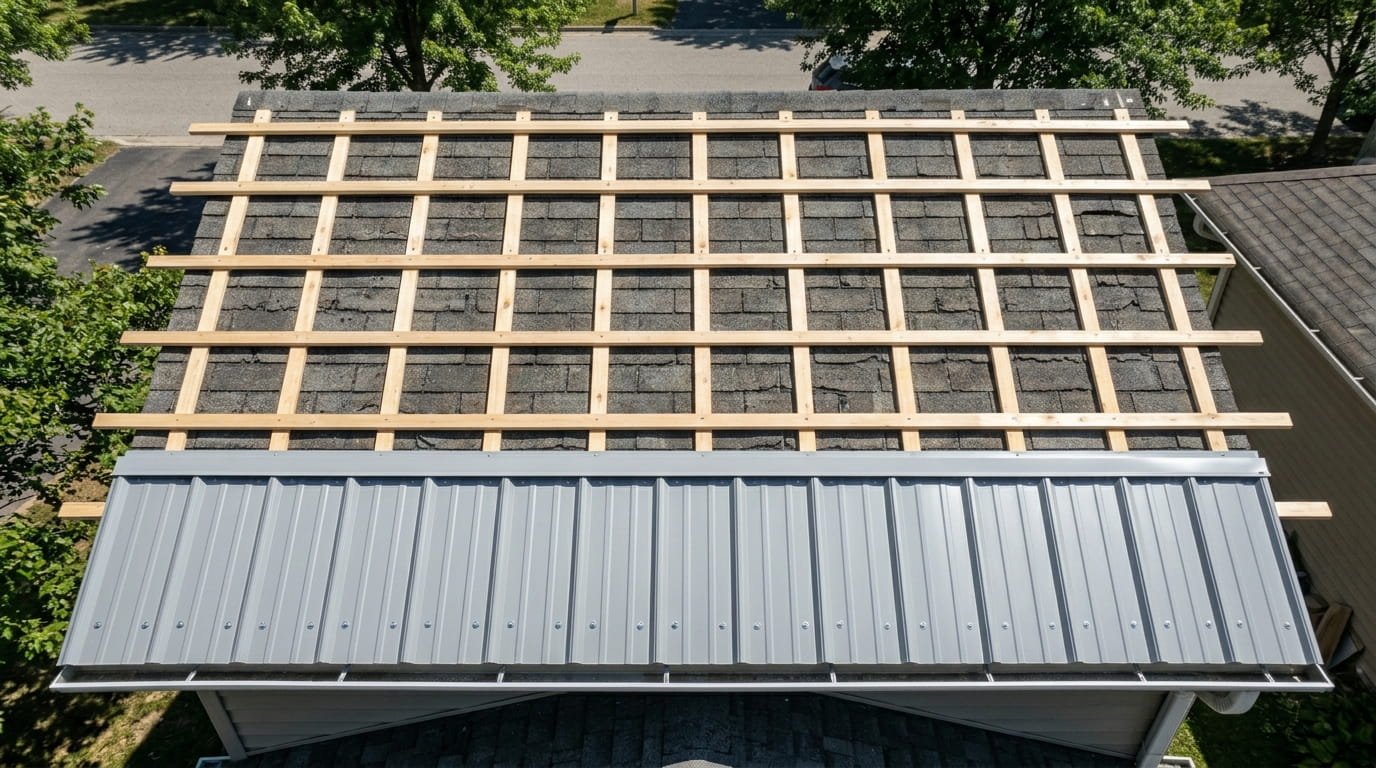
Step 10: Install Rake / Gable Trim
Rake trim seals and protects the exposed panel edges at the gable ends.
- Apply butyl tape along the underside of the trim wherever it contacts the flat surface of the panel.
- Press firmly in place before driving any screws. Fasten every 12 inches through the butyl tape into the panel flat.
- Overlap trim sections minimum 2 inches. Always lap the upper piece over the lower.
Step 11: Install Flashing at All Penetrations
Penetration flashing is where most long-term leaks originate. Each type requires a different approach — read all sub-sections before starting.
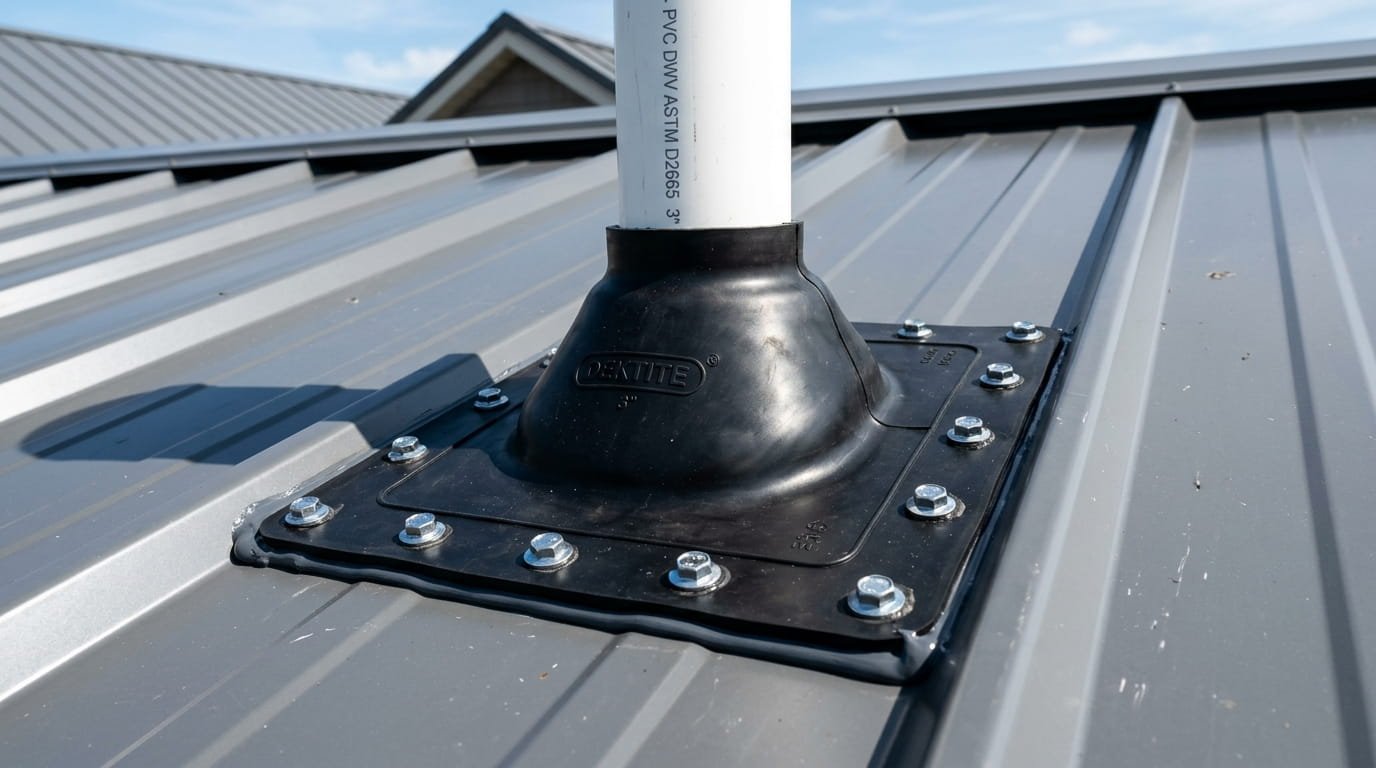
Pipe and Vent Boots
- Slide the boot over the pipe before panels in that area are fully fastened.
- Apply butyl tape under the boot flange and press firmly to the panel.
- Fasten the flange at the top only. This allows for thermal expansion movement of the panel.
Sidewall Flashing
- Use step flashing: individual pieces installed with each panel course, overlapping the panel below by minimum 2 inches.
- Apply sealant at the wall-to-flashing joint only. Not at the panel-to-flashing joint: that joint must allow drainage.
Headwall Flashing
- Use a single continuous piece spanning the full width of the roof plane.
- Tuck minimum 4 inches under siding above the roof. Overlap panels minimum 4 inches below.
Chimney Flashing
Chimney flashing is the most complex flashing in residential roofing. It requires base flashing, step flashing, counter flashing, and a saddle or cricket if the chimney is wider than 30 inches. If you are not experienced with chimney flashing, hire a professional for this specific detail and complete the rest yourself.
Step 12: Install Ridge Cap
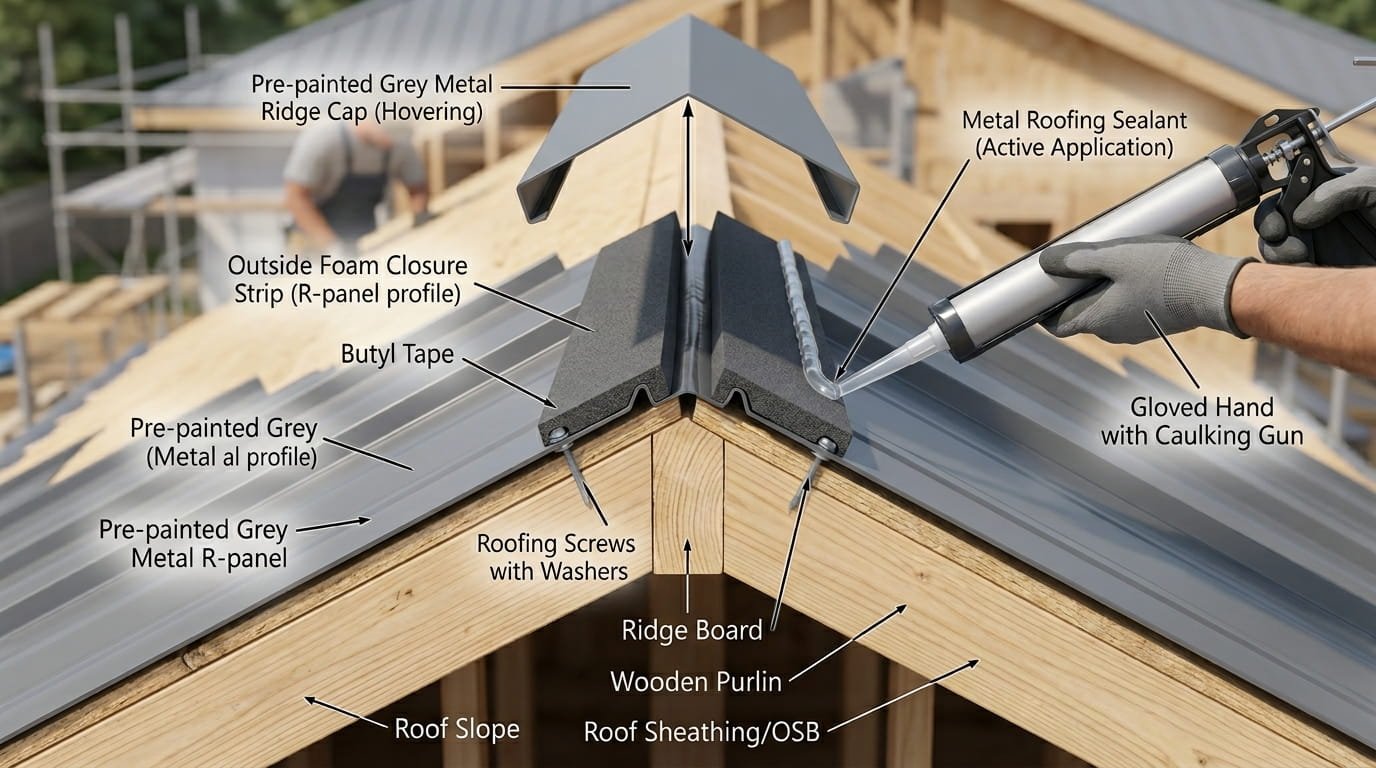
The ridge cap is the final weatherproofing element. Install it correctly and your entire system works as designed.
- Apply outside foam closure strips on both sides of peak, 4 inches from the top, secured with butyl tape.
- Apply a continuous bead of sealant on top of the foam.
- Set the ridge cap over the peak with equal overhang on both sides.
- Fasten with 2-inch screws through every rib directly into roof deck.
- Overlap ridge cap sections minimum 6 inches. Start from the end opposite to prevailing wind direction.
Pro Tip: With the ridge cap complete, water landing anywhere on the roof now sheds from panel to panel to gutter without ever reaching the underlayment. That is the system working correctly.
Step 13: Final Inspection and Cleanup
A completed installation is not finished until it passes your own inspection. Do not skip this step.
- Walk the entire roof and visually check every fastener. Look for crooked screws, screws missing the rib, and missing neoprene washers.
- Check all seams, side laps, and flashing joints for any visible gaps.
- Apply touch-up sealant at any joint that looks questionable.
- Use a magnetic sweeper across the entire roof and all ground areas below. Collect every metal shaving and loose screw.
- Photograph the completed installation — useful for warranty claims and insurance documentation.
Special Installation Situations
Not every installation is a clean gable roof with no penetrations. These scenarios come up regularly and are largely ignored in other guides.
Installing Over Existing Shingles
Installing metal roofing over shingles saves labor and disposal cost but requires verification before you commit to it.
- Verify local building code allows overlay. Most permit one layer over, not two.
- Verify structural load capacity. Adding metal over shingles adds approximately 1.5 lbs per sq ft.
- Install 1×4 furring strips across the existing shingles to create a flat, even surface and an air gap that reduces noise and allows condensation to dissipate.
- Do not install directly over buckled, uneven, wet, or multi-layered shingles.
Noise Reduction
Metal roof noise is one of the top concerns homeowners raise. Here is how to address it in order of effectiveness.
- Solid decking with underlayment (best method — this is the approach this guide assumes).
- Rigid insulation boards installed above deck before panels.
- Furring strips with batt insulation between strips.
- Dense attic insulation below the deck. Proper metal roof underlayment selection also makes a measurable difference.
Condensation Prevention
Condensation forms when warm, moist interior air contacts the cold underside of metal panels. Left unchecked, it causes premature decay of roof deck material and insulation.
- Prevention requires proper attic ventilation and a vapor barrier on the interior side in cold climates.
- Minimum ventilation: 1 sq ft of net free vent area per 150 sq ft of attic floor space.
- Ridge vent combined with continuous soffit vents is the most effective system.
- Do not block soffit vents when installing new eave trim. This is a common installation mistake that leads to chronic condensation problems.
Common Mistakes to Avoid
These are the ten mistakes that lead to the most callbacks, warranty denials, and costly re-installations. Memorize them before you start.
- Misaligning the first panel. The entire roof follows from the first panel. Snap a reference line and verify before driving a single screw.
- Over-tightening metal roofing screws. Crushes the neoprene washer seal. Leaks appear 2 to 3 years later.
- Leaving metal shavings on the roof. They oxidize within 24 hours and cause permanent rust staining.
- Using standard ice and water shield under metal. Non-HT-rated membranes soften under metal panel heat and lose adhesion.
- Skipping foam closure strips. Insects, birds, and water infiltrate through open ribs at the eave and ridge.
- Mixing incompatible metals. Aluminum and steel, or copper and steel, in direct contact causes galvanic corrosion.
- Forgetting sealant at trim splices. Every trim overlap without sealant is an open water entry point.
- Cutting panels with an angle grinder. Heat damages the protective panel coating and triggers rust at the cut edge. Use aviation snips or a cold-cut blade.
- Fastening through the center of valley flashing. Prevents thermal movement and causes buckling and leaks. Fasten edges only.
- Skipping the building permit. May result in denied insurance claims, forced removal and re-installation, and liability for water damage.
DIY vs. Professional Installation

Some roofs are excellent DIY candidates. Others are not. This comparison will help you make the right call for your specific situation.
| Factor | DIY Installation | Professional Installation |
| Cost | $300 to $700 per square | $800 to $1,200 per square |
| Project timeline | 5 to 10 days (1,500 sq ft) | 2 to 4 days |
| Warranty coverage | Materials only | Labor and materials |
| Permit management | Homeowner’s responsibility | Usually included |
| Complex areas | High error risk | Handled correctly |
| Code compliance | Homeowner’s responsibility | Contractor’s responsibility |
| Specialized tools | Must rent or buy | Contractor owns them |
DIY Is a Good Fit When:
- Simple gable roof with minimal penetrations.
- Exposed fastener panel system (not standing seam).
- Roof pitch between 4:12 and 8:12.
- You have prior carpentry experience and are comfortable at heights.
Hire a Professional When:
- Multiple valleys, dormers, or chimneys are on the roof.
- Roof pitch is above 9:12 or below 2:12.
- You are installing a standing seam system.
- You are not comfortable working at height.
Post-Installation Maintenance Schedule
A metal roof is low-maintenance, but not no-maintenance. Follow this schedule to protect your investment and catch problems before they become expensive repairs.
| Timeframe | Task |
| 30 days after installation | First inspection: check all fasteners, look for missed metal shavings |
| Every 6 months | Clear debris from valleys and gutters; visual inspection of panel edges |
| Annually | Inspect fastener washers for compression or cracking; check all sealant at penetrations |
| Every 5 to 10 years | Re-apply sealant at high-movement joints (chimneys, skylights, headwall) |
| Every 10 to 15 years | Inspect exposed fastener washers — replace any that are cracked, flat, or compressed |
| Every 20 to 25 years | Consider full roof recoat if using an exposed fastener system |
For ongoing maintenance needs in New York, reach out to our team and let us provide roof maintenance services for both DIY and professionally installed metal roofs.
Frequently Asked Questions
These are the questions homeowners ask most often about how to install metal roofing. Answers are direct and complete.
Q1: How long does it take to install a metal roof?
A typical 1,500 sq ft residential roof takes a DIYer 5 to 10 days working with one helper. Professional crews complete the same job in 2 to 4 days. Planning, material delivery, and deck preparation add time before installation begins.
Q2: Can I install metal roofing over existing shingles?
Yes, in most jurisdictions if only one layer of shingles currently exists and the deck is structurally sound. Install 1×4 furring strips over the shingles to create an even surface and airspace. Verify your local building code first — some areas prohibit overlay installations.
Q3: What screws do I use for metal roofing?
Use self-tapping hex-head metal roofing screws with a bonded neoprene washer. Length depends on panel and deck thickness. 1.5-inch to 2-inch screws work for most residential applications. Never use drywall screws or standard wood screws.
Q4: How far apart should metal roofing screws be?
Screws should be spaced no more than 24 inches apart in rows running horizontally across the panel. At the eave, place screws on both sides of every rib. On the field of the roof, one screw per rib per row is standard.
Q5: Do I need underlayment under metal roofing?
Yes. Metal roof underlayment provides secondary waterproofing, manages condensation, and is required by most manufacturer warranties. Use high-temperature rated ice and water shield at vulnerable areas and synthetic underlayment for full coverage.
Q6: What is the minimum roof pitch for metal roofing?
Most exposed fastener metal panels require a minimum pitch of 3:12. Standing seam panels can go as low as 1:12 with proper sealant details. Roofs below 2:12 require full ice and water shield coverage rather than standard underlayment.
Q7: How do I cut metal roofing panels?
For short cuts and trim work, use aviation snips. For long straight cuts, use a circular saw with a fine-tooth metal-cutting blade rated for cold cuts. Never use an angle grinder — the heat damages the panel coating and causes rust at the cut edge.
Q8: Why is my metal roof leaking around screws?
The most common cause is over-tightened fasteners that have crushed the neoprene washer, or under-tightened fasteners that never sealed properly. Aged or cracked washers on older roofs are also common. Replace affected screws and washers rather than applying sealant over them.
Q9: Does a metal roof need to breathe?
Yes. Proper attic ventilation prevents condensation on the underside of metal panels. Provide a minimum of 1 sq ft of net free vent area per 150 sq ft of attic floor, using a combination of ridge and soffit vents.
Q10: How long do metal roofing screw washers last before needing replacement?
Quality neoprene washers on properly torqued screws typically last 10 to 20 years. Inspect them annually and replace any that appear cracked, flattened, or have lost elasticity. This is the primary ongoing maintenance task for exposed fastener metal roofs.
Q11: Can I walk on a metal roof?
Yes, but carefully. Step only on the flat areas between ribs, never on the ribs or ridges. Wear soft-sole, non-slip rubber boots. Avoid walking on panels during hot weather when protective coatings are softer and more susceptible to damage.
Q12: Do I need a permit to install a metal roof?
In most U.S. jurisdictions, yes. A building permit is required for full roof replacement. Costs range from $150 to $500 depending on location. Skipping the permit can result in denied insurance claims, mandatory removal, and resale complications. Contact your local building department before starting.
Conclusion
How to install metal roofing comes down to three things done right: thorough planning before the first panel goes down, precise fastening technique on every screw, and attention to every flashing and trim detail. Get those three things right and the roof will outlast most of the house beneath it. Skipping steps, rushing the fastening, or cutting corners on flashing is how a 50-year roof turns into a 5-year headache. The investment in time and preparation pays off every time.
If you have worked through this guide and realized your roof has a complex layout, the smart move is to bring in professionals for those specific details or for the full project. EZ Roofing & Builders provides expert metal roofing installation and inspections across Long Island, Nassau County, Queens County, and surrounding areas. Whether you need a second opinion on your DIY work or a full professional installation, reach out to our team and we will help you get it done right.