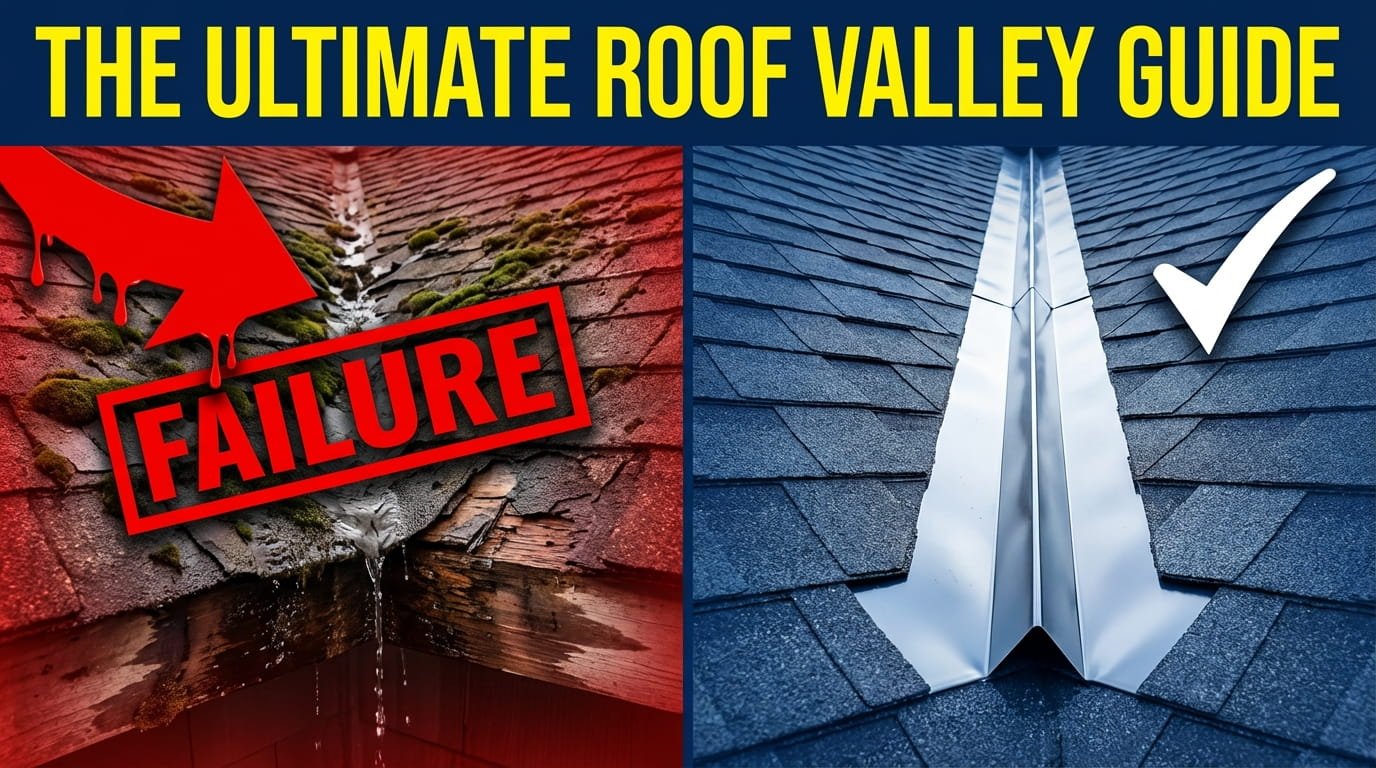
A roof valley is the most critical, and most vulnerable, part of any pitched roof. It channels more water than any other area of your roof, yet it is often the last thing homeowners think about until a leak appears on their ceiling.
Whether you are building a new home, replacing an aging roof, or trying to understand why water keeps getting in, by the end of this guide you will have a complete picture of how roof valleys work and how to keep them performing for decades.

What Is a Roof Valley?
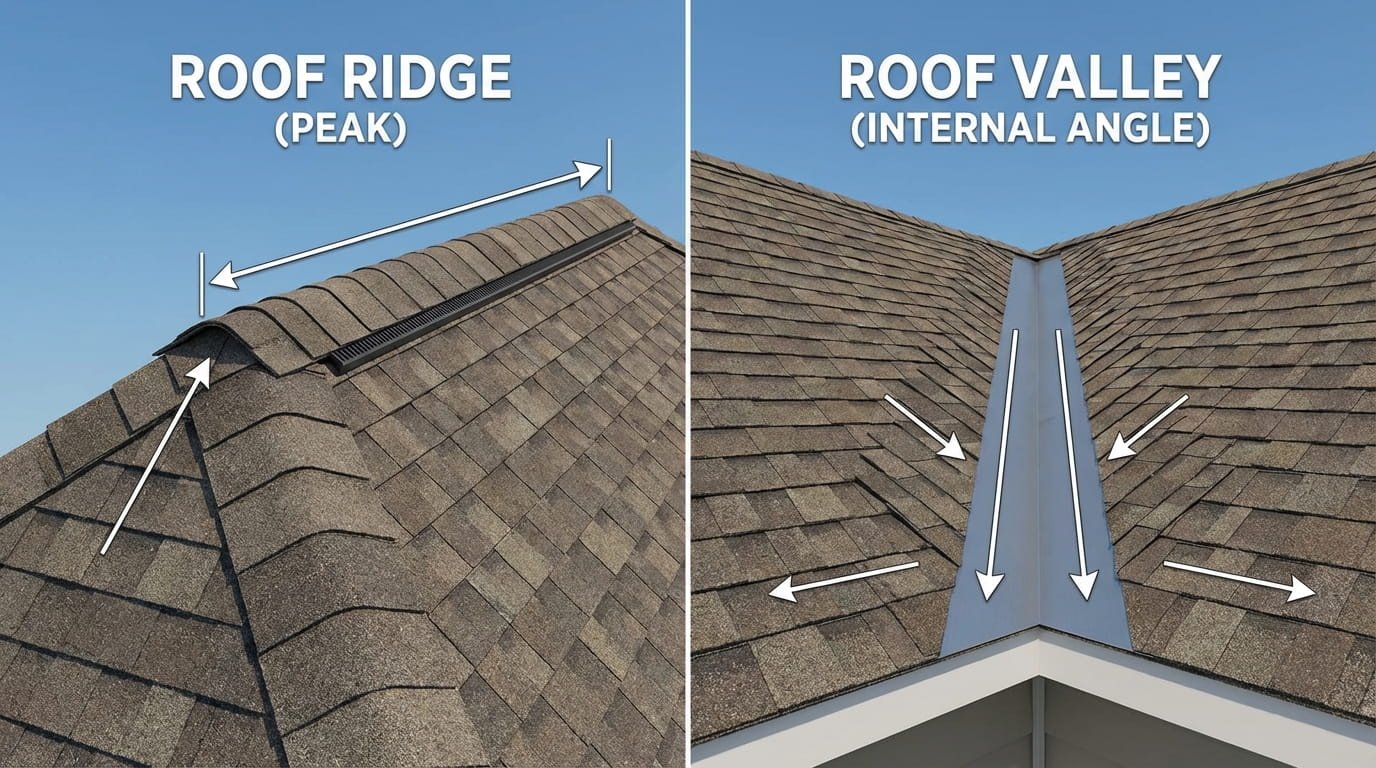
A roof valley is the internal angle formed where two sloping roof sections meet. Picture a V-shaped channel running from the peak of your roof down toward the gutters, that channel is the valley. Its primary job is to collect rainwater and snowmelt from both roof planes and direct it safely into the gutter system.
Because two entire roof sections funnel all their water into this single channel, roof valleys experience the highest water volume and pressure of any area on your roof. During a heavy storm, the water moving through a valley can be three times greater than what flows over a standard roof section. This concentrated flow is why proper valley construction is so critical, even a minor installation error can lead to leaks, wood rot, and structural damage.
What Is the Opposite of a Roof Valley?
The opposite of a roof valley is a roof ridge. While a valley is an internal angle where two slopes meet at their lowest point, a ridge is the external angle at the very top of a roof where two slopes meet at their highest point. Water flows away from a ridge in both directions, while water flows toward and through a valley.
Why Roof Valleys Matter More Than You Think
Most homeowners focus on shingles when thinking about roof health, but experienced roofers know that valleys tell the real story. A well-installed roof with a poorly constructed valley will leak. The valley determines how effectively your entire roofing system manages water, especially during heavy rain, ice storms, and seasonal snowmelt.
Types of Roof Valleys
Not all roof valleys are built the same way. There are six main types of roof valleys, each with its own installation method, appearance, performance characteristics, and ideal use case. Understanding the differences helps you make smarter decisions for your home.
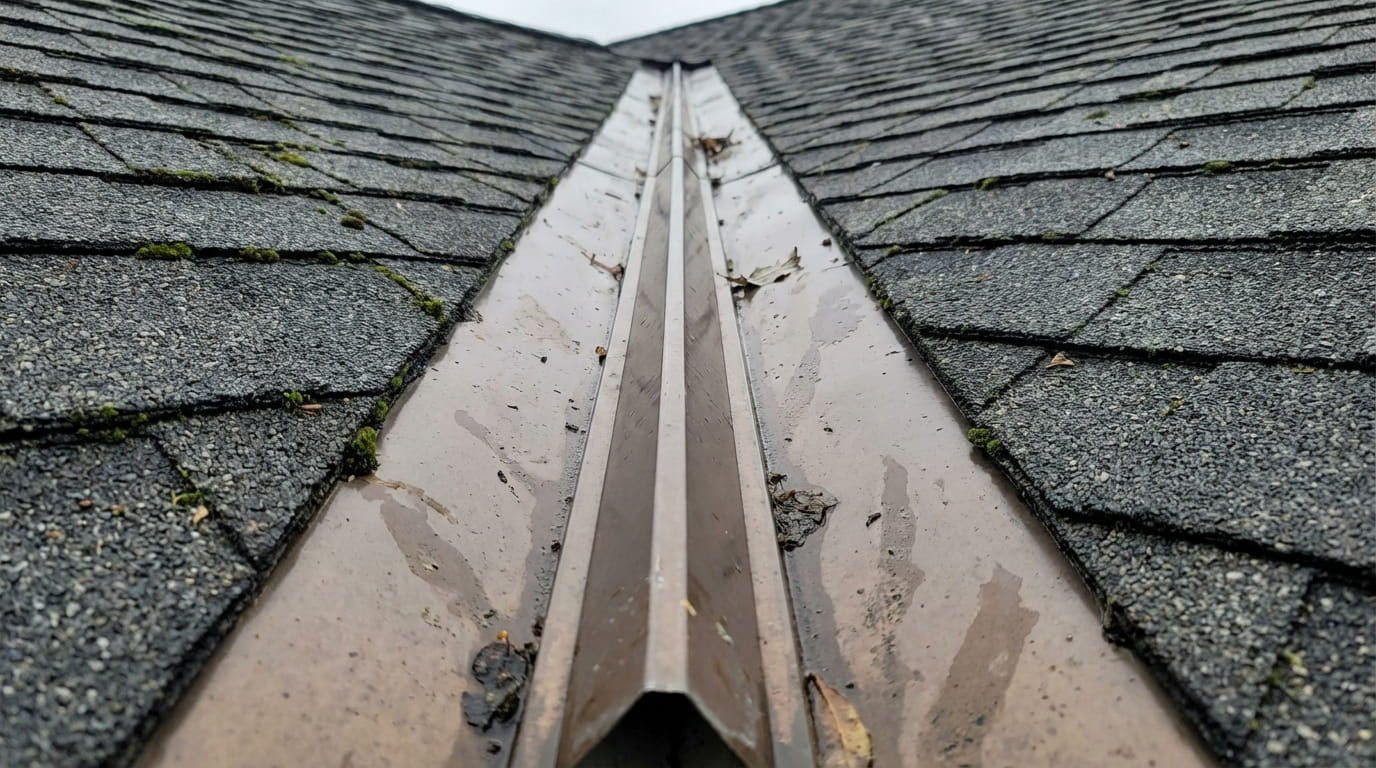
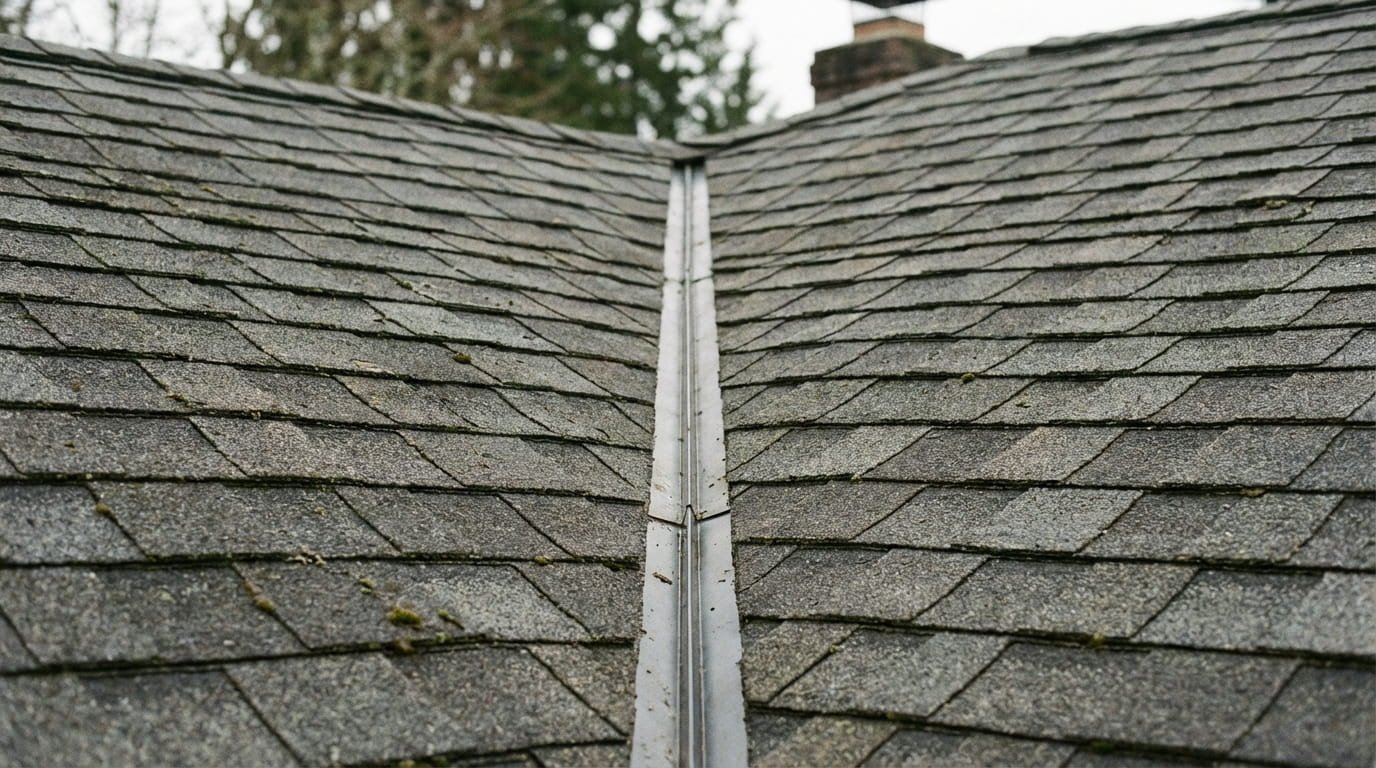
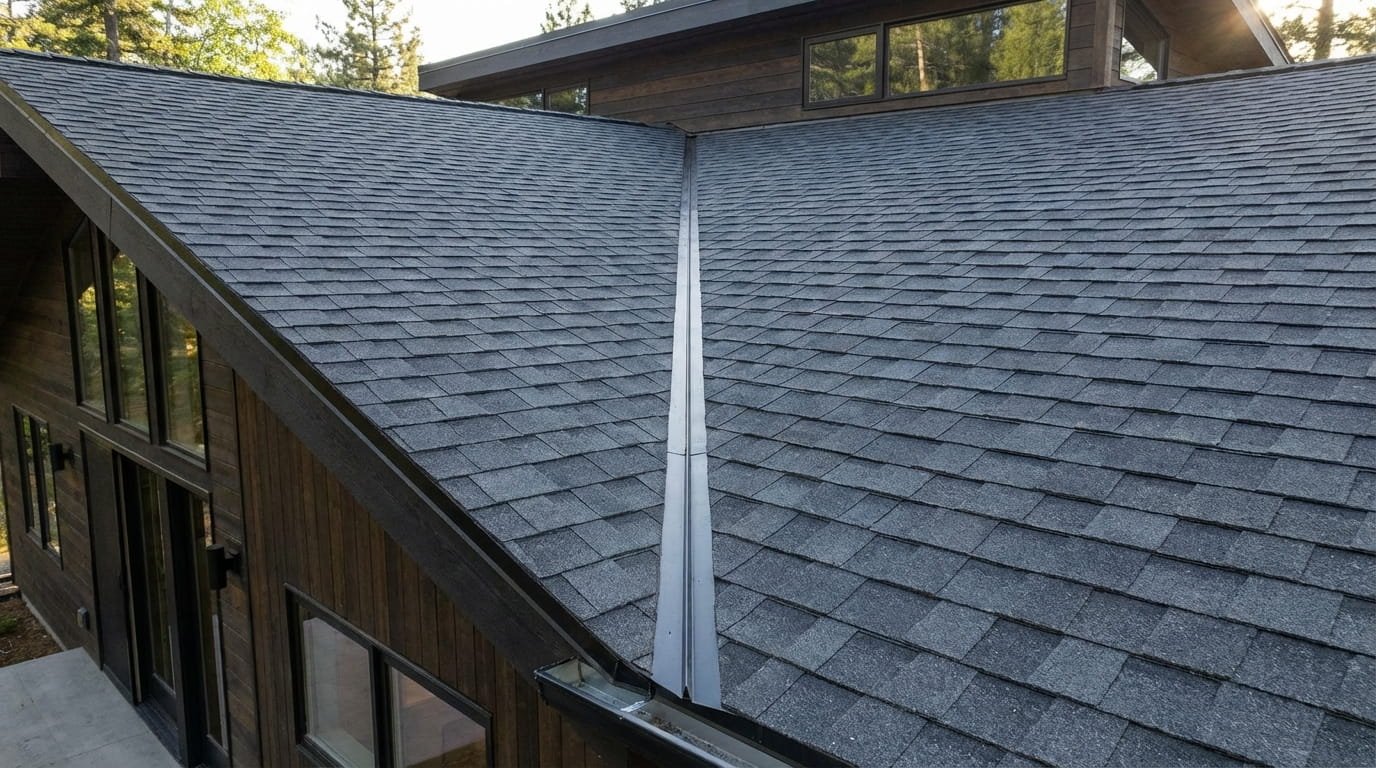
An open valley is the most straightforward and highest-performing valley type. In this design, the roofing material on both sides stops several inches short of the centerline, leaving a visible strip of metal flashing exposed down the middle. A metal channel, typically made from galvanized steel, aluminum, or copper, runs the entire length of the valley over an ice and water shield underlayment.
- Superior water drainage, smooth metal moves water faster than shingles
- Easy to inspect and clean, damage is immediately visible
- Long lifespan, quality metal flashing can last 25 to 50 years
- Best performance in heavy rain and snow regions
- Metal is visible from the ground, which some homeowners find less attractive
- Higher upfront cost due to metal materials and skilled labor
- Improper installation can create leak points at flashing edges
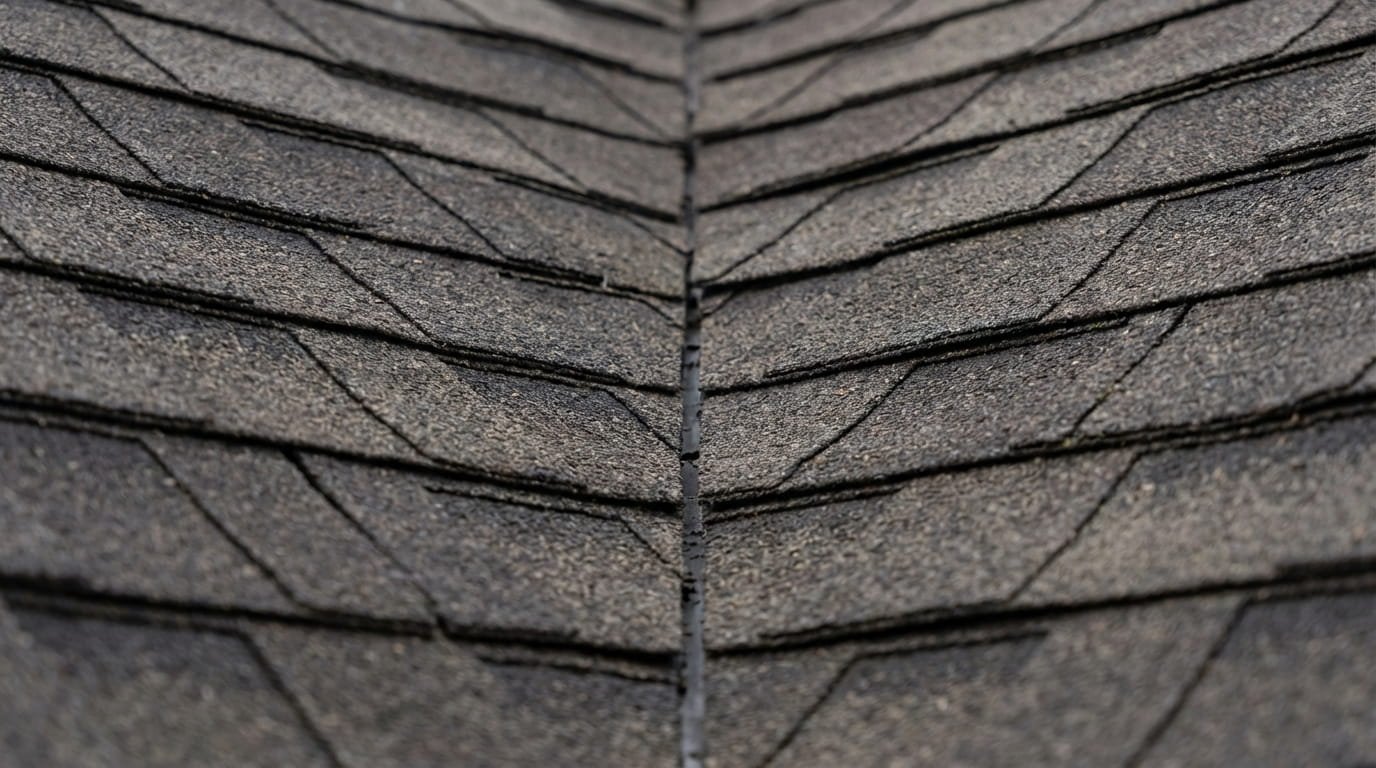
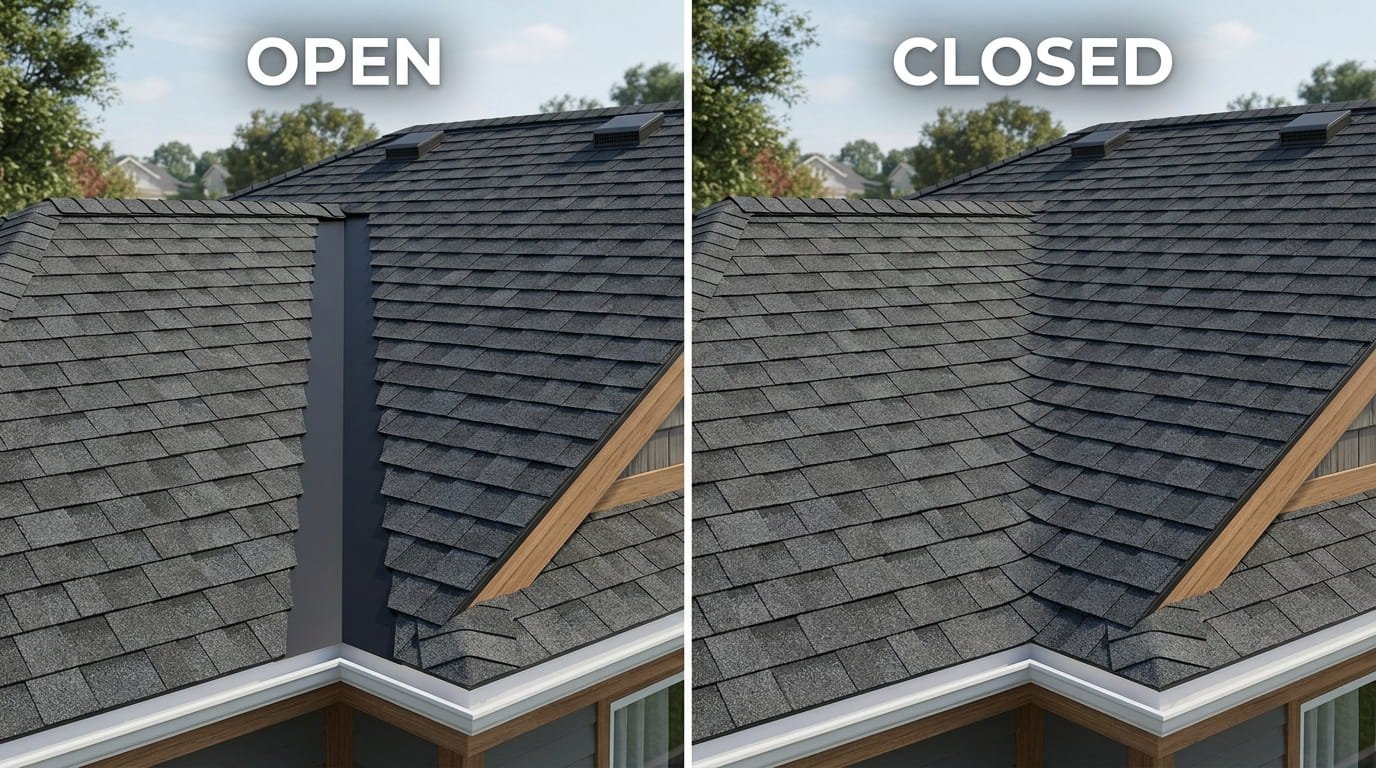
A closed cut valley is the most popular valley type for asphalt shingle roofs. Shingles from one roof plane extend across the valley and overlap onto the adjoining plane. The overlapping shingles are then cut in a straight line a few inches from the valley centerline, creating a clean, continuous appearance. Roofing cement is applied under the cut edges for additional water protection.
- Clean, seamless appearance with no metal visible
- Lower material cost since no additional metal flashing is needed
- Works well in moderate climates
- Shingles wear faster due to concentrated water flow
- More difficult to inspect since flashing is hidden beneath shingles
- Requires precise installation to prevent leaks along the cut edge
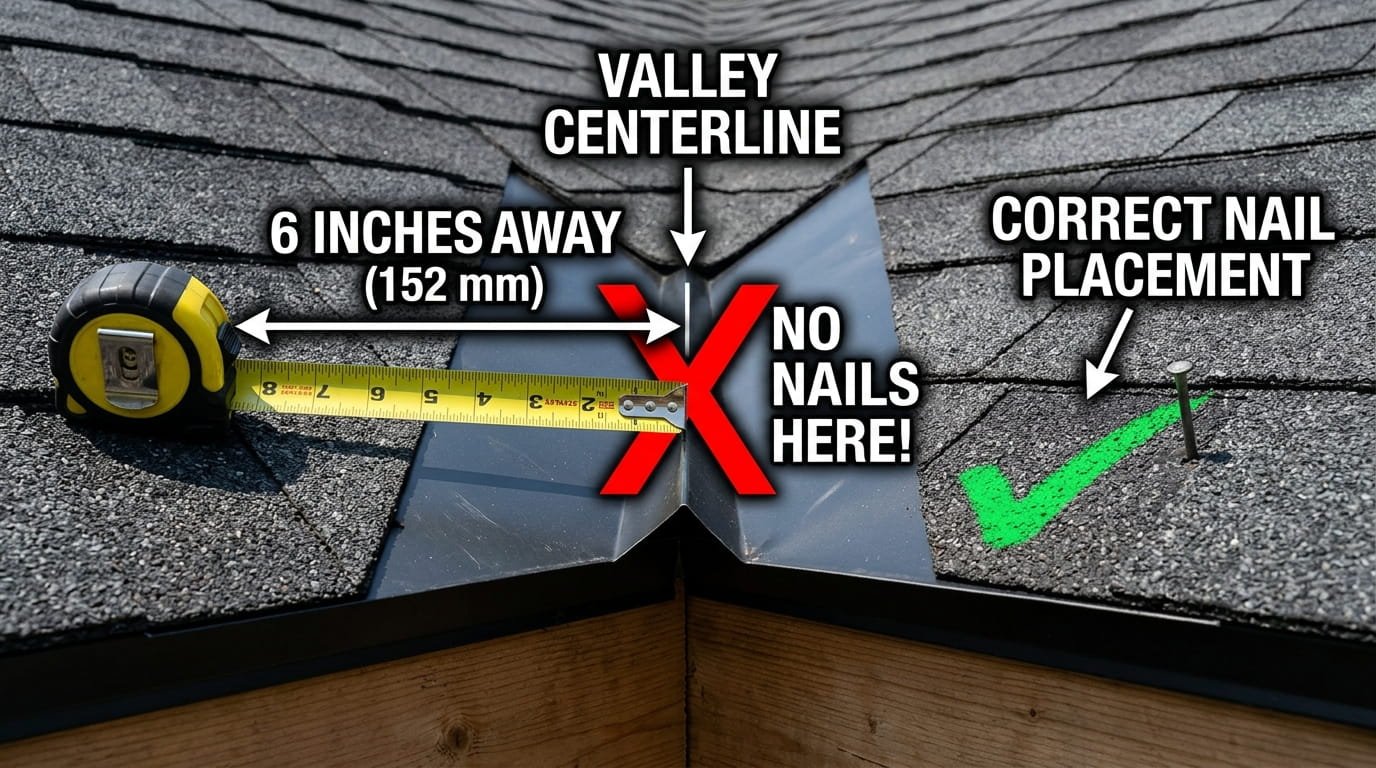
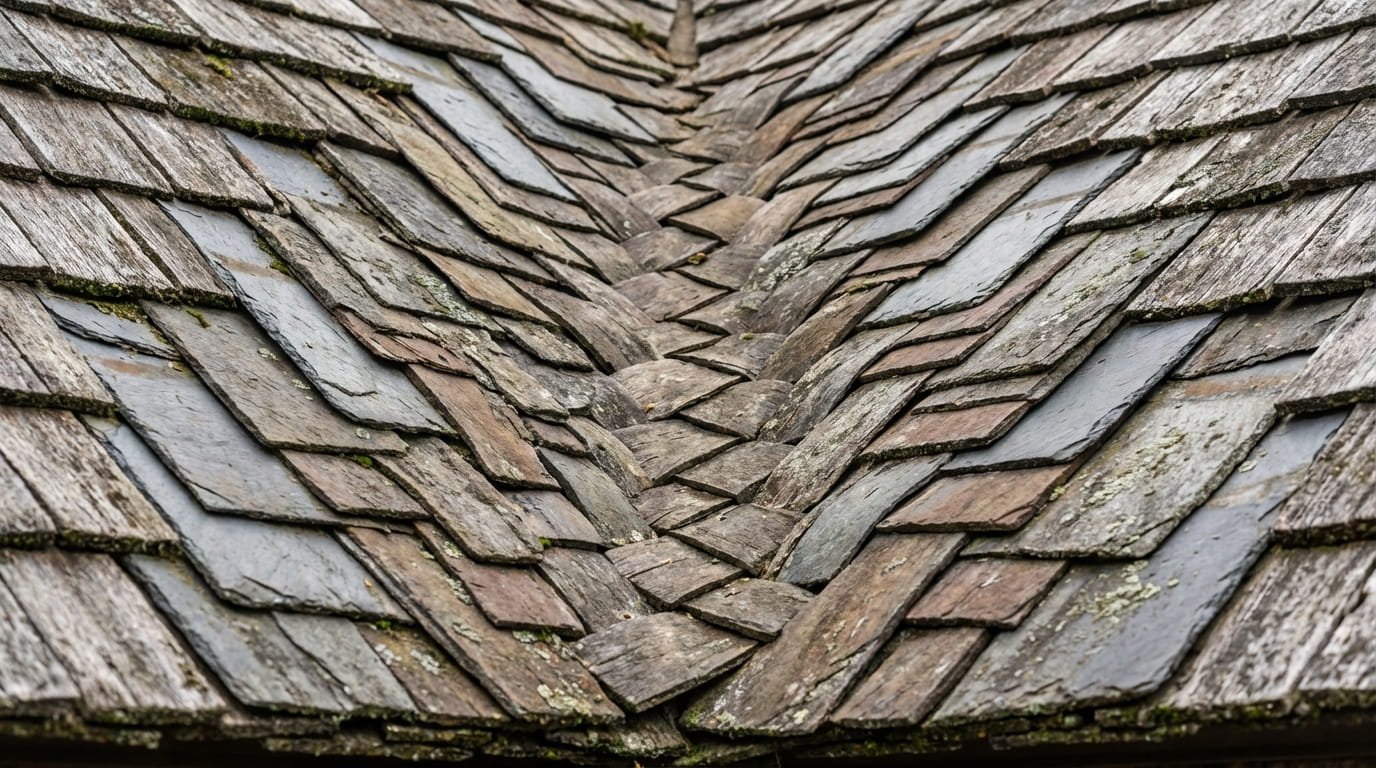 A woven valley involves alternating shingles from both roof planes across the valley centerline in an interlocking pattern. Instead of cutting shingles at the valley, each course from one plane overlaps with the course from the opposing plane, creating a woven basketweave appearance. Nails are kept at least 6 inches from the valley center to avoid penetrating the critical water channel.
- Multiple shingle layers provide strong weather protection
- No cut edges that can lift or curl
- Attractive textured appearance
- Only suitable for three-tab shingles, architectural shingles crack during weaving
- Harder to inspect for damage under the layered construction
- Not recommended in high-water-volume areas
The California cut valley is a hybrid method that combines elements of both the closed cut and woven techniques. Shingles from one roof plane extend completely across the valley while the shingles from the opposing plane receive a precise diagonal cut parallel to the valley centerline. Each shingle corner is clipped to prevent water from catching at the edge, and the cut line stays approximately 2 inches from the valley center.
- Clean, straight appearance with good visual appeal
- Faster installation than woven valleys
- Easier to inspect and repair than fully woven valleys
- Not suitable for very high-rainfall regions
- Requires skilled cutting to maintain straight, consistent lines
- Not recommended for Golden Pledge warranty installations
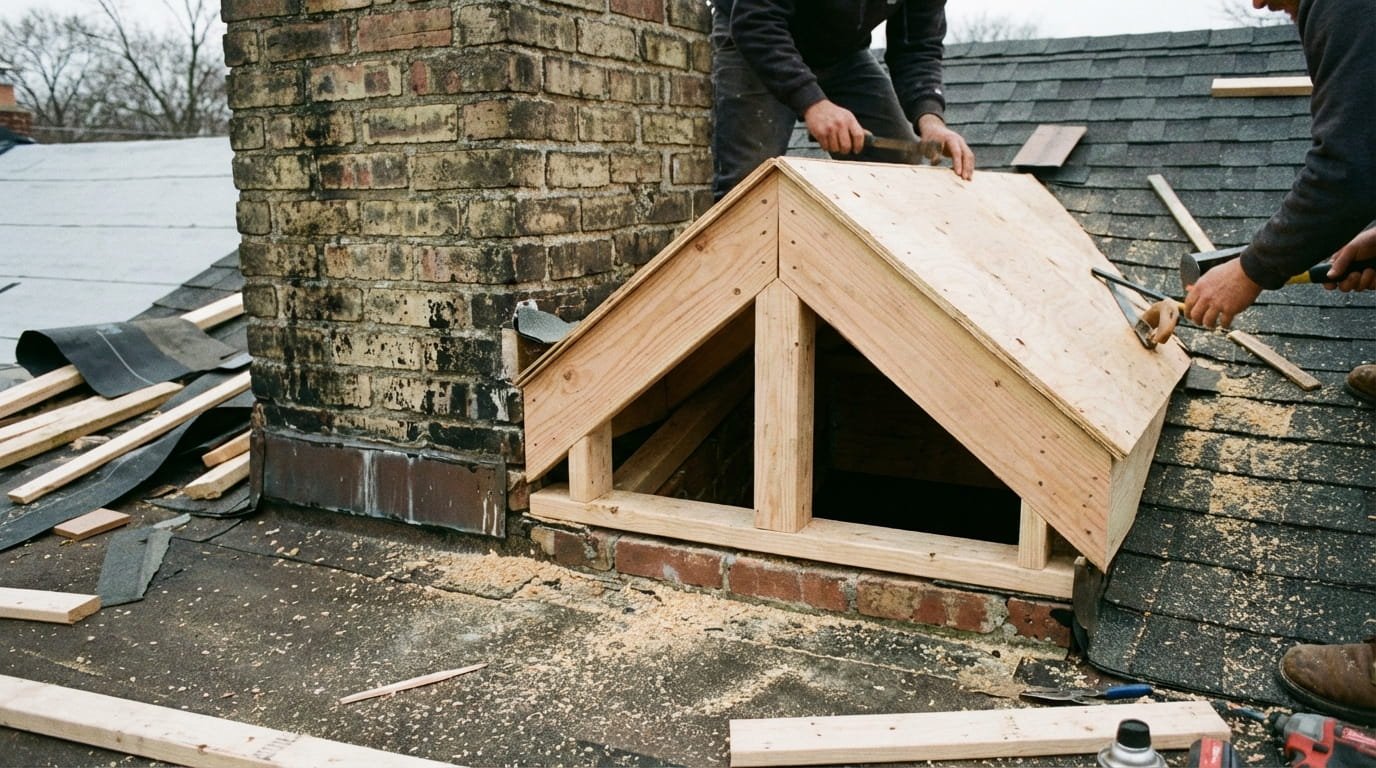
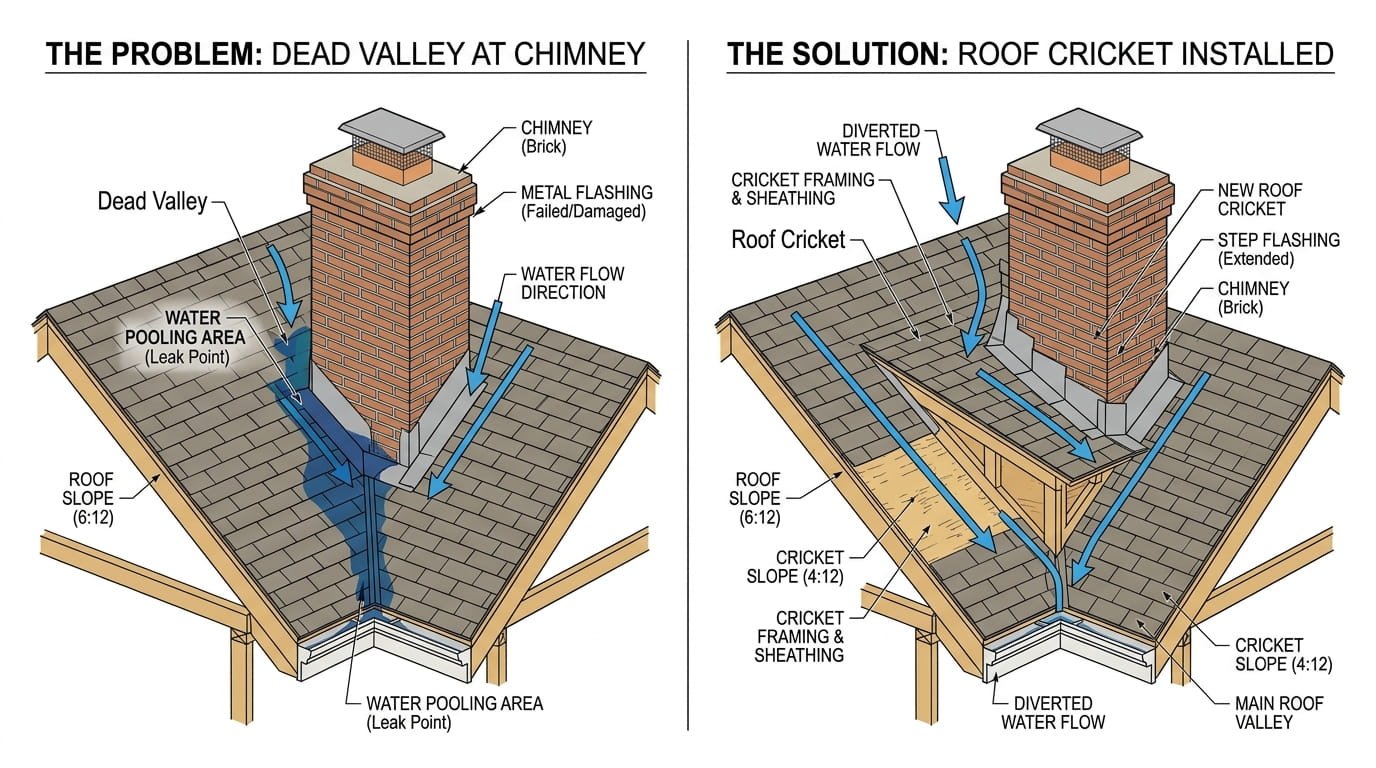
A dead valley is one of the most misunderstood and dangerous conditions in residential roofing. Unlike a standard valley where water flows naturally downward, a dead valley forms where a roof plane meets a vertical wall, chimney, or dormer, creating a flat or near-flat area where water cannot drain properly.
Because the area is flat or nearly flat, water pools rather than flows. This standing water saturates the underlayment and decking continuously, causing wood rot, mold growth, and eventual structural failure. Dead valleys are not a design choice, they are a condition to be corrected. If your roof has a dead valley, consult a professional roofer immediately.
The Professional Solution, Building a Cricket: A cricket is a small, peaked roof structure built behind a chimney or at the base of a vertical wall to split the water flow and redirect it into two properly draining valleys. A well-built cricket eliminates the dead zone entirely by giving water a slope to follow. Dead valleys also require more robust flashing than standard valleys, step flashing at every course and a continuous base flashing. Sealant alone is never sufficient.
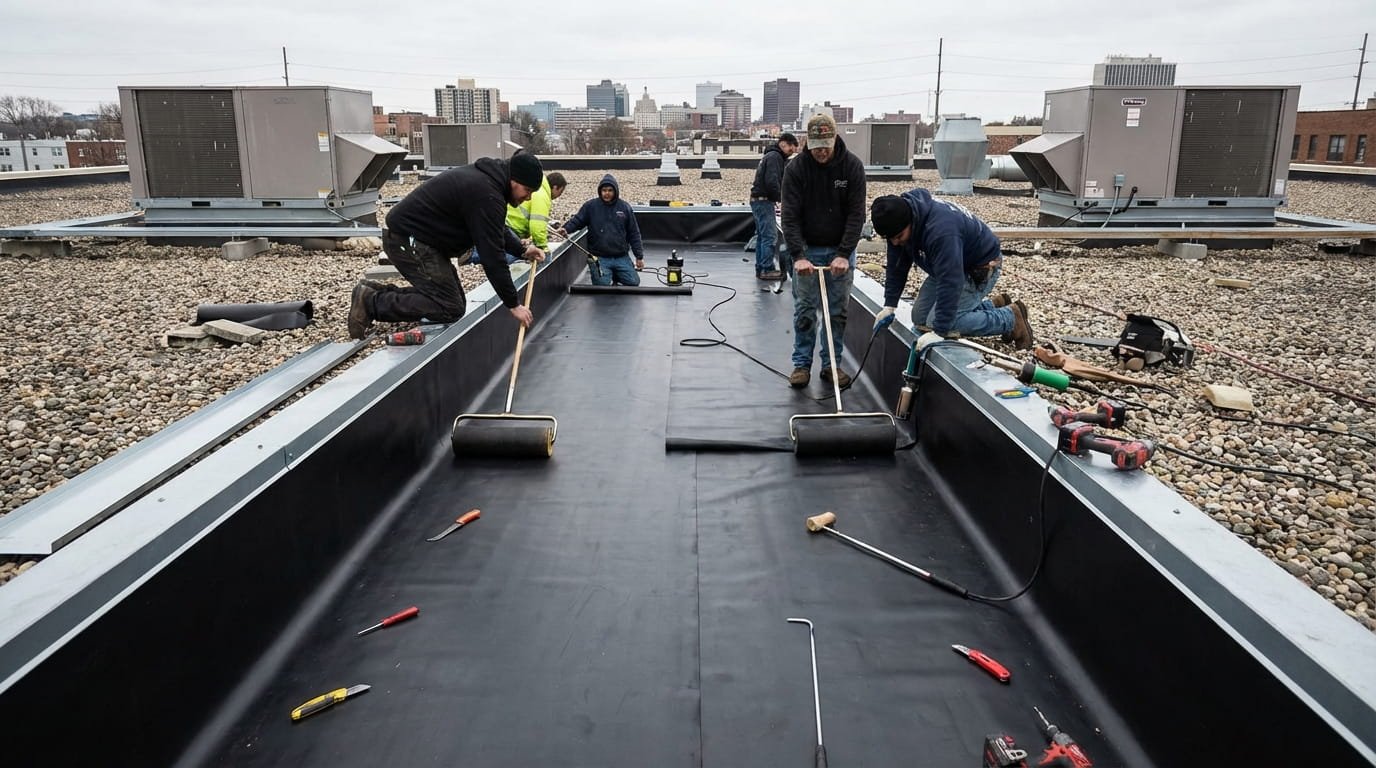
A flat roof valley occurs when two roof sections meet at a very low pitch, typically less than 2:12, creating a near-horizontal valley where standard drainage methods do not work effectively, making proper flat roof maintenance critical. Flat roof valleys are common on sections of complex rooflines where a sloped roof meets a low-slope or flat roof extension.
- Water moves very slowly, increasing the risk of ponding
- Standard asphalt shingles are not suitable, the area requires EPDM, TPO, or modified bitumen
- Debris accumulates rapidly and blocks drainage
- Flat roof valleys require a continuous waterproofing membrane with careful attention to transition zones
What Goes in a Roof Valley?
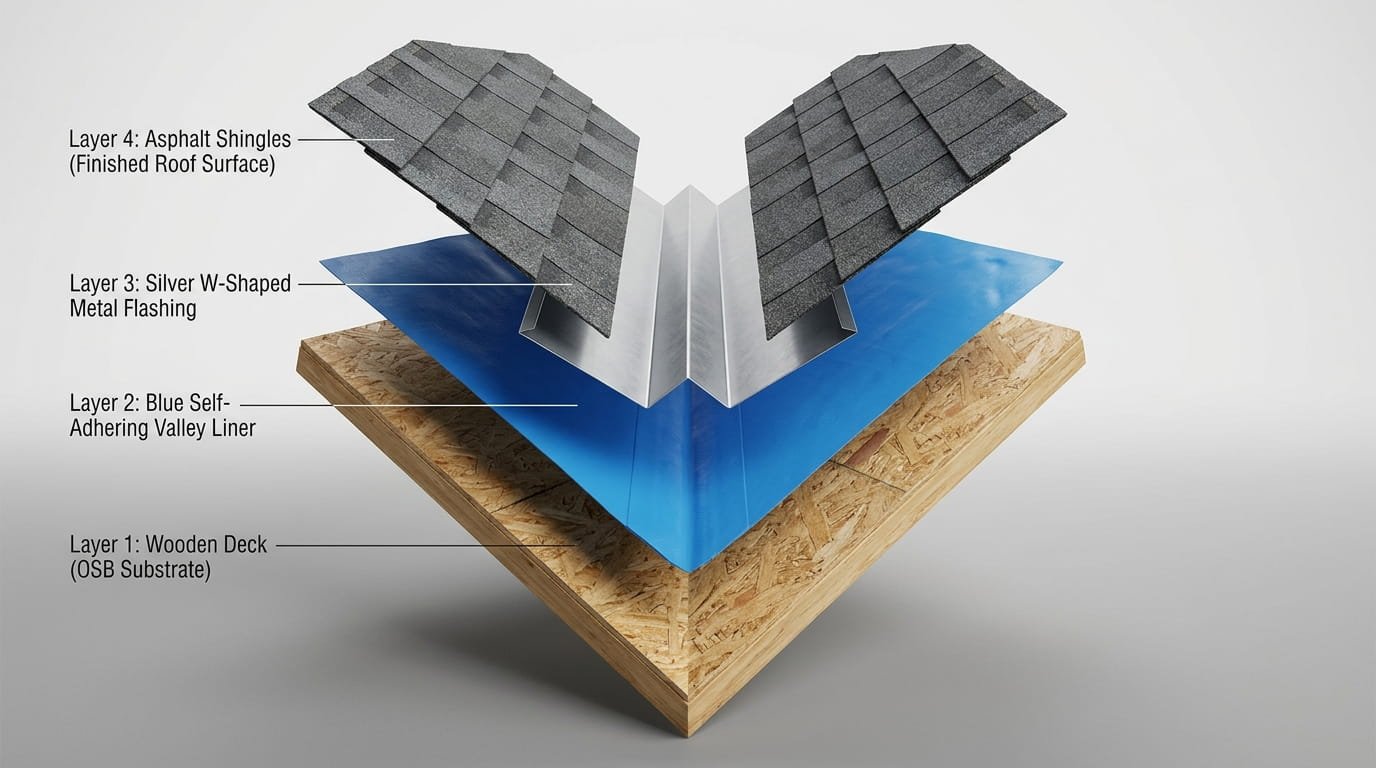
Every properly constructed roof valley has multiple layers working together to keep water out. Understanding what goes into a valley helps you evaluate whether your existing valley is up to the job.
Valley Liner vs Valley Metal: What Is the Difference?
These two terms are often confused, but they refer to two different components that work together.
- Valley Liner is a self-adhering waterproof membrane, typically rubberized asphalt, installed directly onto the roof deck as the first layer of protection. It bonds to the decking and must extend at least 24 inches onto the decking of both intersecting roof planes.
- Valley Metal, also called valley flashing, is the pre-formed metal channel installed on top of the liner. It creates the visible V-shaped channel that directs water flow and is typically installed before shingles are laid.
The valley liner is the backup, and the valley metal is the primary water management system. Both are required for a properly waterproofed valley.
Roof Valley Materials: Which One Should You Choose?
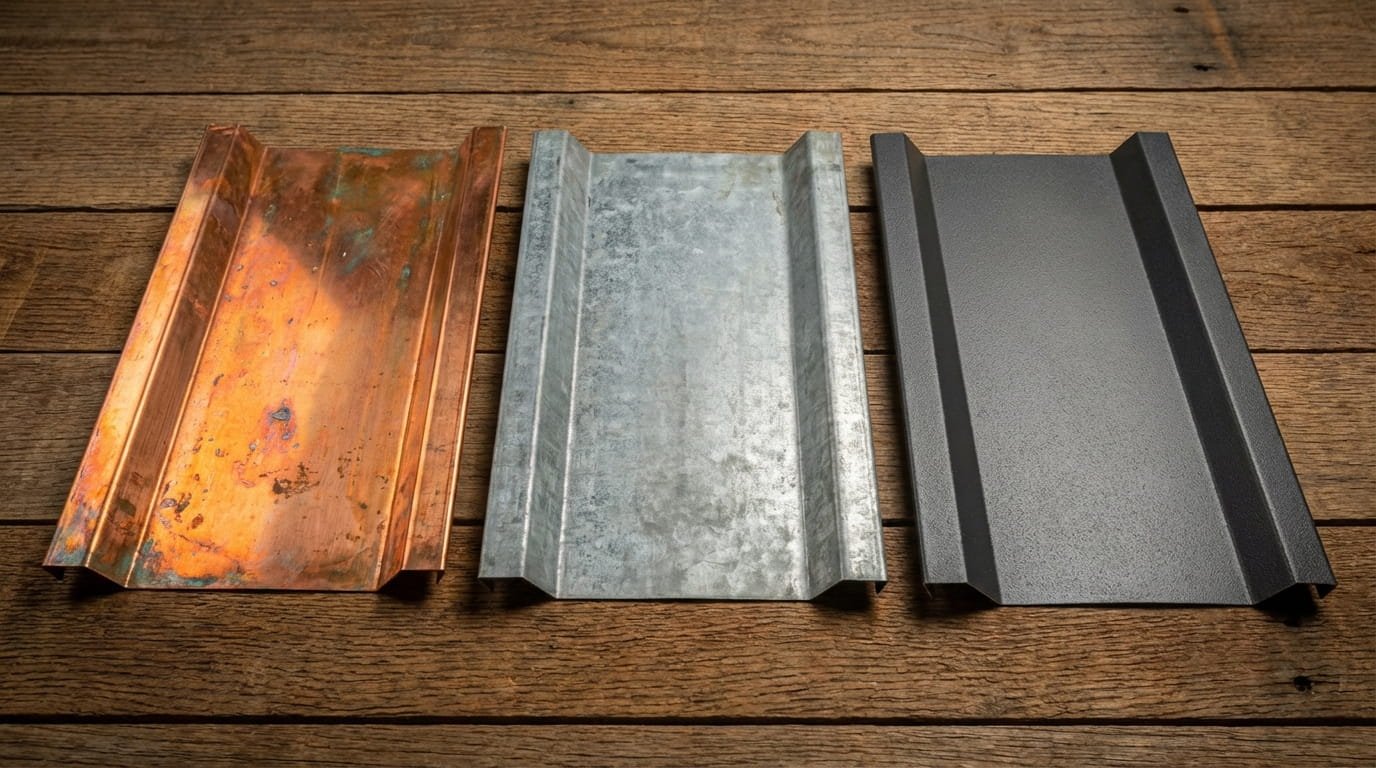
The metal used for valley flashing significantly affects both the performance and longevity of the valley. Here is a comparison of the most common options:
| Material | Lifespan | Cost | Best For |
|---|---|---|---|
| Galvanized Steel | 20–30 years | Low–Medium | Most residential roofs |
| Aluminum | 20–30 years | Medium | Coastal areas, lightweight applications |
| Copper | 50+ years | High | Premium roofs, historic homes |
| Lead | 50+ years | High | UK and European installations |
| Tin | 20–25 years | Low | Budget installations, older homes |
| Stainless Steel | 30–50 years | High | High-corrosion environments |
Valley Flashing Width: What Size Do You Need?
Valley flashing width is not one-size-fits-all. The correct width depends on the roof pitch and the expected water volume.
| Roof Pitch | Minimum Valley Width |
|---|---|
| Low slope (2:12 – 4:12) | 24 inches minimum |
| Standard slope (4:12 – 8:12) | 18–24 inches |
| Steep slope (8:12 and above) | 16–18 inches |
Most residential installations use 24-inch wide valley flashing as a standard. In high-rainfall regions or on low-slope roofs, wider flashing of 28–36 inches provides additional protection.
Valley Flashing Underlayment
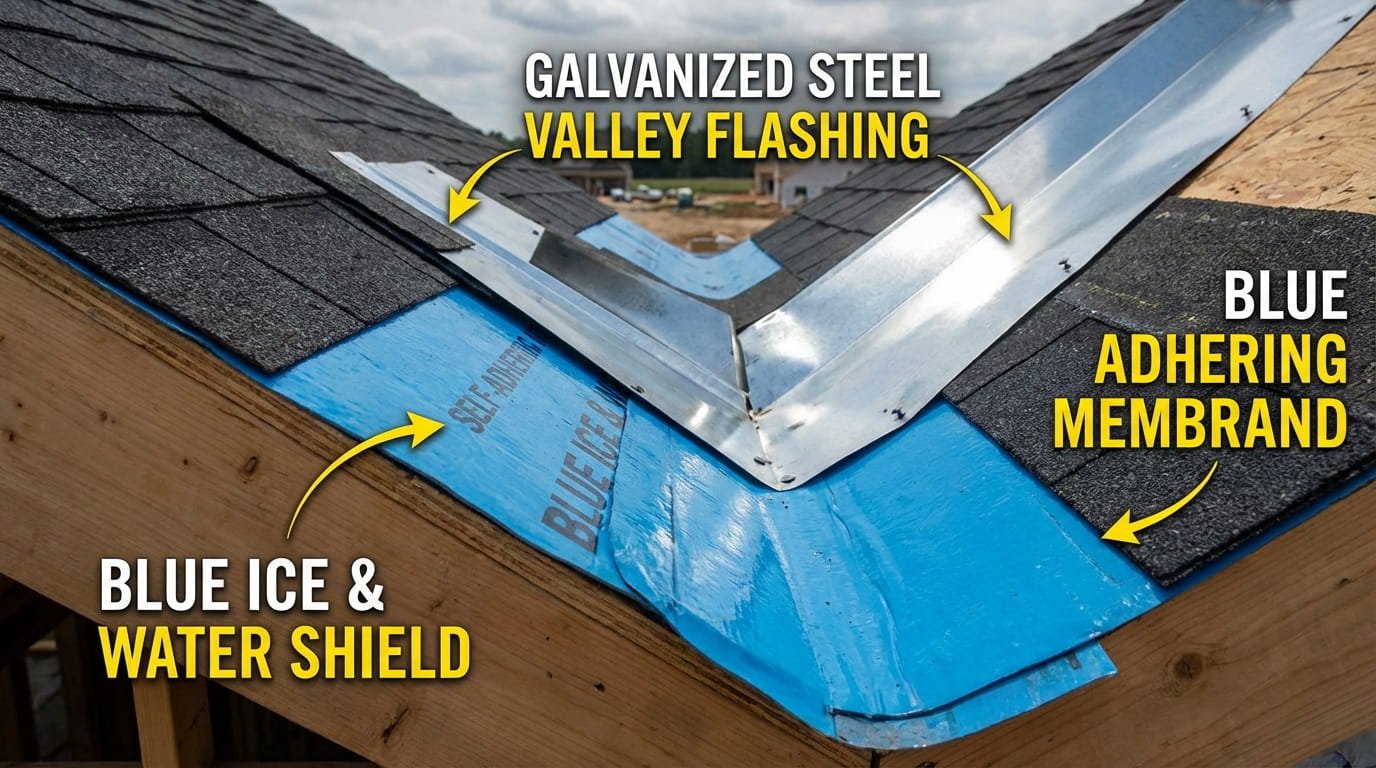
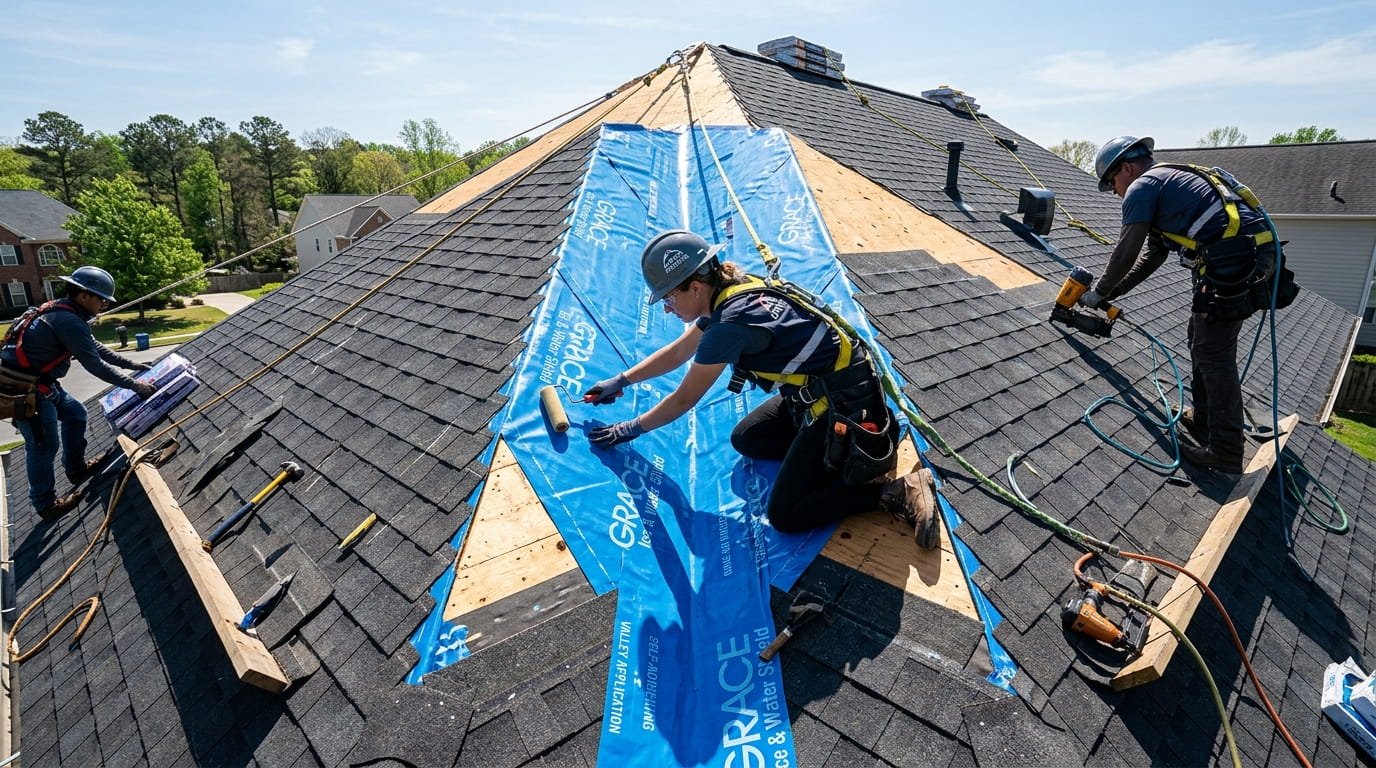
The underlayment beneath valley flashing is arguably the most important component in the entire valley assembly. Even if the flashing fails, a properly installed underlayment prevents water from reaching the roof deck. Ice and Water Shield is the gold standard for valley underlayment:
- Bonds directly to the roof deck without nails or fasteners
- Self-seals around any fasteners that penetrate it
- Remains flexible in extreme cold
- Resists water infiltration even under standing water conditions
- Must run the full length of the valley and extend at least 24 inches onto each intersecting roof plane
Types of Valley Flashing: Complete Guide
Valley flashing is not a single product, it comes in several types, each suited to different roofing materials, applications, and budgets.
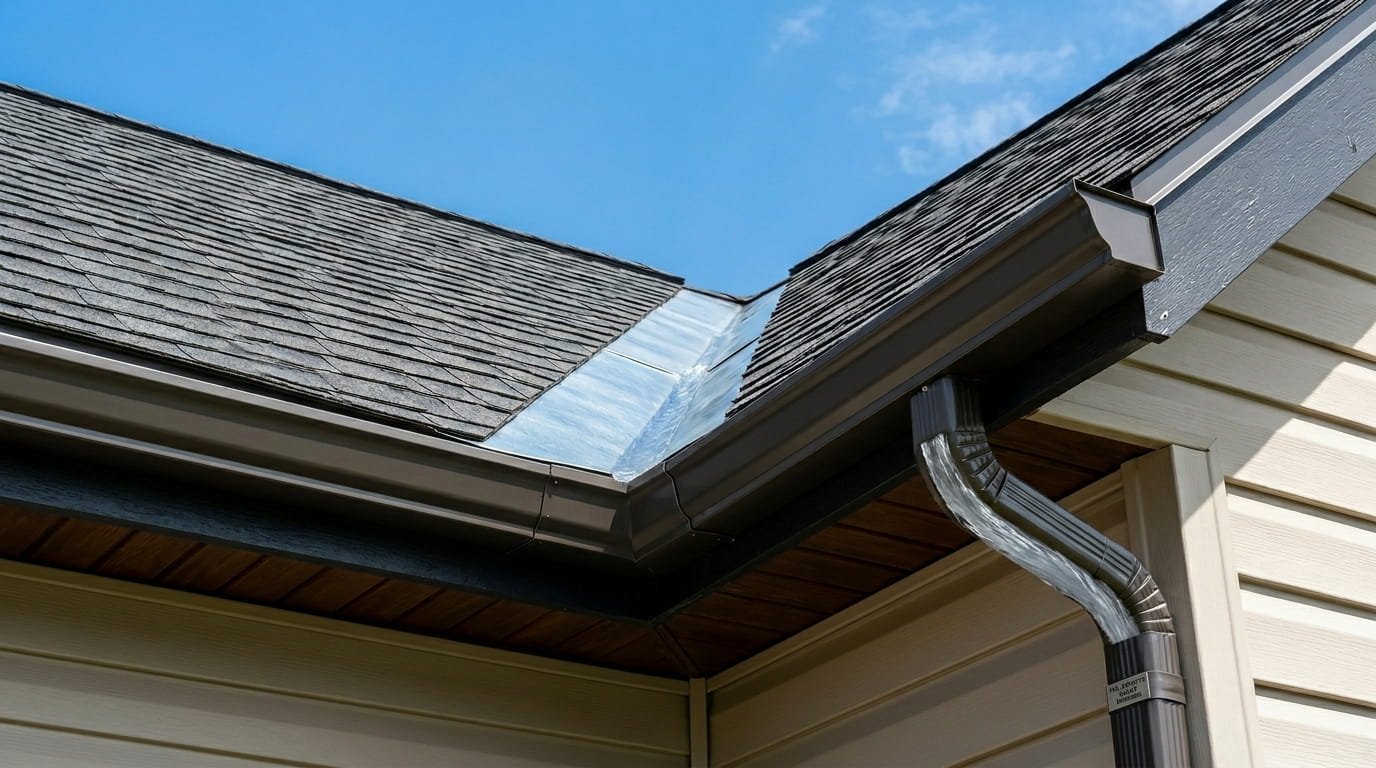
Open Valley Flashing
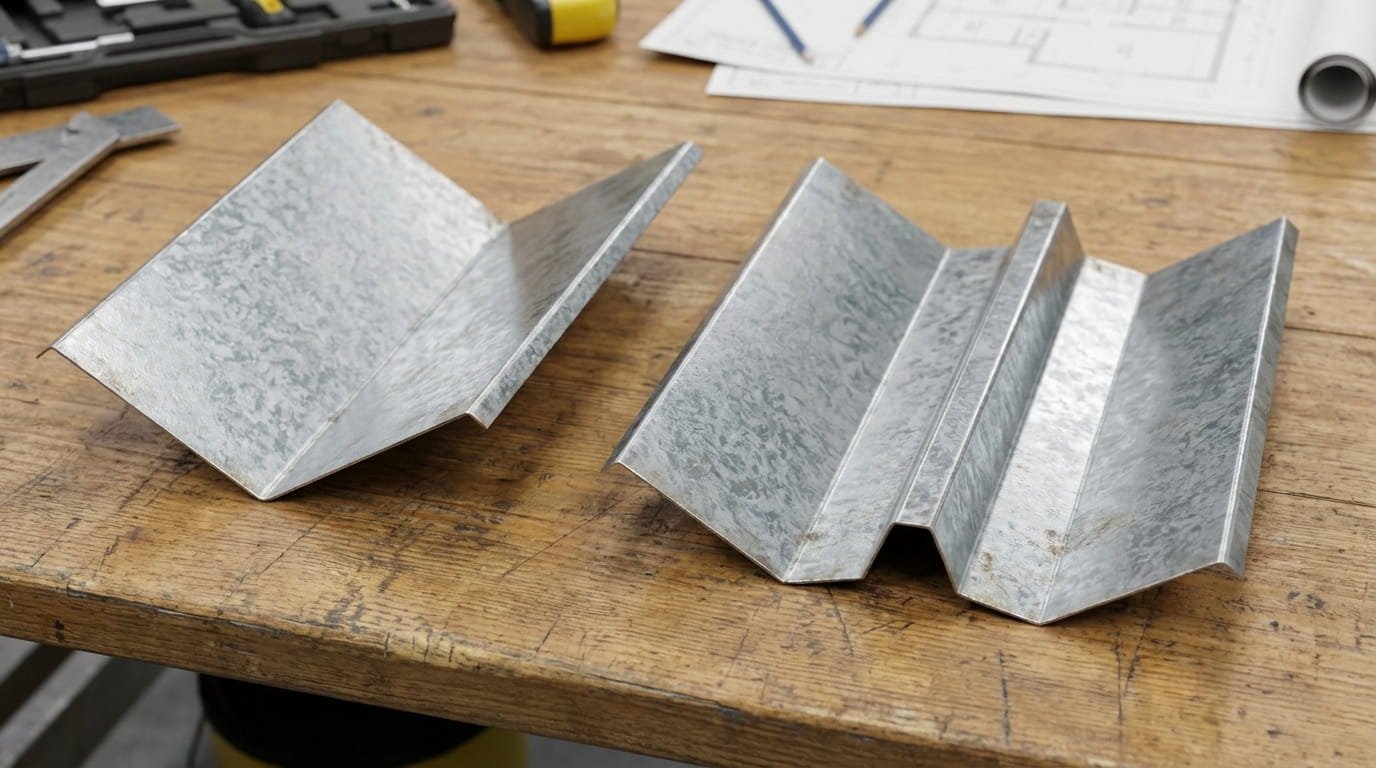
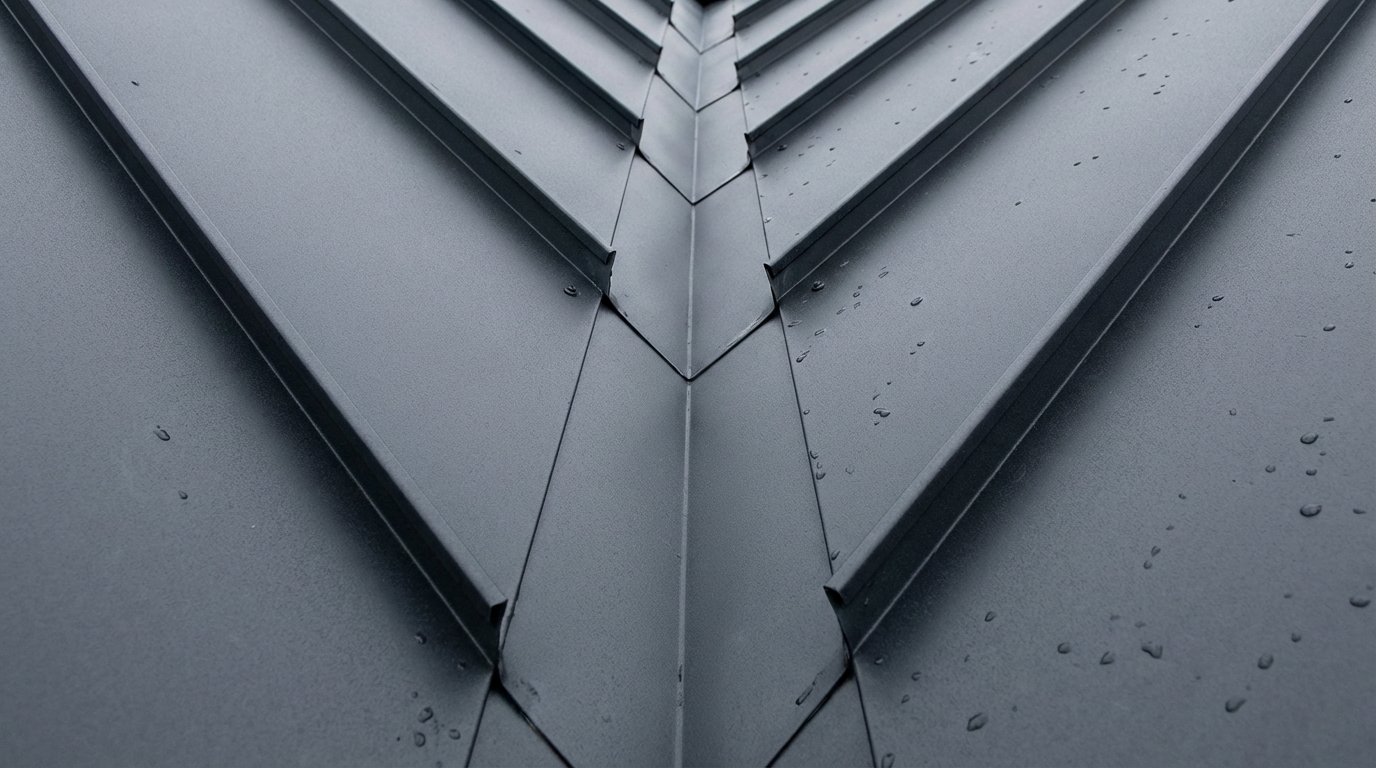
Open valley flashing is the standard metal channel used in open valley installations. It is pre-formed into a V or W shape and installed over the ice and water shield underlayment. The W-shape includes a raised center rib that prevents water from one side crossing over to the other during heavy rainfall.
- Minimum 24-gauge metal thickness required
- Centered and running continuously from eave to ridge
- Fastened only along the outer edges, never through the valley center
- Minimum 6-inch overlap at any horizontal joints, sealed with roofing sealant
Hidden Valley Flashing
Hidden valley flashing is installed beneath shingles in closed valley systems. The metal flashing is present but completely covered by the overlapping shingles above. The advantage is a clean, uninterrupted appearance. The disadvantage is that problems cannot be spotted during a visual inspection, they only reveal themselves when water appears inside the home.
Valley Flashing for Tile Roof
Tile roofs require specialized valley flashing due to the weight and rigidity of the tiles:
- Wider flashing required, minimum 24 inches, often 28–36 inches
- Thicker gauge to support the weight of tiles at the valley edges
- Additional mortar bed or clip system may be required to secure tiles without cracking them
- Typically features higher side ribs to contain water under the tile overhang

Tile roofs require wider, heavy-gauge flashing for maximum durability.
Valley Flashing for Metal Roof
Metal roofs require valley flashing made from the same or compatible metal to prevent galvanic corrosion. Using dissimilar metals, for example copper flashing with aluminum panels, causes electrochemical reactions that rapidly deteriorate both materials. Key requirements include matching metal type and gauge, a concealed clip fastening system to allow for thermal expansion, and hemmed edges that prevent water from running sideways under the panels.
Valley Flashing Tape: When to Use It
Valley flashing tape is a self-adhesive butyl or rubberized asphalt tape used to seal seams and joints. It is not a substitute for full flashing, rather a supplementary sealing product used at horizontal lap joints, edges where flashing meets shingles, transitions between valley and step flashing, and repair situations where a small section has separated. High-quality valley flashing tape maintains adhesion from -20°F to 200°F and resists UV degradation.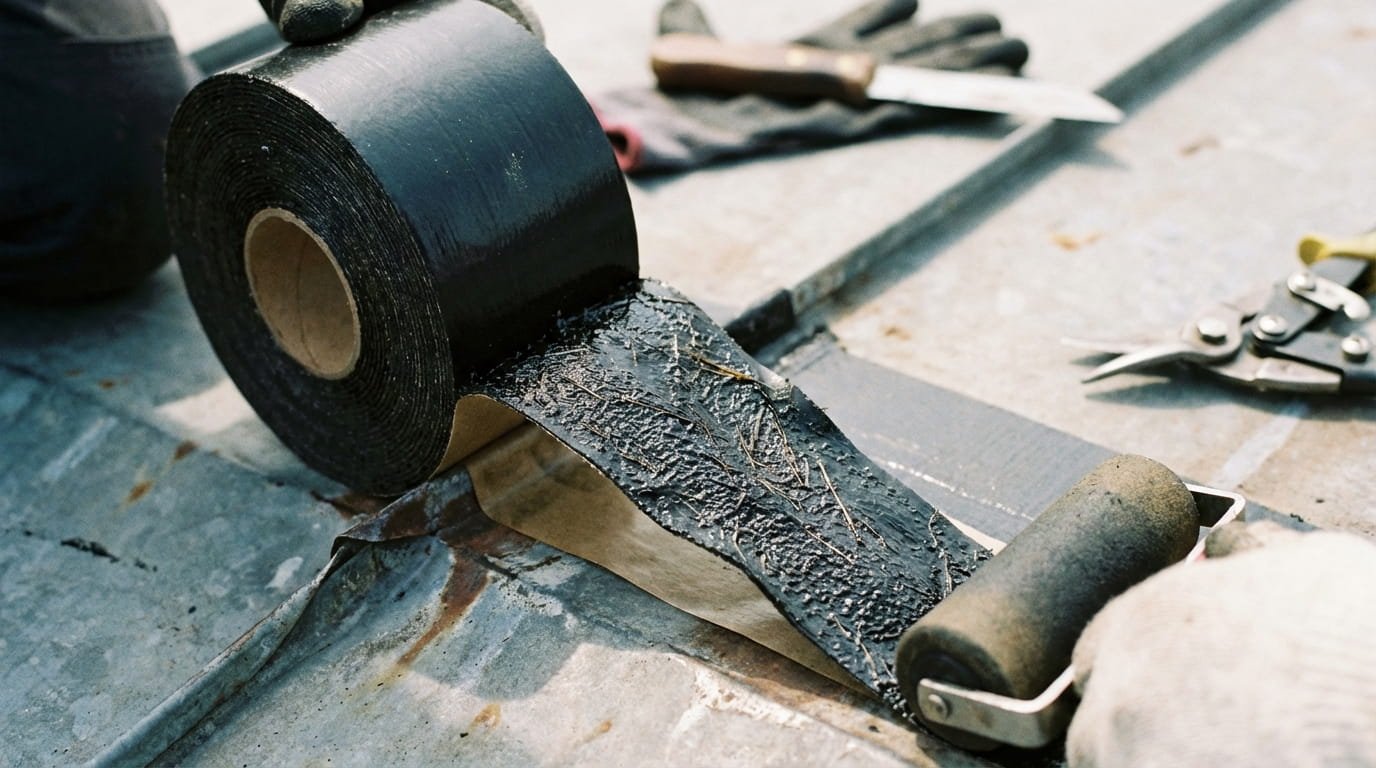
Valley Flashing Detail and Specifications
A properly detailed valley flashing assembly from bottom to top includes:
- Clean, dry roof decking
- Ice and water shield membrane, full length of valley, 24 inches onto each plane
- Standard synthetic underlayment over the rest of the roof field
- Pre-formed metal valley flashing, centered, fastened at outer edges only
- Shingles trimmed and installed with corners clipped at the valley edge
- Minimal urethane sealant at critical lap joints
All nails must stay at least 6 inches from the valley centerline to avoid creating penetration points in the primary water channel. This is non-negotiable and applies to all valley types.
Valley Capping vs Flashing: Key Difference
Valley Flashing is the metal installed inside the valley channel, actively directing water flow down and away. Valley Capping refers to the covering material applied over the peak where two roof sheets meet at a ridge, covering and sealing a joint rather than actively directing water. In simple terms: flashing channels water, capping covers and seals joints.
Valley Flashing vs Apron Flashing
Valley flashing is installed in the valley, the internal angle where two sloping planes meet. Apron flashing, also called base flashing, is installed at the base of a vertical wall or headwall where a roof plane meets a wall surface. The key functional difference: valley flashing manages lateral water flow between two sloping planes, while apron flashing manages the transition between a horizontal roofing surface and a vertical wall.
How to Choose the Right Roof Valley Type
With six valley types and multiple flashing options, how do you know which is right for your home? Use this practical decision framework:
By Climate
| Climate Type | Recommended Valley | Reason |
|---|---|---|
| Heavy rain / wet climate | Open valley | Maximum drainage capacity |
| Heavy snow | Open or closed with full ice and water shield | Prevents ice dam backup |
| Dry / arid climate | Any type | Lower water volume, more flexibility |
| High wind zone | Closed cut | Sealed edges resist wind-driven rain |
| Coastal / salt air | Open with aluminum flashing | Corrosion resistance |
By Roofing Material
| Roofing Material | Best Valley Type |
|---|---|
| Asphalt shingles (3-tab) | Woven or closed cut |
| Asphalt shingles (architectural) | Closed cut or California cut |
| Metal roofing | Open with matching metal flashing |
| Slate or tile | Open valley with heavy gauge flashing |
| Cedar shake | Open valley |
At-a-Glance Comparison Table
| Valley Type | Appearance | Drainage | Durability | Cost | Maintenance |
|---|---|---|---|---|---|
| Open | Metal visible | Excellent | Excellent | High | Low |
| Closed Cut | Seamless | Good | Good | Medium | Medium |
| Woven | Textured | Good | Good | Medium | Medium |
| California Cut | Clean line | Very Good | Very Good | Medium | Low |
| Dead Valley | N/A (avoid) | Poor | Poor | High to repair | High |
| Flat Valley | N/A | Poor without membrane | Depends | High | High |
Roof Valley Cost: What to Expect

Roof valley costs vary depending on the valley type, materials, roof complexity, and labor rates in your area. Here is a realistic breakdown:
Cost Per Linear Foot by Valley Type
| Valley Type | Material Cost | Labor Cost | Total Per Linear Foot |
|---|---|---|---|
| Woven valley | $2–4 | $6–8 | $8–12 |
| Closed cut valley | $3–5 | $7–10 | $10–15 |
| Open valley (galvanized steel) | $5–8 | $10–17 | $15–25 |
| Open valley (copper) | $15–25 | $10–17 | $25–42 |
Valley Flashing Replacement Cost
- Repointing only (replacing cement, reusing existing flashing): $90–$225
- Full valley flashing replacement (new metal and labor): $400–$675 per valley
- Complete valley rebuild (flashing, underlayment, and shingles): $600–$1,200 per valley
Valley Flashing Price by Material
- Galvanized steel: $1.50–$3.00 per linear foot
- Aluminum: $2.00–$4.00 per linear foot
- Copper: $8.00–$15.00 per linear foot
- Lead: $5.00–$10.00 per linear foot
These are material-only prices. Always factor in labor, underlayment, and any associated shingle work when budgeting for valley repairs or replacement. Always get at least three written quotes from licensed contractors before committing.
Roof Valley Maintenance and Common Problems
Proper maintenance dramatically extends the life of your roof valleys and prevents the costly leaks and structural damage that come from neglect.
Roof Valley and Gutter: How They Work Together
Your roof valley and gutter system are directly connected. The valley collects and channels water, and the gutter carries it away from your home’s foundation. For this system to work properly:
- Gutters must be sized adequately for the water volume your valley delivers
- The valley must align directly with a downspout location wherever possible
- Gutters must be kept clear so that backed-up water cannot travel up into the valley
- A clogged gutter is one of the most common indirect causes of roof valley leaks
Common Valley Problems
- Debris Accumulation: Leaves, twigs, and granules collect naturally at the lowest point of the valley. This debris blocks water flow, creating standing water that accelerates deterioration of both shingles and flashing.

Debris accumulation is the #1 cause of premature valley failure. - Ice Dams: In cold climates, snow accumulates in valleys and undergoes repeated freeze-thaw cycles. The resulting ice dams force meltwater under shingles and flashing, causing leaks that typically appear in spring, long after the damage occurred.
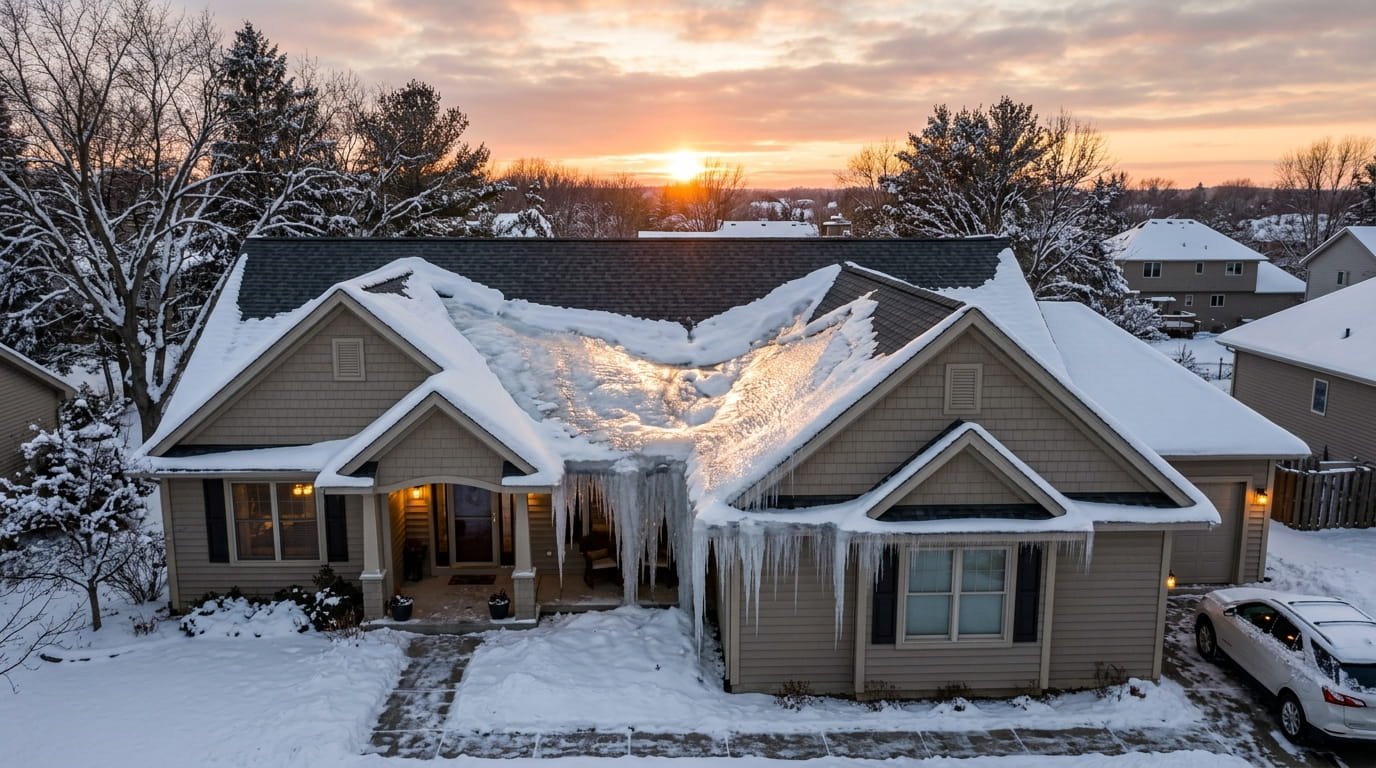
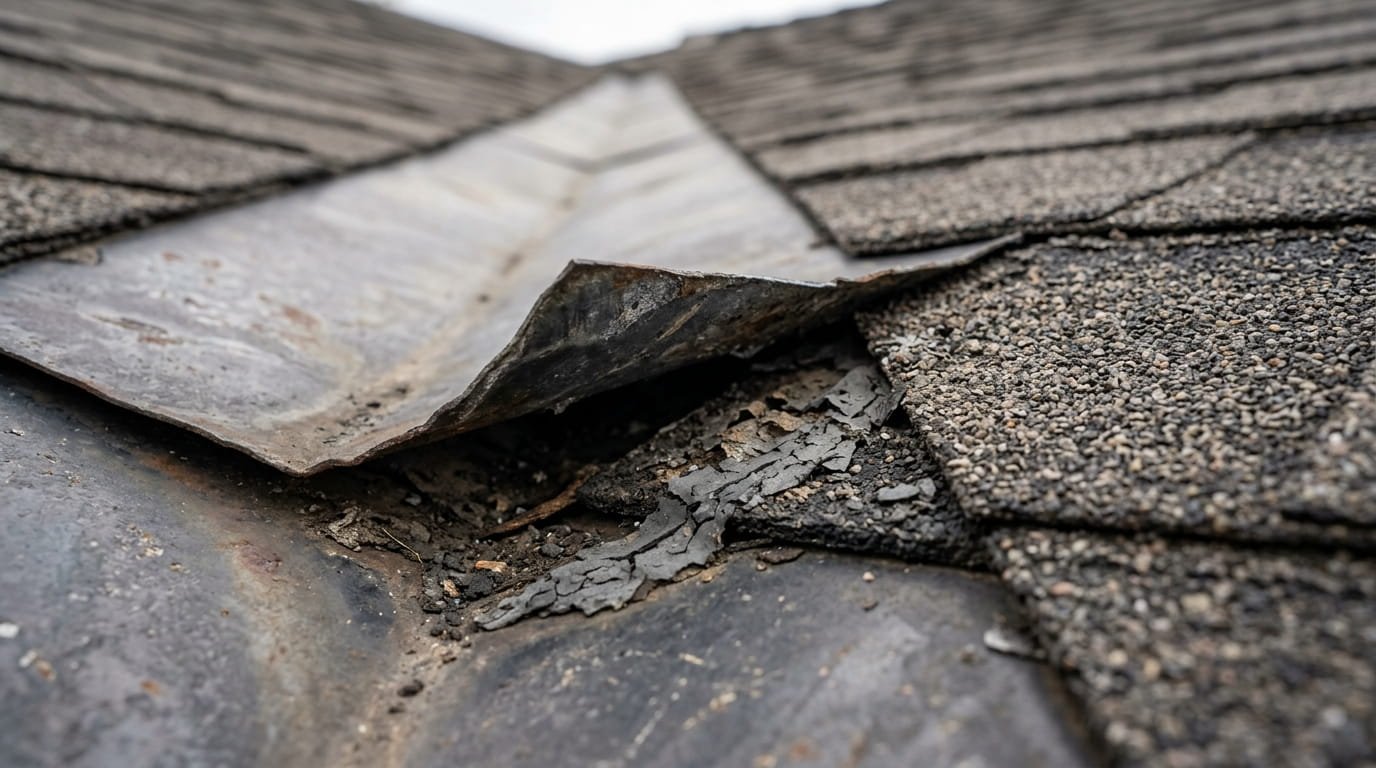
Ice dams can force water under your shingles, leading to spring leaks. - Flashing Separation: Thermal expansion and contraction causes metal flashing to move seasonally. Over time, this loosens fasteners and creates gaps between the flashing and adjoining shingles.
- Sealant Failure: Standard latex and silicone caulks break down rapidly under UV exposure and temperature stress. Only premium urethane or polymer-based roofing sealants should be used in valley applications.
Ensure your gutters are sized to handle the water volume from the valley.
Maintenance Schedule
| Season | Maintenance Task |
|---|---|
| Spring | Inspect for ice dam damage, check flashing for separation, clear winter debris |
| Summer | Check sealant condition, trim overhanging branches |
| Fall | Clear leaves monthly, inspect gutter alignment, prepare for winter |
| Winter | Monitor for ice dam formation, inspect attic for condensation or water entry |
| After storms | Full visual inspection, focus on shingles, flashing, and gutters |
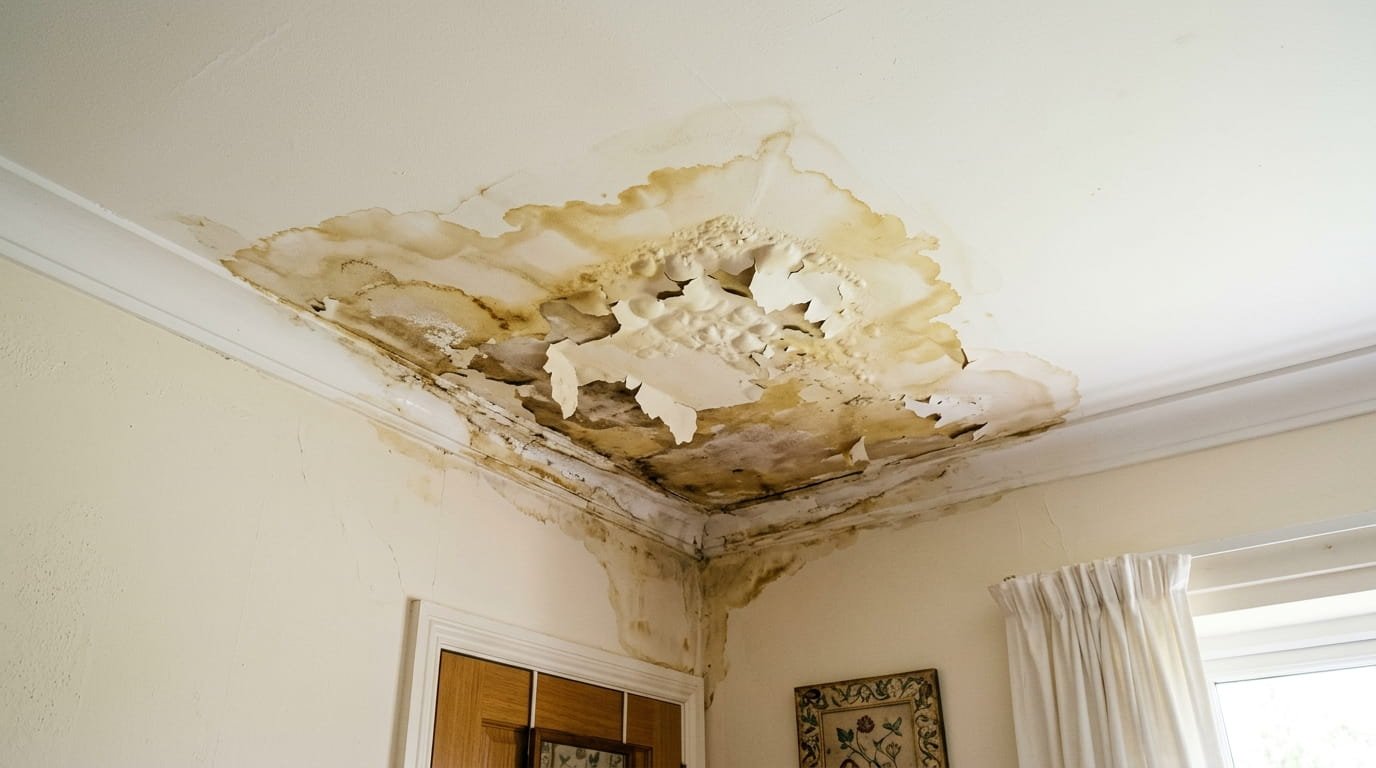
Signs Your Roof Valley Is Leaking
Roof valley leaks often develop slowly, giving homeowners warning signs well before serious damage occurs. Know what to look for:
Inside the Home
- Water stains on ceilings directly below valley intersections, yellow, brown, or dark circular stains
- Mold or mildew odor in the attic
- Visible moisture or daylight in the attic near valley areas
On the Roof Surface
- Missing granules or erosion along shingle edges near the valley
- Cracked, curled, or lifted shingles at valley edges
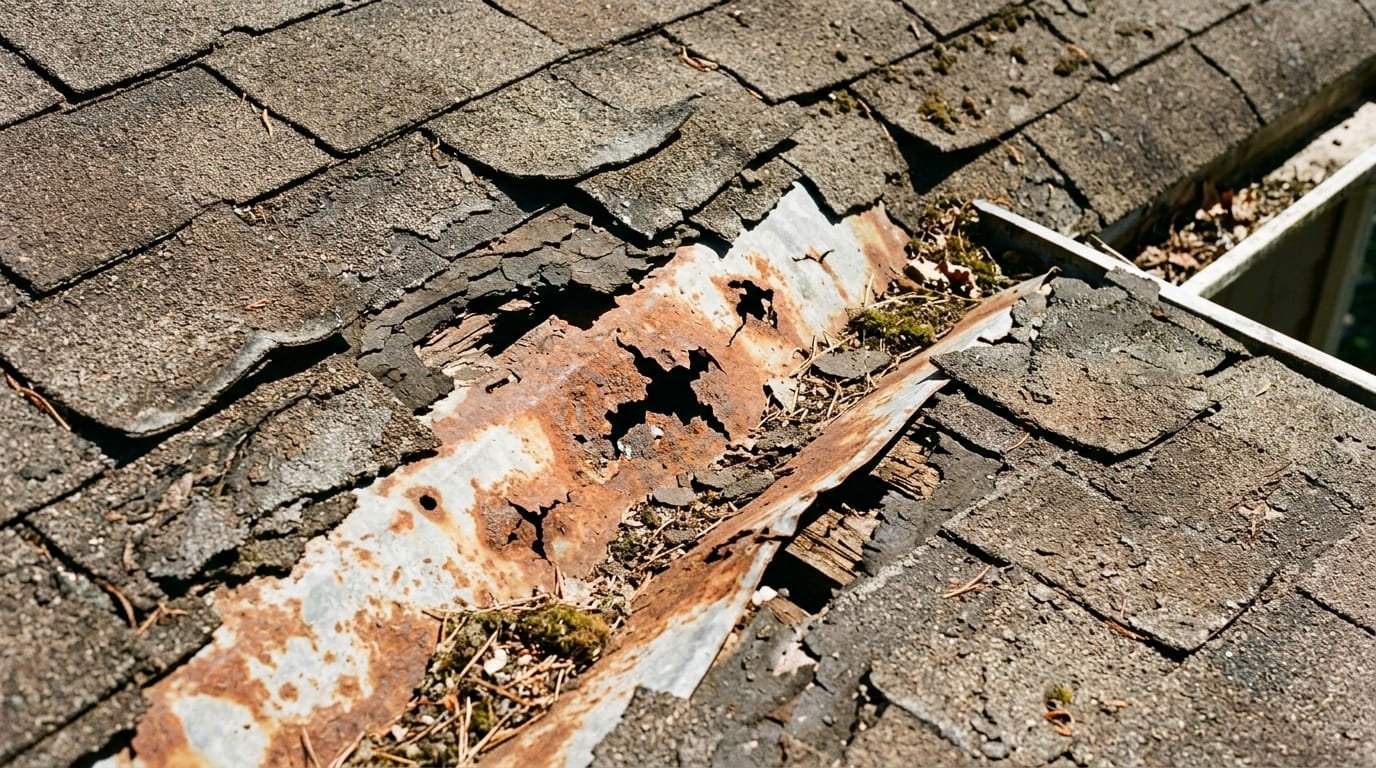
- Rust stains streaking from metal flashing onto surrounding shingles
- Visible gaps or separation between flashing and shingles
- Bent, displaced, or corroded metal flashing
Any standing water in a valley 24 hours after rain, multiple missing shingles near the valley, or interior water stains that correspond to valley locations require immediate professional assessment. Water damage spreads rapidly once it gets past the valley flashing.
Roof Valley Repair Options
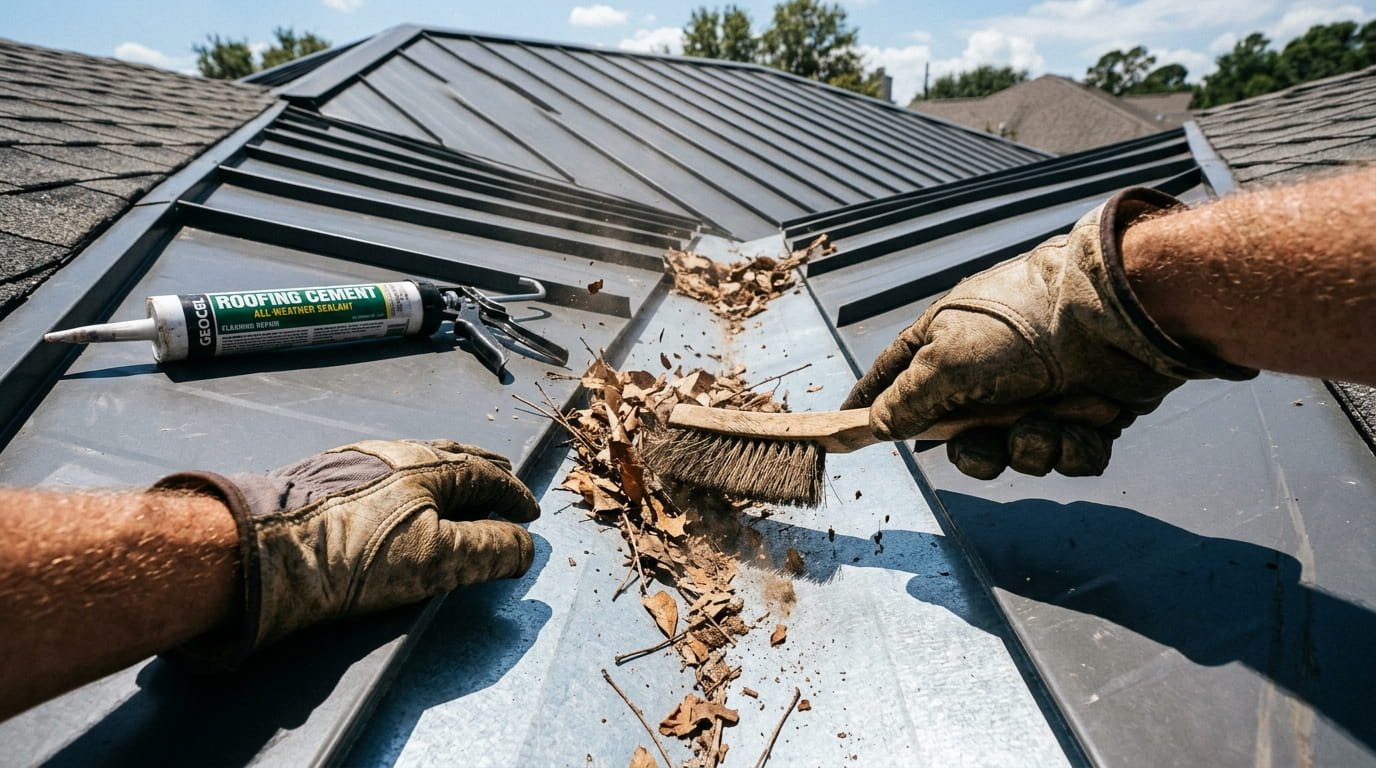
- Clearing debris from the valley channel
- Resealing lifted shingle edges with roofing cement
- Applying fresh sealant at flashing joints that have opened slightly
- Underlayment failure, requires full replacement
- Flashing replacement for corrosion or significant damage
- Dead valley correction, building a cricket
Open Valley vs Closed Valley: Which Is Better?
This is the most common question homeowners ask about roof valleys. The honest answer is that neither is universally better, each excels in different circumstances.
| Factor | Open Valley | Closed Valley |
|---|---|---|
| Water drainage | Excellent | Good |
| Appearance | Metal visible | Seamless shingles |
| Lifespan | 25–50 years | 15–25 years |
| Maintenance | Easy to inspect | Harder to inspect |
| Cost | Higher | Lower |
| Best climate | Heavy rain/snow | Moderate/dry |
| Material compatibility | All types | Asphalt shingles mainly |
| DIY repair | Harder | Easier |
- You live in a high-rainfall or heavy-snow region
- You prioritize long-term durability over aesthetics
- Your roof uses heavy materials like slate or tile
- You want a valley that is easy to inspect and maintain
- Appearance is your top priority
- You are in a moderate climate
- You are working with standard asphalt shingles
- Budget is a primary concern
Frequently Asked Questions About Roof Valleys
What is a roof valley?
A roof valley is the internal V-shaped angle formed where two sloping roof sections meet. It channels rainwater and snowmelt from both roof planes toward the gutters. Because it handles the combined water load of two roof sections, the valley is the highest-stress and most water-exposed area of any pitched roof.
What is the opposite of a roof valley?
The opposite of a roof valley is a roof ridge. A ridge is the external peak at the top of a roof where two slopes meet at their highest point. Water flows away from a ridge in both directions, while water flows toward and through a valley.
What goes in a roof valley?
A properly constructed roof valley contains multiple layers: a clean roof deck, a self-adhering ice and water shield underlayment extending at least 24 inches onto each roof plane, pre-formed metal valley flashing centered over the underlayment, and shingles trimmed and installed with their corners clipped at the valley edges.
What is a dead valley on a roof?
A dead valley forms where a roof plane meets a vertical wall or chimney rather than another sloping plane, creating a flat or near-flat area where water cannot drain by gravity. Dead valleys are dangerous because standing water continuously saturates the decking and flashing. The professional solution is to build a cricket, a small peaked structure that redirects water away from the flat zone.
What is the most durable roof valley type?
Open valleys with copper flashing are the most durable, with lifespans exceeding 50 years. Open valleys with galvanized steel or aluminum flashing are the most practical long-term choice for most homeowners, offering 25–50 years of service with proper maintenance.
How much does it cost to replace a roof valley?
A full valley flashing replacement typically costs $400–$675 per valley for materials and labor. A complete valley rebuild including new underlayment and shingles ranges from $600–$1,200 per valley. Valley flashing replacement alone, without disturbing the shingles, costs $90–$225 for repointing work.
What is hidden valley flashing?
Hidden valley flashing is metal flashing installed beneath shingles in a closed valley system. The metal provides waterproofing protection but is completely concealed by the overlapping shingles. While it maintains the clean appearance of a closed valley, it cannot be visually inspected without removing shingles.
What is the difference between a valley liner and valley metal?
A valley liner is the self-adhering waterproof membrane installed directly on the roof deck as the first layer of protection. Valley metal, also called valley flashing, is the pre-formed metal channel installed on top of the liner that actively directs water flow. Both components are required: the liner is the backup protection, and the valley metal is the primary drainage system.
Do I need valley flashing?
Yes. Valley flashing is not optional, it is an essential component of any properly waterproofed roof valley. Without flashing, water will infiltrate the valley joint, causing rot, mold, and structural damage. Building codes in most jurisdictions require valley flashing, and most roofing manufacturer warranties specify approved flashing methods.
How do I know if my roof valley is leaking?
The most common signs are water stains on the ceiling or walls below the valley, mold or mildew odor in the attic, missing granules or erosion along the shingle edges near the valley, rust stains on surrounding shingles, and visible gaps between the flashing and shingles. If you notice any of these signs, have the valley professionally inspected immediately. Water damage spreads quickly once it gets past the valley flashing.
Conclusion

The roof valley is not just one part of your roof, it is the part that determines how well your entire roofing system manages water. A properly installed valley with the right materials, adequate underlayment, and correct flashing can last decades without issue. A poorly constructed valley will fail regardless of how good the rest of the roof is.
Whether you are choosing between open and closed valley styles, deciding on flashing materials, or investigating an existing leak, the principles are the same: use quality materials, install them correctly, and inspect them regularly. Use the maintenance schedule in this guide every season and address small issues before they become expensive structural problems.
If you suspect your roof valleys are compromised, or if you are planning a new roof installation, contact us for a professional valley assessment. Our technicians specialize in valley construction and can identify problems before they become expensive repairs. A professional roof inspection typically costs $100–$300 and can save you thousands by giving you an accurate diagnosis before you spend money in the wrong direction.