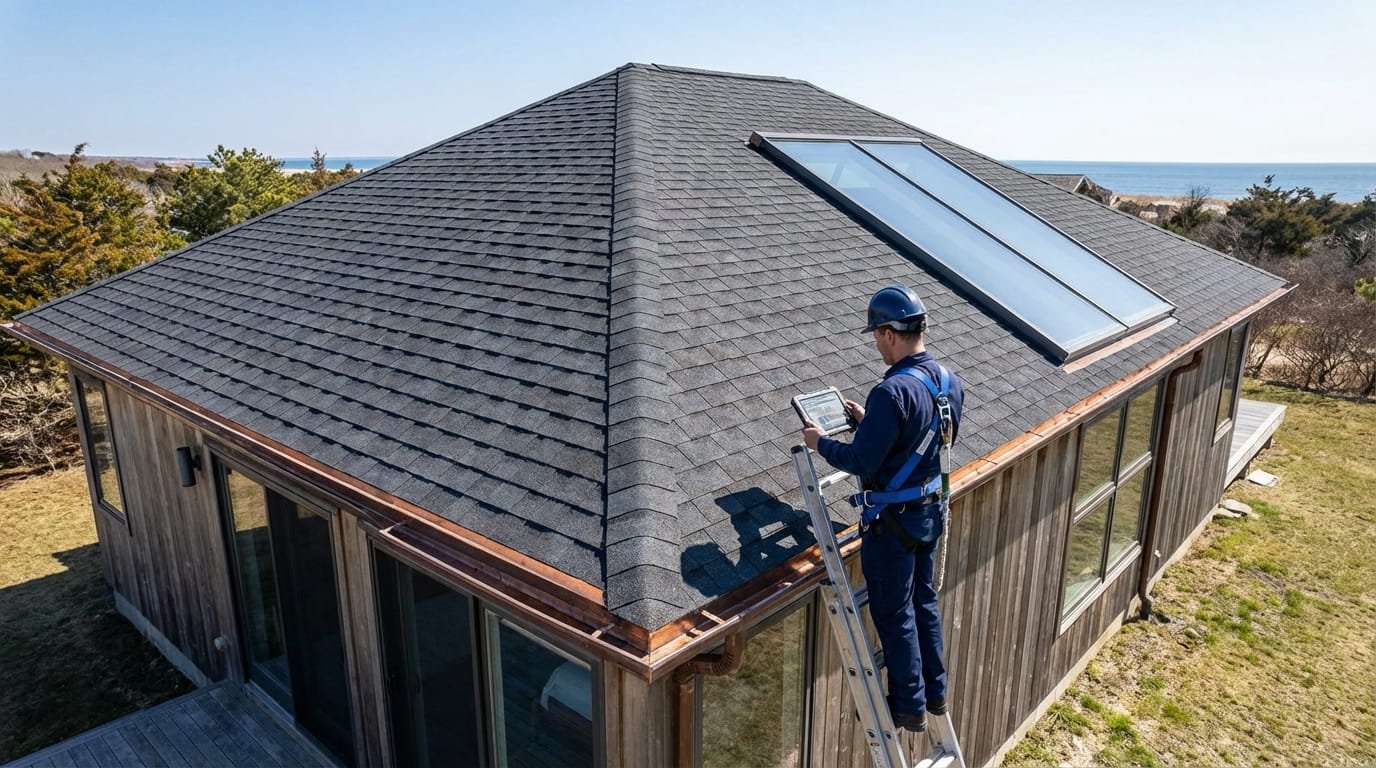
When your roof shows signs of damage, the first question that runs through most homeowners’ minds is: how bad is this? But the more useful question, the one that leads to better financial decisions, is: is this repairable, or has it crossed into replacement territory?
At the same time, some homeowners patch and repair repeatedly on aging roofs, spending more cumulatively than a single replacement would have cost. Knowing the difference is everything.
This guide breaks down every major type of roof damage by repairability, includes a clear decision framework, provides typical repair costs, and tells you when DIY is reasonable versus when you need a licensed professional.
The Repairability Framework: 4 Factors That Decide
Before diving into specific damage types, here is the universal framework for evaluating whether any roof damage is repairable. Every scenario below can be filtered through these four factors:
Isolated damage, confined to a single area, one section, or a specific penetration point, is almost always repairable regardless of damage type. Widespread damage affecting 30% or more of the total roof surface almost always indicates that replacement is the smarter long-term investment, even if individual patches could technically be applied.
Under 10 years old: repair is almost always the right financial decision, even for moderate damage.
10–20 years old: depends on damage type and extent, evaluate case by case.
Over 20 years old: even for technically repairable damage, replacement may be smarter. You are repairing a roof that will need full replacement within 5–10 years anyway, and repair costs add up.
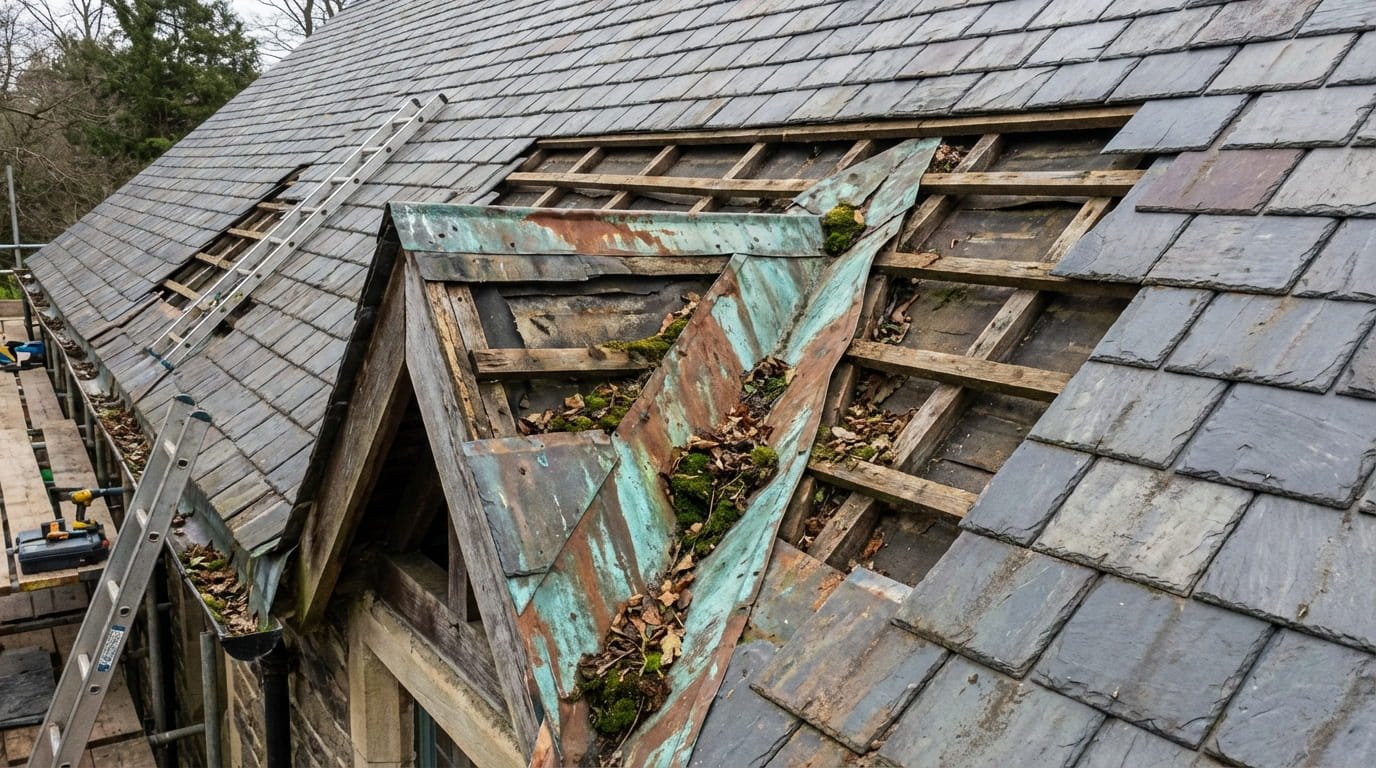
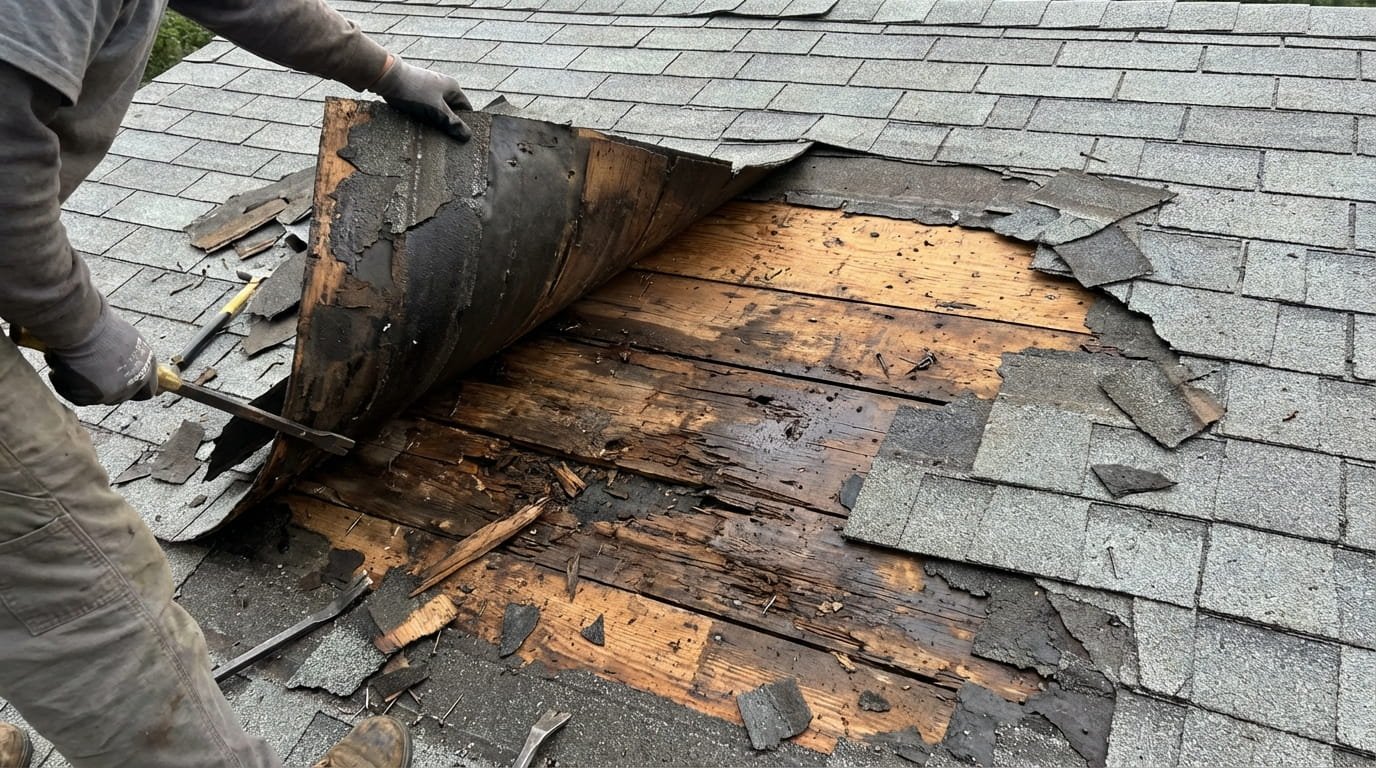
This is the most critical distinction in roof repair. Surface damage (shingles, flashing, sealant, gutters, vent boots) is almost always repairable, often at low cost. Structural damage (roof decking rot, rafter failure, widespread sagging, mold throughout attic insulation) crosses the replacement threshold in most cases. A roof can have significant-looking surface damage that is entirely repairable, while a roof with modest visual damage may have hidden structural problems. This is why professional inspection matters.
If the cost of repairing the damage exceeds 30% of the full replacement cost of your roof, replacement is almost always the better financial decision. Spending $5,000 on repairs to a roof that costs $15,000 to replace may not be justified, especially if the roof is already 15+ years old and will likely require additional repairs within the next few years.
| Evaluation Factor | Repair Signal | Replace Signal |
|---|---|---|
| Damage scope | Isolated, one area or penetration point | Widespread, 30%+ of roof surface |
| Roof age | Under 15 years with limited history of repairs | Over 20 years, or 15–20 with repeated repairs |
| Damage layer | Surface only (shingles, flashing, sealant) | Structural (decking rot, rafter damage, sagging) |
| Cost comparison | Repair cost <30% of replacement cost | Repair cost >30% of replacement cost |
| Repair history | First or second repair in roof’s life | Multiple repairs in past 3–5 years |
If you have paid for roof repairs twice in the past three years and the same areas are leaking again, you may be in the “repair trap,” spending cumulatively more on patches than a replacement would cost. A complete roof inspection will tell you whether you are approaching the replacement threshold.
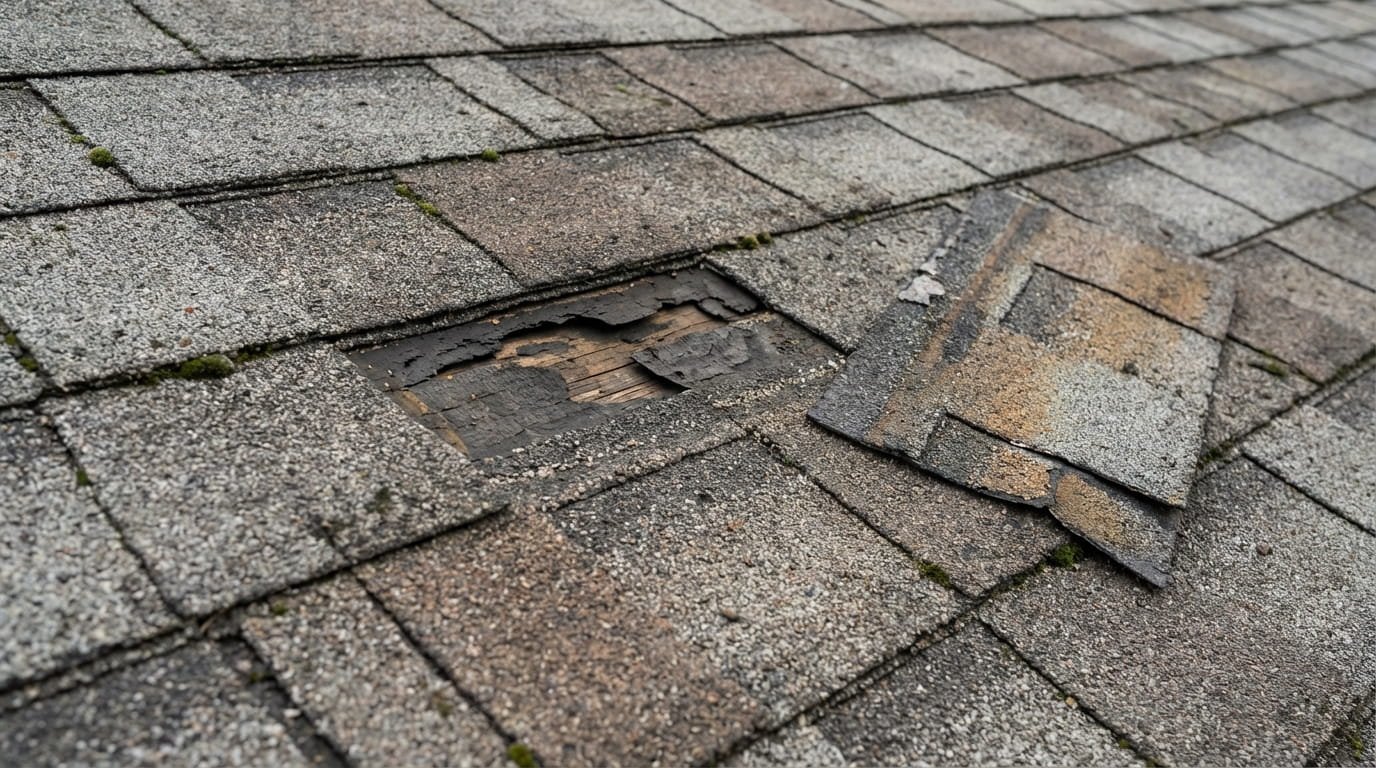
Shingles are your roof’s first layer of defense and the most commonly damaged component. The good news: most shingle damage is repairable, particularly when caught early.
Types of Shingle Damage and Their Repairability
- Missing shingles: highly repairable. A roofing contractor can replace individual or small groups of missing shingles in a few hours. The key is acting before rain infiltrates the exposed underlayment.
- Cracked shingles: repairable with roofing cement for minor cracks; replacement of individual shingles for significant cracking. Cost: $150–$400 for a small area. (See our guide on how much a pack of shingles costs.)
- Curling or cupping shingles: early-stage curling can be re-secured with roofing cement. Widespread curling indicates the shingle layer is reaching end of life, and replacement is approaching.
- Granule loss: isolated granule loss from impact (hail, debris) is repairable by replacing affected shingles. Widespread granule loss throughout the roof means the shingles are aging systemically, a sign the whole roof is nearing replacement.
- Blistering: bubbles or holes from heat exposure. Replace affected shingles, then address the ventilation root cause (see UV/Heat Damage section below).
The Color-Match Problem
Here is something most roofing articles skip: replacing a few shingles on a roof that is 5+ years old almost always results in visible color mismatch. Asphalt shingles fade and weather over time, and new shingles from the same product line will look noticeably different from the aged surrounding shingles. This is primarily a cosmetic concern, the repair is still structurally sound, but it matters if you are selling the home within the next few years. Options include replacing a larger, visually complete section to minimize the patchwork appearance, or accepting the mismatch and disclosing it to buyers.
| Shingle Issue | Repairable? | Avg Repair Cost | DIY Possible? | Replace Instead If… |
|---|---|---|---|---|
| Missing shingles (1–5) | Yes | $150 – $400 | Careful DIY on low pitch | More than 20% of roof affected |
| Cracked shingles | Yes | $150 – $500 | With experience | Cracking is widespread throughout |
| Curling edges (early) | Yes | $100 – $300 | Yes, roofing cement | Curling is widespread, roof aging |
| Granule loss (isolated) | Yes | $200 – $600 | No, need shingle match | Gutters full of granules consistently |
| Blistering from heat | Yes + fix ventilation | $200 – $600 | No | More than 25% of surface affected |
Roof leaks are the damage type that triggers the most homeowner panic, often unnecessarily. The majority of roof leaks have specific, locatable sources and are entirely repairable. The variable that determines repairability is how long the leak has been active before it was addressed.
The Leak Travel Problem: Why the Drip Is Never Where the Entry Is
Water entering a roof rarely drips straight down to where it appears inside your home. It travels along rafters, runs down the underlayment, and pools in low points before dripping through a ceiling. This means the visible stain on your bedroom ceiling may correspond to a leak entry point 4–8 feet away, often in the opposite direction from where you might intuitively look.
The correct way to locate a roof leak: in the attic after a rainstorm, trace water stains or wet insulation uphill from where the drip appears. The actual entry point is almost always higher on the roof. Common sources include failed flashing at penetrations, cracked vent boots, nail pops that have lifted shingles, and clogged valleys.
Repairable Leak Sources
- Failed flashing around chimney, skylights, or pipes: highly repairable. New flashing or sealant restores the water barrier.
- Cracked or deteriorated vent boot (rubber collar around pipe penetrations, see: what is a pipe jack on a roof?): straightforward replacement, $150–$300.
- Lifted or loose shingles allowing wind-driven rain entry: re-secure with roofing cement or replace affected shingles.
- Nail pops, which are nails backing out over time that create small entry points: drive nails back in and seal with roofing cement.
- Clogged valleys trapping standing water: clean and re-flash the valley. For gutter-related issues, see our seamless gutters page.
When a Leak Crosses Into Replacement Territory
- Multiple simultaneous leak points across different areas of the roof
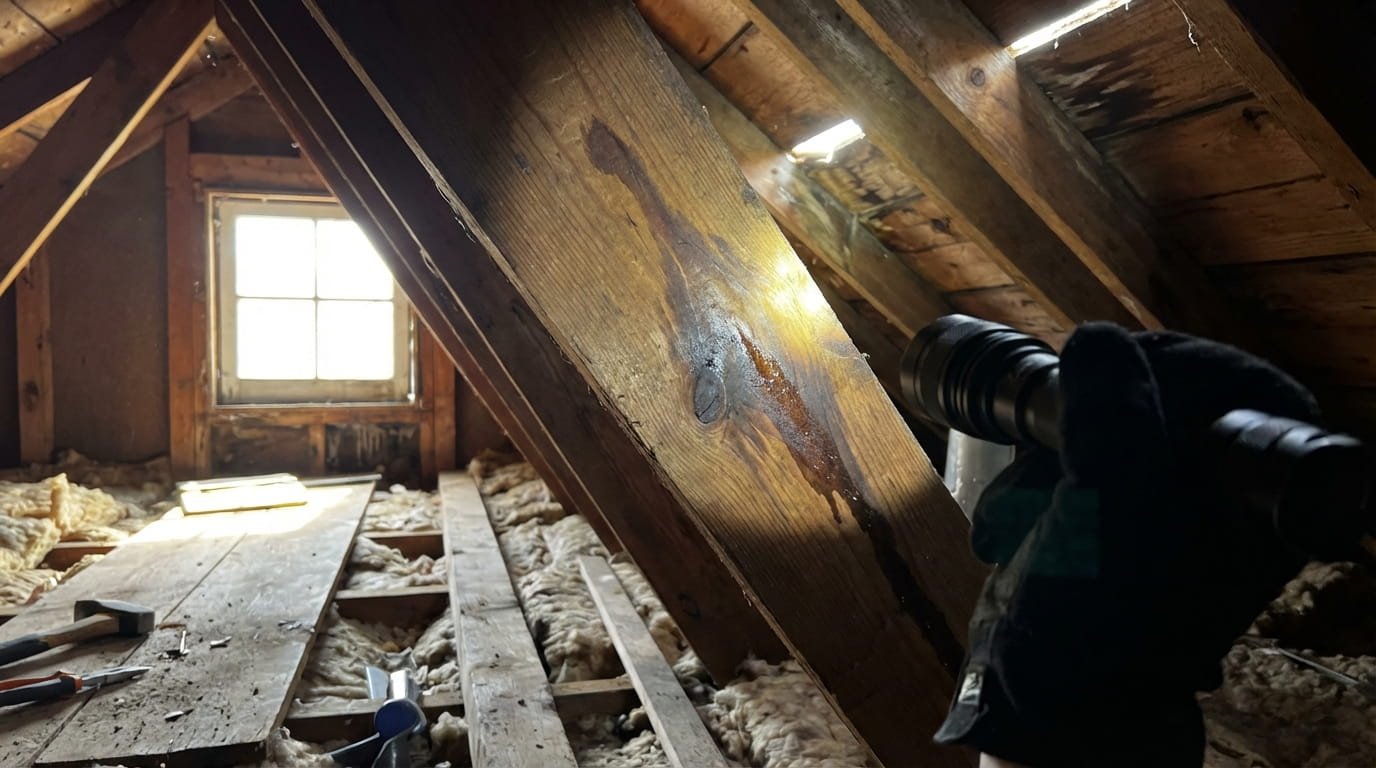
- Decking rot visible in the attic: soft, dark, or crumbling wood decking means water has been present for an extended period
- Mold or mildew throughout the attic insulation, indicating chronic moisture rather than a single event
- Structural members (rafters, ridge board) showing water damage or rot
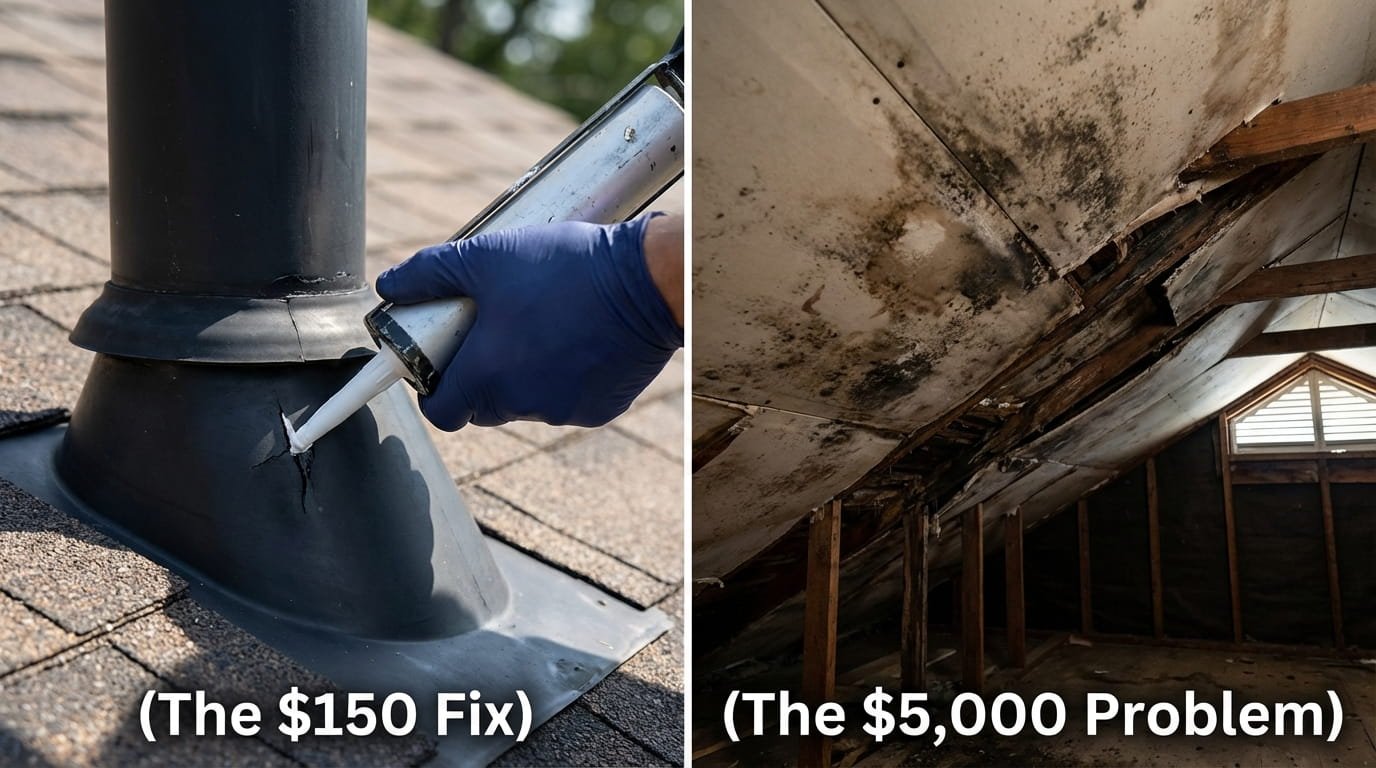
A $300 leak repair ignored for three months can cost $3,000–$8,000 once water has saturated the decking, damaged insulation, and begun mold growth. Time is the single biggest variable in leak repairability. The same damage that is a $300 fix today may be a $6,000 fix in six months.
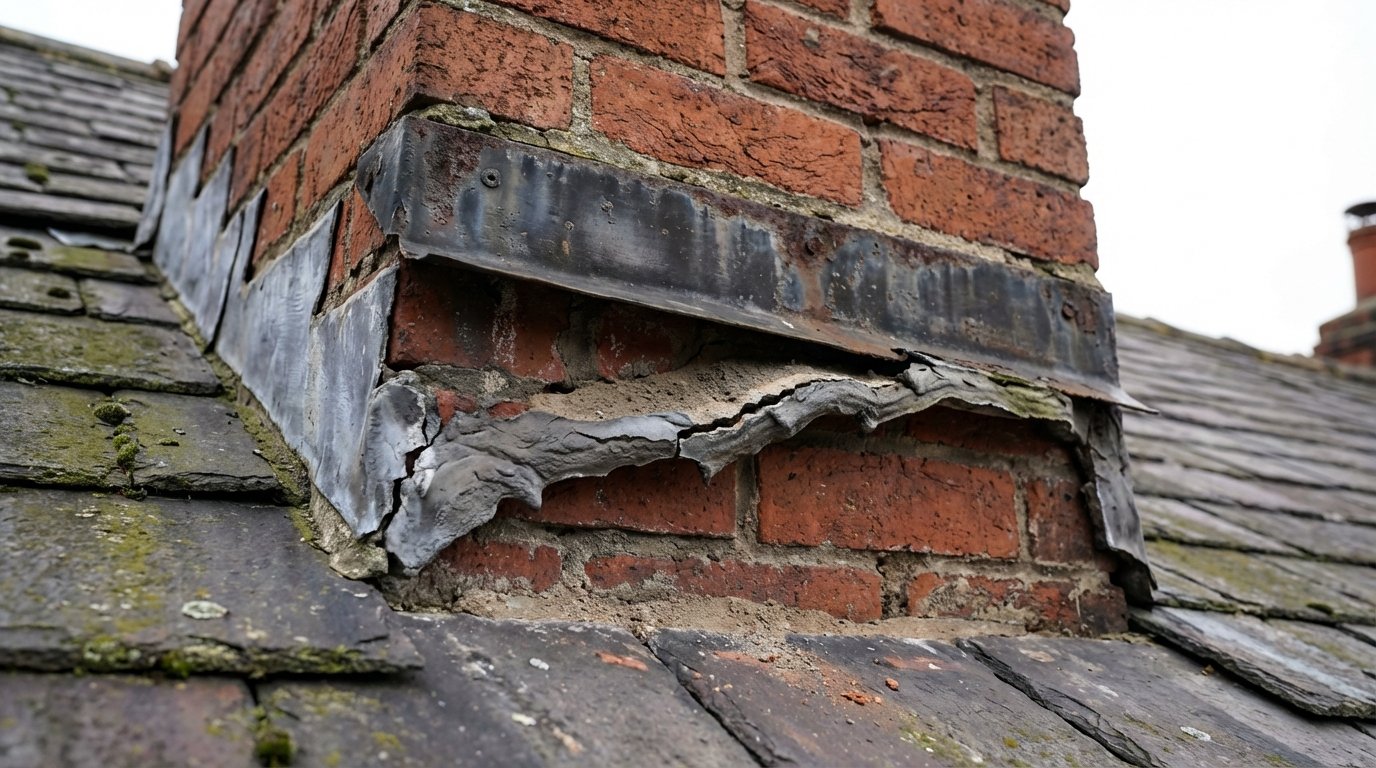
Flashing failures are among the most common causes of roof leaks, and among the easiest to repair. Flashing is the thin metal (usually aluminum or galvanized steel) that seals the joints between the roof surface and vertical elements like chimneys, walls, skylights, and dormers.
Counter-Flashing vs. Step Flashing: Two Different Failure Modes
Most homeowners and many roofing articles refer to “flashing” as a single thing. In practice, there are two distinct components that fail in different ways:
- Step flashing: individual L-shaped metal pieces woven between shingles along a roof-to-wall joint. Failure mode: individual pieces shift, corrode, or separate from the wall. Repair: replace individual pieces or re-secure with roofing cement.
- Counter-flashing: a second layer of metal embedded in the chimney or wall mortar that laps over the step flashing. Failure mode: the sealant between counter-flashing and the chimney cracks or the mortar joint fails. Repair: re-seal or replace the counter-flashing.
Understanding which component has failed guides the repair correctly. Re-caulking counter-flashing when step flashing has shifted will not stop the leak.
When to Reseal vs. When to Replace Flashing
- Sealant failure only (caulk is cracked or missing, metal is still intact and correctly positioned): reseal with silicone roofing caulk. Cost: $100–$250.
- Metal is corroded, bent, or has separated from its attachment points: full flashing replacement required. Cost: $200–$600 depending on location and complexity.
- Chimney flashing replacement: $300–$800, one of the most common professional repairs.
| Flashing Location | Common Failure | Fix Type | Avg Cost |
|---|---|---|---|
| Chimney (counter-flashing) | Sealant crack, mortar failure | Reseal or replace | $300 – $800 |
| Skylight perimeter | Butyl tape or sealant failure | Re-seal or replace flashing | $200 – $500 |
| Pipe vent boot | Rubber collar cracks from UV | Replace vent boot | $150 – $300 |
| Wall-to-roof step flashing | Individual pieces shift or corrode | Replace shifted pieces | $200 – $500 |
| Valley flashing | Flashing corrodes or separates | Re-flash entire valley | $300 – $700 |
| Dormer flashing | Sealant fails at multiple points | Reseal or reflash | $200 – $600 |
Storm damage is the most common trigger for emergency roof inspections, and also the damage type most likely to be covered by homeowners insurance. Knowing how to assess storm damage and document it correctly is as important as knowing whether it is repairable.
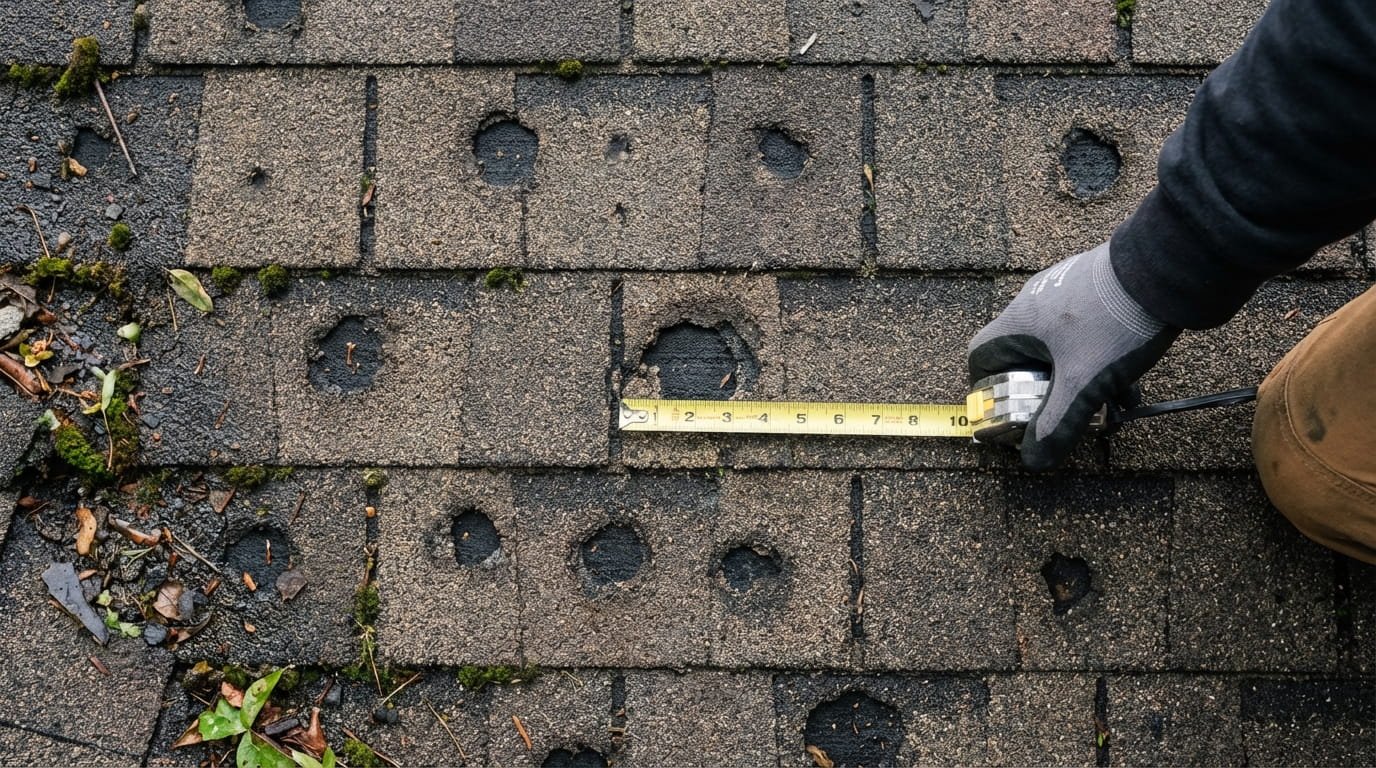
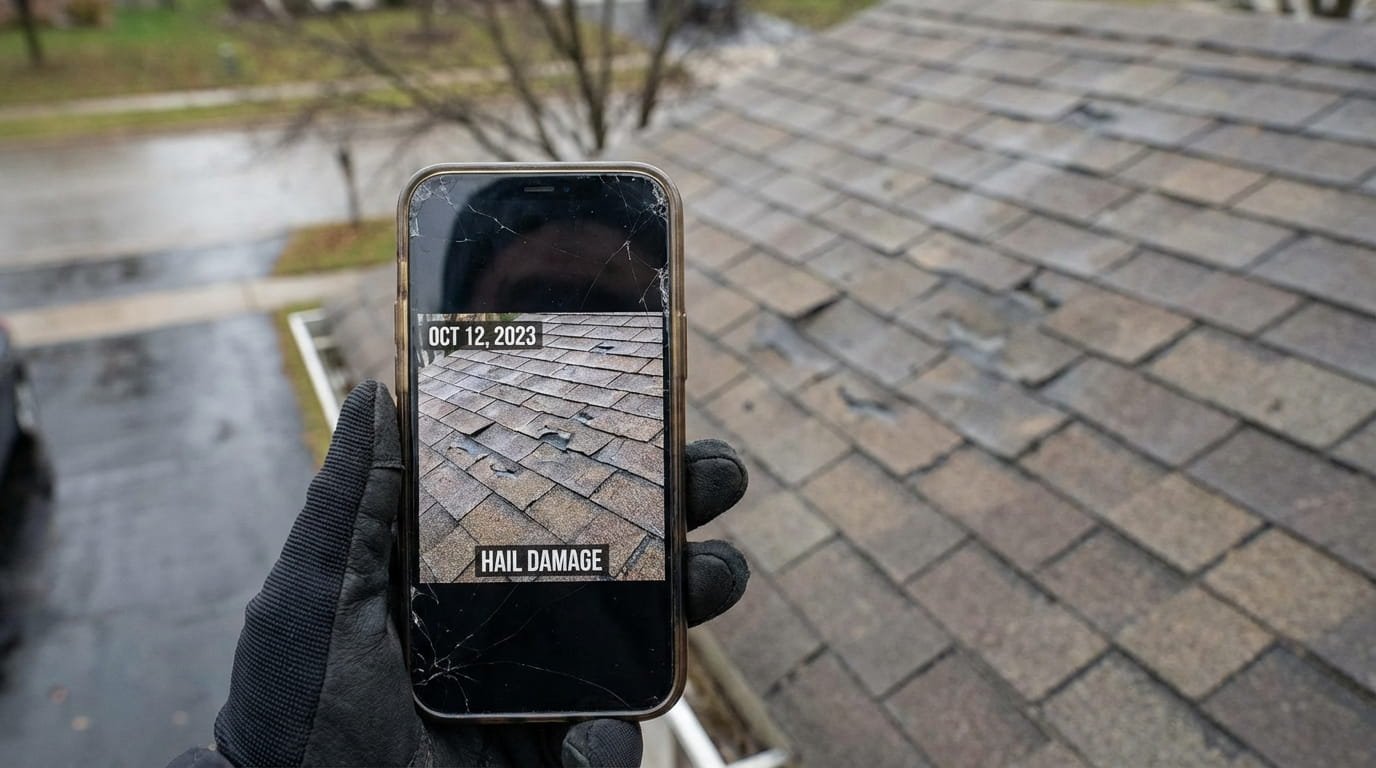
Hail Damage: The 8-Spot Rule
Hail damage on asphalt shingles appears as dark spots where the impact has knocked granules away, leaving the underlying asphalt exposed. The industry benchmark for assessing hail repairability:
- Fewer than 8 hail hits per 100 square feet: targeted repair and shingle replacement in affected areas
- 8 or more hits per 100 square feet: full replacement is typically recommended, as the shingle layer has been comprehensively compromised across the roof
On metal roofs, hail appears as dents. On tile roofs, as cracks. Slate is highly resistant to hail. If you cannot see damage from the ground, look for dents on gutters, downspouts, and AC units. These are softer metals that show hail impact clearly and serve as indicators of what your roof experienced.
Wind Damage: Repairable Range
- Lifted shingle edges (not removed, just curled up from wind): re-secure with roofing cement, $100–$300
- Missing shingles in a localized area: replace missing shingles, $150–$500
- Dented or displaced flashing: re-secure and re-seal, $150–$400
- Widespread missing shingles across multiple sections: replacement threshold. Multiple missing shingle areas signal the fastening throughout the roof has been compromised.
Documenting Storm Damage for Insurance Claims
This is the step most homeowners miss, and it is as important as the repair itself. Insurance claims for storm damage are significantly easier to process when documented immediately and thoroughly:
- Photograph the roof from all four sides from the ground within 24–48 hours of the storm
- Photograph gutters, downspouts, and any metal surfaces (AC unit, vents) to show hail impacts
- Check the attic for any new water staining or wet insulation and photograph it with the date visible
- Note the storm date and compare against NOAA weather records for your zip code (free online), this provides independent verification
- Do not make permanent repairs before your insurance adjuster inspects. Temporary tarping is fine and necessary, but permanent repairs before an adjuster visit can complicate your claim.
Claims filed within 48–72 hours of a storm are far less likely to be disputed than claims filed weeks later. File promptly, even if you are not yet sure of the full extent of the damage. You can supplement the claim with additional findings after the adjuster’s visit.
Ice dam damage is a cold-climate issue that is almost entirely preventable, but when it occurs, the damage it causes ranges from fully repairable to structurally serious depending on how long the water has been trapped.
How Ice Dam Damage Happens
An ice dam forms when heat escaping from the attic melts snow on the upper roof surface. The meltwater flows down toward the colder eaves, refreezes, and builds a dam of ice. Water backs up behind the dam and forces its way under the shingles, because water flows uphill when it has nowhere else to go. For more on snow load risks, see our guide on how much snow a roof can hold.
Repairability by Stage
- Ice dam with no visible interior damage: repairable. Remove the dam using calcium chloride (not salt or mechanical chipping), inspect shingles after melting, replace any lifted or displaced shingles ($200–$600).
- Ice dam with water staining in attic but no decking damage: repairable. Repair shingles, dry and replace affected insulation ($400–$1,200).
- Ice dam with decking rot or structural member damage: crosses the replacement threshold for the affected sections.
The cost to prevent ice dam formation, improving attic insulation and adding ridge/soffit ventilation, runs $500–$1,500. The cost to repair ice dam damage after the fact runs $2,000–$8,000. For homeowners in cold climates who experience recurring ice dams, prevention is the overwhelmingly better financial choice.
UV and heat damage develops gradually and is often dismissed as normal aging. But there is a critical distinction between normal end-of-life wear and accelerated damage caused by a fixable root problem.
Signs and Their Repairability
- Isolated blistering (bubbles on shingle surface from trapped moisture baking in heat): replace affected shingles, but also address the ventilation issue driving it.
- Cracked or brittle shingles in sunny sections: replace affected area. If brittleness is widespread, the shingle layer is failing systemically. Also read our guide on heating effects on roofing for material-specific insight.
- Warping or buckling in specific sections: often caused by poor ventilation. Repairable with shingle replacement plus ventilation upgrade.
Ventilation as the Root Cause
This is the most important thing to understand about UV and heat damage: it is dramatically accelerated by poor attic ventilation. When heat has nowhere to escape, it builds up under the roof deck and literally bakes the shingles from below while the sun bakes them from above. Replacing damaged shingles without fixing the ventilation means the new shingles will fail on the same accelerated timeline.
If your roof is showing heat damage before it should based on its age, have a contractor assess your attic ventilation before scheduling repairs. Adding ridge vents, soffit vents, or an attic fan may cost $300–$800 and will significantly extend the repaired shingles’ life. See our detailed page on roof ventilation for more.
| Heat / UV Sign | What It Means | Repairable? | Root Fix Needed |
|---|---|---|---|
| Blistering (isolated) | Trapped moisture + heat | Yes, replace shingles | Check ventilation |
| Widespread cracking | Shingle layer aging systemically | Replace threshold | N/A, evaluate age |
| Warping / buckling (sections) | Poor ventilation, heat buildup | Yes + ventilation upgrade | Ventilation required |
| Granule loss (localized) | Impact or early aging | Yes, replace sections | None if isolated |
| Granule loss (widespread) | Full shingle layer aging | Replacement approaching | N/A, plan replacement |
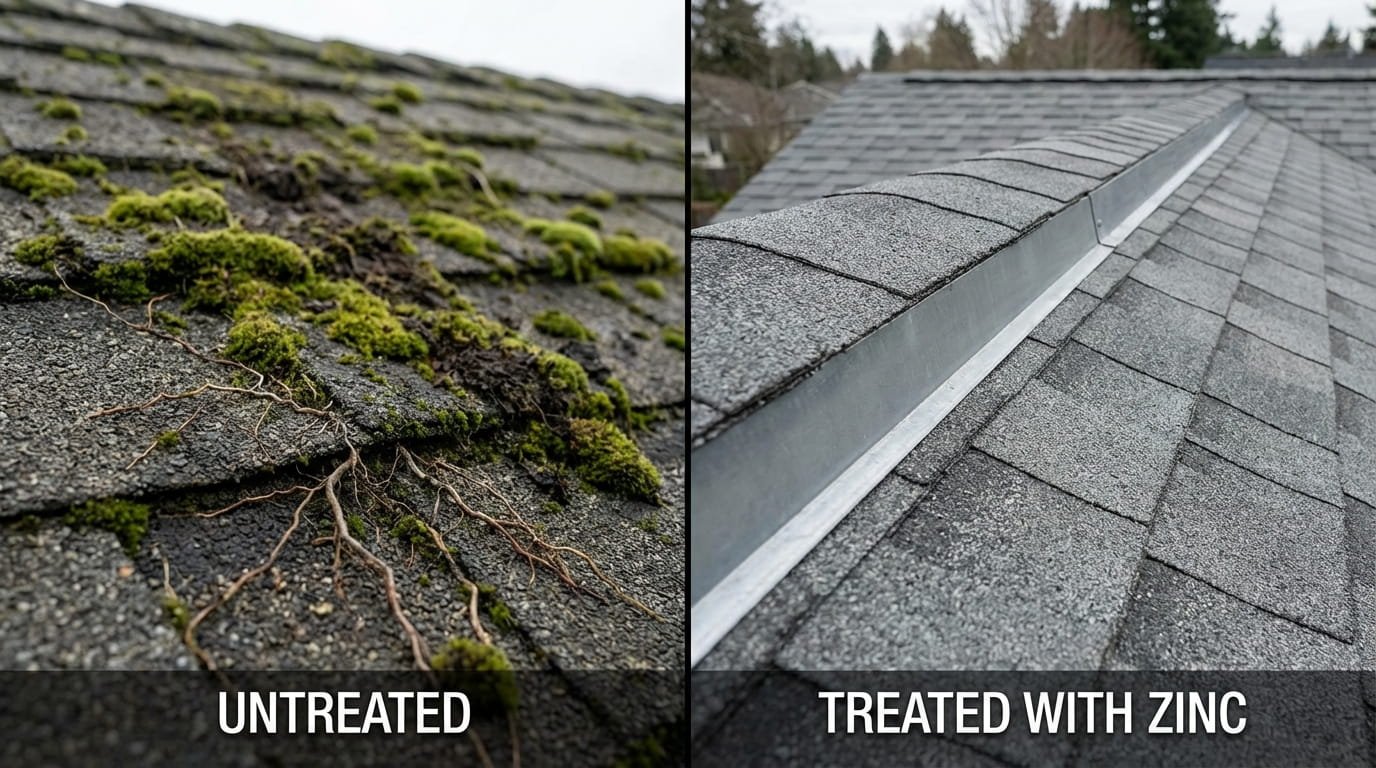
Moss and algae are surface problems that become structural problems if ignored long enough. Understanding the three-stage progression tells you exactly where you stand. If you are seeing dark streaks, read our detailed guide on black streaks on roof shingles.
The Three-Stage Progression
- Stage 1, Surface growth only: moss or algae visible on shingle surfaces, has not yet lifted edges or penetrated under shingles. Fully repairable with professional cleaning and treatment. Cost: $300–$700 for a standard home.
- Stage 2, Root penetration under shingles: moss roots have lifted shingle edges and grown beneath. Affected shingles must be replaced after cleaning. Cost: $500–$1,500 depending on extent.
- Stage 3, Decking rot: chronic moisture from moss has penetrated to the wood decking below. Decking sections require replacement. This crosses into structural repair and may approach the replacement threshold for older roofs.
Why Pressure Washing Makes It Worse
This is a common and costly DIY mistake: using a pressure washer to remove moss from a roof. High-pressure water strips granules from asphalt shingles (the same granules that protect against UV and impact), forces moisture under shingles, and can lift or crack tiles. Pressure washing effectively causes the same damage as a hailstorm while removing the moss.
The correct method: a low-pressure application of a diluted cleaning solution (bleach-water mix or commercial roof cleaner), followed by gentle rinsing. Then treat the cleaned surface with a zinc or copper solution to inhibit regrowth.
Long-Term Prevention
- Install zinc or copper strips at the ridge: rainwater washing over the metal creates a mild biocide that prevents regrowth across the entire roof below.
- Trim overhanging branches: shade and organic debris are the two biggest contributors to moss and algae growth.
- Keep gutters clear: standing water at the roof edge creates the moisture conditions moss thrives in.
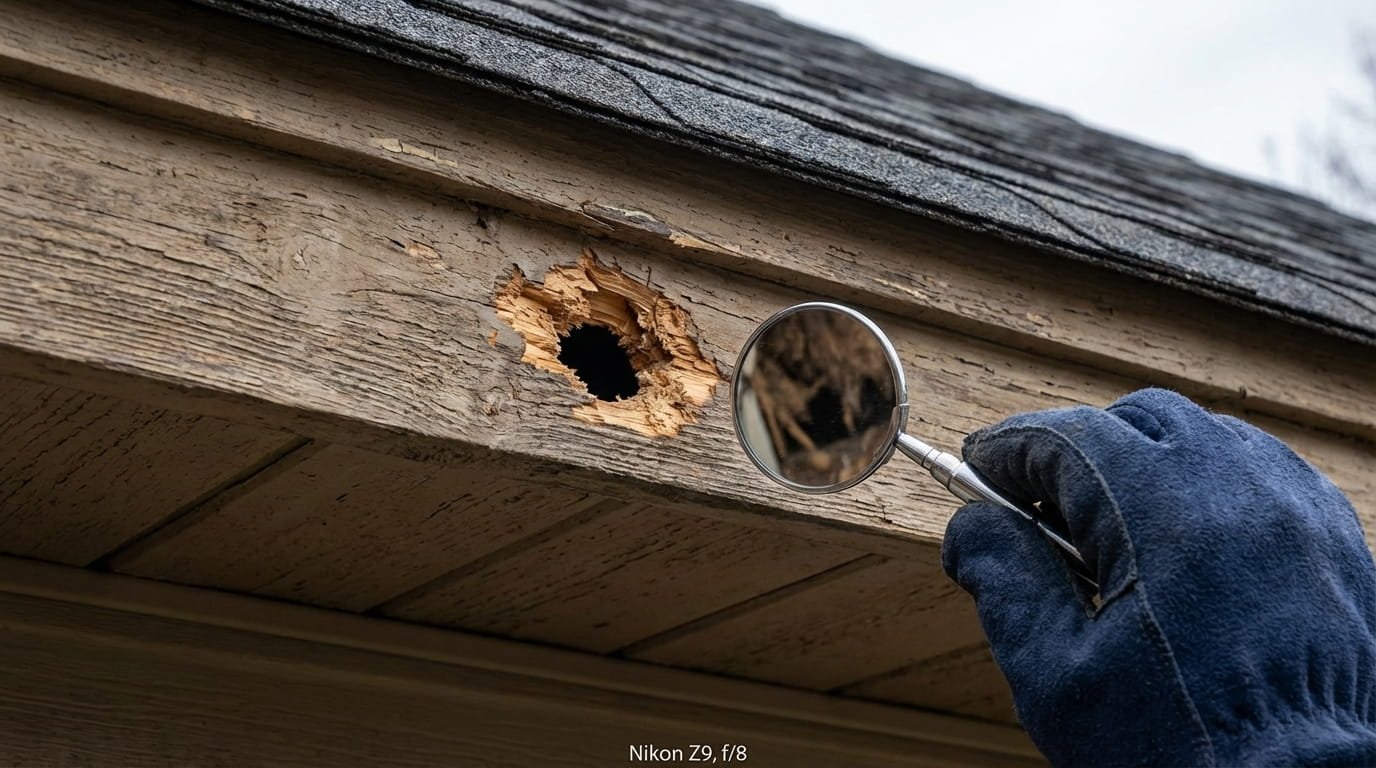
Pest damage ranges from minor surface breaches to serious structural compromise depending on the pest type and how long the infestation has been active. The most important principle: you must address the infestation before repairing the roof.
Common Pests and Their Damage
- Squirrels and raccoons: chew entry holes near ridge lines, soffits, or fascia edges. Damage is usually localized and repairable ($200–$600) if addressed before secondary water damage develops. Signs: visible gnaw marks, animal droppings in attic, scratching sounds.
- Rats and mice: similar entry points but smaller holes. Often harder to detect. Same repair approach as larger rodents.
- Wasps, hornets, and bees: nests in soffits and eaves cause physical damage to fascia and soffit materials. Repairable after nest removal ($300–$700).
- Termites and carpenter ants: the most serious threat. Can silently destroy roof decking and structural members without visible exterior signs. If termites are suspected (saw-dust-like frass in attic, hollow-sounding wood), professional structural inspection is required before any repair assessment can be made.
The Sequence Problem
This is a critical procedural point that most roofing articles miss entirely: you must complete pest control before roofing repairs. If you seal entry holes before the animals are removed, you trap them inside the roof structure, creating far more damage as they attempt to escape, and creating a decomposition problem if they cannot. The correct sequence is: pest control company removes and excludes the animals, then the roofer repairs the entry points and any structural damage.
Sealing entry holes before the animals have been professionally excluded traps them inside your roof structure. Contact a licensed pest control or wildlife removal company first, then schedule roofing repairs. This is the single most common and costly mistake homeowners make with pest-related roof damage.
Flat Roof Repairs
Flat roofs develop specific failure modes, including blistering, ponding water, membrane tears, and perimeter edge failures, that are distinct from sloped roofs. See our full flat roofing services page for detailed guidance.
- Blisters (bubbles in the membrane from trapped moisture or gas): repairable by cutting, drying, and re-sealing the affected area.
- Small membrane tears or punctures: patch with matching material and appropriate adhesive or heat welding.
- Minor cracking in built-up roofing: seal with appropriate waterproof coating.
- Ponding water (water that does not drain within 48 hours of a rainstorm): if caused by a blocked drain, clear the drain. If caused by improper slope, a drainage correction or re-sloping is required. This is a larger repair.
- Widespread membrane failure or multiple simultaneous leak points: replacement threshold. Flat roofs have a shorter serviceable life than sloped roofs (15–25 years for most systems).
Structural Sagging
- Localized sagging in one area (one or two rafters affected, small deck section): repairable with structural reinforcement. A roofer can sister new rafters alongside damaged ones and replace the affected decking section.
- Sagging along an entire wall line or multiple sections: structural compromise requiring professional engineering assessment. This is replacement territory in most cases.
- Sagging after a snow event that has been present less than a few weeks: may spring back as the structure dries. Have a structural contractor assess before assuming replacement.
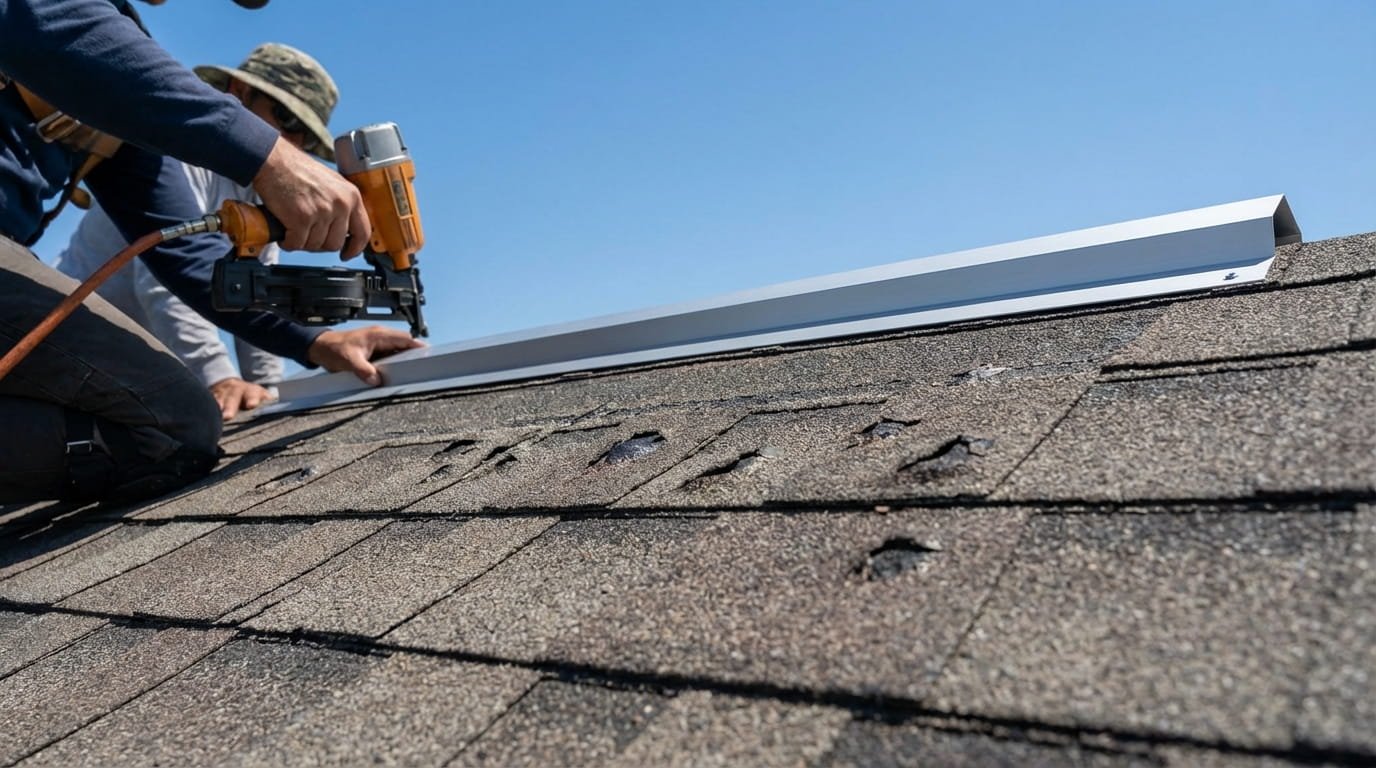
Valley Damage: A High-Priority Repair
Roof valleys, where two roof planes meet and form a V-channel, carry the highest concentration of water of any section of the roof. A failed valley allows a high volume of water to enter rapidly, causing disproportionate damage relative to the area involved. Valley flashing failure should be treated as a high-priority repair regardless of the roof’s overall age, because the water throughput in valleys creates rapid secondary damage. If damage is severe, our emergency roofing service is available 24/7.
- Failed valley flashing (metal has corroded, separated, or been improperly installed): replace valley flashing entirely, $300–$700.
- Open valley with worn or missing material: re-flash with new metal or apply a closed-cut valley approach with overlapping shingles.
When Roof Damage Is NOT Repairable: The Replacement Threshold
Most roof damage is repairable, but here are the clear indicators that replacement is the correct decision. When repairs are no longer the right answer, the next step is a full roof replacement.
The 5 Non-Negotiable Replacement Indicators
- Roof is 25+ years old with multiple types of damage occurring simultaneously: the entire shingle layer is at end of life, and further repairs are throwing good money after bad.
- Widespread decking rot throughout the roof: when the structural foundation beneath the shingles is compromised in multiple areas, there is no surface-level repair that addresses the problem.
- Active mold throughout the attic insulation: indicates chronic, long-term moisture intrusion that has been present for an extended period. A targeted repair will not fix the underlying moisture pathway.
- Sagging over more than one section of the roof: widespread sagging indicates structural failure that is beyond the scope of repair.
- Repair cost exceeds 30% of replacement cost: at this threshold, the financial case for replacement is almost always stronger, especially for roofs over 15 years old.
The Repair Trap: Recognizing When to Stop Patching
The repair trap is a pattern where a homeowner makes multiple small repairs over a few years on an aging roof, each one individually reasonable, but collectively costing more than a single replacement would have.
Signs you may be in the repair trap:
- You have had the roof professionally repaired more than twice in the past five years
- Each repair has been in a different location, suggesting systemic degradation rather than isolated incidents
- The total of your repair invoices over the past three years exceeds $3,000–$4,000 on a roof that is 18+ years old
- Your roofer is suggesting repairs without volunteering a comparison to replacement cost
Any time a professional recommends a roof repair that costs more than $1,500, ask the contractor to also provide a full replacement quote. Some contractors will suggest repairs on aging roofs without volunteering that replacement is the more sensible long-term option. Asking directly ensures you have the full financial picture.
| Damage Condition | Repair or Replace? | Key Reason | Urgency |
|---|---|---|---|
| 1–5 missing shingles, roof under 15 yrs | Repair | Isolated, affordable fix | High |
| Multiple leak points, roof 20+ yrs | Replace | Systemic failure approaching | High |
| Flashing failure (isolated) | Repair | Surface fix, low cost | Medium-high |
| Decking rot in one section | Repair (section replacement) | Structural but localized | High |
| Decking rot in multiple sections | Replace | Structural compromise | Urgent |
| Sagging (one area, recent) | Repair with reinforcement | Localized structural issue | High |
| Sagging (multiple sections) | Replace | Widespread structural failure | Urgent |
| Repair cost >30% of replacement | Replace | Poor long-term ROI | High |
| Roof 25+ yrs, multiple issues | Replace | End of serviceable life | Plan now |
Repair Cost Reference Guide
Here are typical repair cost ranges for the most common damage types. These figures are national averages. Costs in high labor-rate markets (major metro areas, coastal regions) may run 20–40% higher. For material costs, see our guide on shingle bundles and pricing.
| Repair Type | Typical Cost Range | If Ignored, Escalates To | DIY Possible? |
|---|---|---|---|
| Replace 1–5 asphalt shingles | $150 – $500 | $1,500+ in water damage | Careful DIY (low pitch only) |
| Patch isolated roof leak | $300 – $800 | $3,000 – $8,000 in decking/mold | No, source diagnosis needed |
| Replace chimney flashing | $300 – $800 | $2,000+ in chimney water damage | No |
| Replace vent boot | $150 – $300 | $500+ in deck rot at penetration | Yes, with guidance |
| Valley flashing replacement | $300 – $700 | $2,000+ from high water volume | No |
| Moss removal and treatment | $300 – $700 | $1,500+ in shingle/deck damage | Partially, not pressure washing |
| Flat roof patching (small area) | $200 – $600 | $1,500+ in ongoing leaks | No, requires matching materials |
| Gutter repair / reattachment | $150 – $400 | $500+ in fascia/shingle damage | Yes |
| Minor structural reinforcement | $500 – $1,500 | Full deck replacement ($3,000+) | No |
| Ice dam damage repair | $400 – $1,500 | $3,000+ if decking affected | No |
DIY vs. Professional: Which Repairs Can You Do Yourself?
Roofing is one of the higher-risk DIY categories, not because the repairs are technically complex, but because working at height carries real fall risk, and improperly done repairs can cause more damage than they fix. Here is a clear guide to where the DIY line sits:
Repairs Generally Safe for Careful DIY
- Gutter cleaning and reattachment of loose gutter sections on a single-story home
- Replacing 1–3 missing shingles on a low-pitch (4:12 or less) roof that you can safely access
- Re-caulking a vent boot that is accessible without walking on steep roof sections
- Applying roofing cement to a few curling shingle edges visible from the edge of the roof
- Moss cleaning with low-pressure water and appropriate cleaning solution (no pressure washing)
Always Hire a Professional
- Any work on roofs steeper than 6:12 pitch, as fall risk is significant
- Any multi-story roof, since ladder work at that height requires professional safety equipment
- Active leaks where the source is not clearly identifiable. Misdiagnosing the source wastes money and leaves the leak active.
- Any structural repair (rafters, decking, ridge board)
- Any work near electrical mast, HVAC equipment, or chimney
- Any repair involving flashing. Improperly installed flashing is the leading cause of new leaks after DIY attempts.
- Any repair you plan to claim on insurance. Insurers may reject claims for workmanship-related damage from unlicensed DIY repairs.
| Repair Type | DIY Safe? | Skill Level | Risk of DIY Error |
|---|---|---|---|
| Gutter cleaning | Yes | Basic | Low |
| Replacing 1–3 shingles (low pitch) | Carefully | Moderate | Medium, leak if improperly flashed |
| Re-caulking vent boot | Carefully | Basic | Low-medium |
| Moss removal (low-pressure) | Yes | Basic | Low if no pressure washer |
| Flashing repair or replacement | No | Expert | High, leading cause of DIY leaks |
| Leak source diagnosis | No | Expert | High, water travels, source is hidden |
| Structural repair | No | Expert | High, safety and warranty implications |
| Flat roof patching | No | Specialist | High, material matching critical |
Frequently Asked Questions
What types of roof damage are repairable?
The majority of common roof damage types are repairable when caught early: missing or damaged shingles, isolated leaks, flashing failures, vent boot cracks, hail damage below the 8-spot threshold, ice dam damage without decking rot, moss and algae at stages 1–2, localized structural sagging, and most flat roof membrane issues. The damage types that cross into replacement territory are widespread decking rot, systemic shingle failure across the whole roof, and structural compromise in multiple areas.
How do I know if my roof needs repair or full replacement?
Apply the four-factor framework: (1) Is the damage isolated or widespread? (2) How old is the roof? (3) Is the damage surface-level or structural? (4) Does repair cost exceed 30% of replacement cost? If the damage is isolated and surface-level on a roof under 15 years old, repair is almost certainly the right call. If the damage is widespread, structural, or the roof is 20+ years old, replacement deserves serious consideration. A professional inspection will give you a definitive assessment.
How much does it cost to repair roof damage?
Repair costs range from $150 for a simple shingle replacement to $1,500 for moderate structural reinforcement. The most common repairs, including flashing replacement, leak patching, vent boot replacement, and shingle work, typically fall in the $150–$800 range. A full professional inspection ($100–$300) is worthwhile before committing to any repair over $500, as it ensures the visible damage is the only damage.
Can I repair my roof myself?
Some minor repairs are within the capability of a careful DIYer: gutter work, replacing a few accessible shingles on a low-pitch roof, and re-caulking vent boots. However, most roof repairs, particularly those involving flashing, active leaks, steep pitches, or multi-story access, should be handled by a licensed professional. The fall risk is real, and improperly repaired flashing is the leading cause of new leaks following DIY attempts.
How long can I wait before repairing roof damage?
The honest answer is: not long. Roof damage compounds quickly because water infiltration escalates exponentially once it begins. A small shingle repair ignored for one season can become a decking and insulation replacement by the following year. If you have active water entry, address it within days. For damage that is not yet actively leaking (granule loss, minor flashing issues), schedule a repair within 30–60 days.
Does homeowners insurance cover repairable roof damage?
Homeowners insurance covers sudden and accidental damage from storms, hail, wind, and falling objects. It does not cover damage from neglect, normal wear, or gradual deterioration. For storm-related repairs, document the damage immediately (dated photos, weather records), file the claim promptly, and do not make permanent repairs before the adjuster inspects. Having a roofing contractor present during the adjuster’s visit helps ensure all damage is identified and documented. The Insurance Information Institute has a detailed breakdown of what policies typically include.
Final Thoughts
Most roof damage is repairable. The enemy is not the damage itself but the delay in addressing it. A $200 shingle repair today prevents a $4,000 decking repair next year. A $400 flashing replacement prevents a $6,000 mold remediation job. The pattern is consistent across every damage type: early action is cheap, delayed action is expensive.
Use the repairability framework in this guide as your starting point: assess scope, age, surface vs. structural, and cost ratio. Pairing regular repairs with a roof maintenance plan is the most cost-effective approach over time. When in doubt, a professional inspection gives you a definitive diagnosis for $100–$300, far less than the cost of guessing wrong in either direction.
If you have noticed any of the signs described in this guide, such as granules in gutters, water stains inside, visible shingle damage, or moss growth, a professional roof repair inspection is the right next step. It takes 1–2 hours, gives you a complete picture of your roof’s condition, and tells you exactly what is repairable, what needs monitoring, and whether replacement is on the horizon.
![]()